You can grow orchids successfully in a fabric grow bag, but only if you set it up so the roots get air as much as water. The biggest mistake people make is treating an orchid bag like a regular planter and using dense soil. Orchid roots need to breathe. The moment the medium stays wet too long, you're headed toward rot.
Better Grow Orchids in a Bag: Step by Step Setup

Marcus Holloway
22 Jun 2026

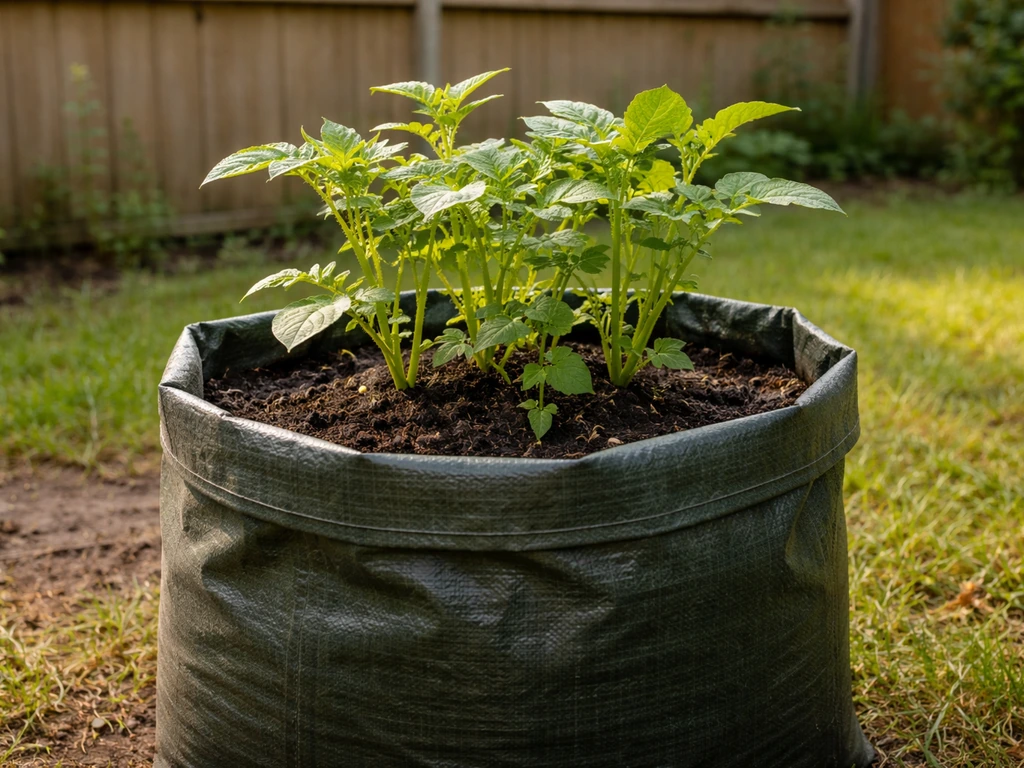
Get the mix right (coarse bark, not potting soil), choose the correct bag size with drainage, water based on what the medium tells you rather than a fixed schedule, and keep air moving around the plant. Do all that, and bag-growing can actually work better than a solid plastic pot for many orchid types. If you're also shopping for the best potato grow pots, the same container-permeability and drainage principles apply.
What 'growing orchids in a bag' actually means
People search for this in a few different ways, so it's worth being clear about what setup we're talking about. If you want to buy the right size and type of grow bag for potatoes, check garden centers or online retailers that sell fabric grow bags for vegetable gardening. There are three common interpretations: using a fabric grow bag as the main container (the approach this guide focuses on), using a clear plastic bag or humidity tent placed over the pot to retain moisture, and wrapping the pot base in plastic to reduce drying. Each has a different purpose.
A fabric grow bag used as the primary container is the most interesting option for home growers. Fabric bags are porous, which means the walls breathe and allow air to reach roots from the sides, not just the top. This air pruning effect is exactly what you want for orchids, whose roots have velamen tissue designed to absorb moisture quickly and then release it. The problem with traditional plastic pots is that once water pools at the bottom, those roots sit in anaerobic conditions and start to rot. Fabric changes that dynamic considerably. If you like the idea of a potato grow bag setup for easy gardening, the same air and drainage principles still apply for healthy roots.
Plastic bag setups (humidity tents, bag-over-the-pot methods) are typically used during rooting or recovery, not for long-term growing. They trap humidity and slow evaporation, which helps stressed or bare-root orchids establish. If that's what you're trying to do, the guidance is different, and I'll note where it applies. But if you want to set up a fabric grow bag as your regular orchid container and get it right from the start, read on. A gardener's best grow bag can also work for many indoor orchid setups, as long as you pair it with the right orchid medium and drainage approach fabric grow bag.
Picking the right bag size and material for orchids
Fabric grow bags come in different materials, and they don't all behave the same way. Nonwoven polypropylene (the standard felt-like fabric) is the most common and works reasonably well for orchids because it allows air and moisture to pass through the sides. Thicker, denser fabric dries more slowly. Thinner, more open-weave fabric dries faster. For orchids, faster drying is generally better, so lean toward thinner, more breathable fabric when you have a choice.
Size matters a lot. Orchids should never be over-potted. A pot or bag that is too large holds excess medium that stays wet long after the roots have taken what they need, and that's a direct path to root rot. For a standard Phalaenopsis, a 4-inch or 6-inch (roughly 0.
If you want the right fit, a gardener's supply company gardener's best potato grow bag can be a helpful option for orchid bag sizing 4-inch or 6-inch. 5 to 1 gallon) bag is appropriate. For larger sympodial orchids like Cattleyas, a slightly larger bag may work, but the root ball should still fit snugly with about an inch of medium on each side. If you're sizing up from a previous container, go up only one size at a time.
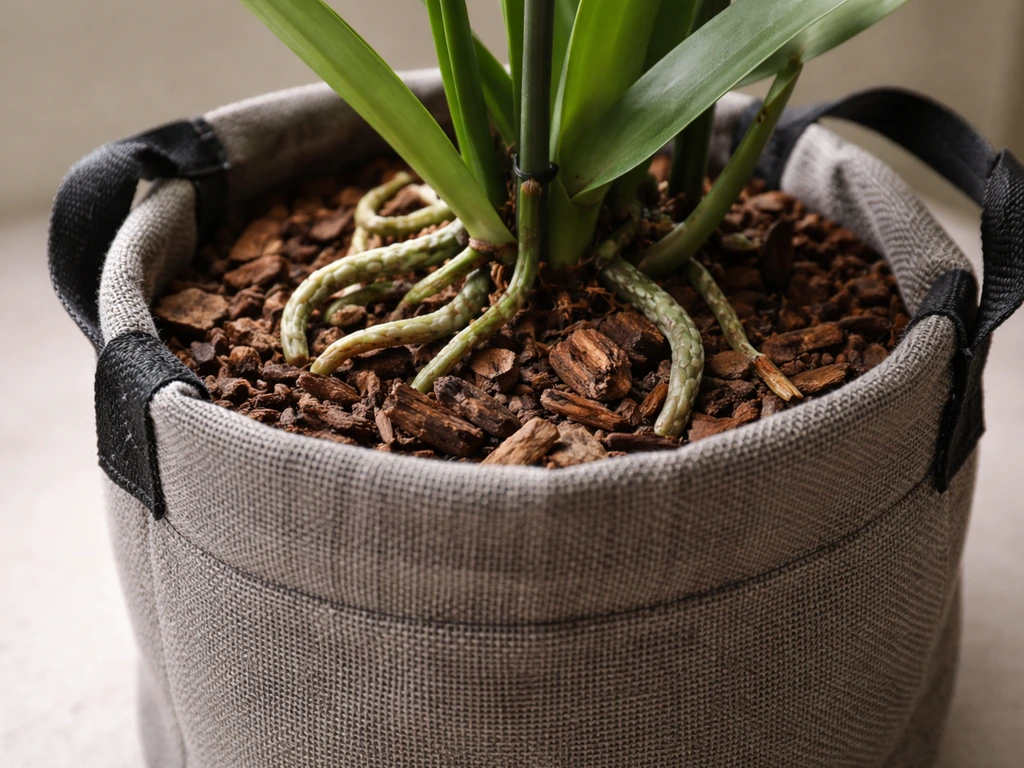
One important modification: fabric bags typically don't have drainage holes in the traditional sense because the fabric itself wicks and drains slowly. For orchids, this is not fast enough. Line the bag with a net or mesh pot insert, or place a net pot directly inside a slightly larger fabric bag. This gives you the air-pruning benefit of the fabric exterior while allowing the faster drainage and aeration that orchid roots require. The AOS actually recommends a net or mesh pot approach for Phalaenopsis specifically, with roots sitting in no more than about half an inch of water that wicks upward while the rest stays aerated.
The right orchid mix for a bag setup
Do not use regular potting soil in a grow bag for orchids. Ever. Potting soil compacts, holds too much water, and suffocates orchid roots quickly. Orchid medium should be coarse, chunky, and designed to hold some moisture while still draining fast. In a fabric bag, you actually want slightly coarser medium than you'd use in a solid plastic pot because the bag's own porosity already helps with surface drying.
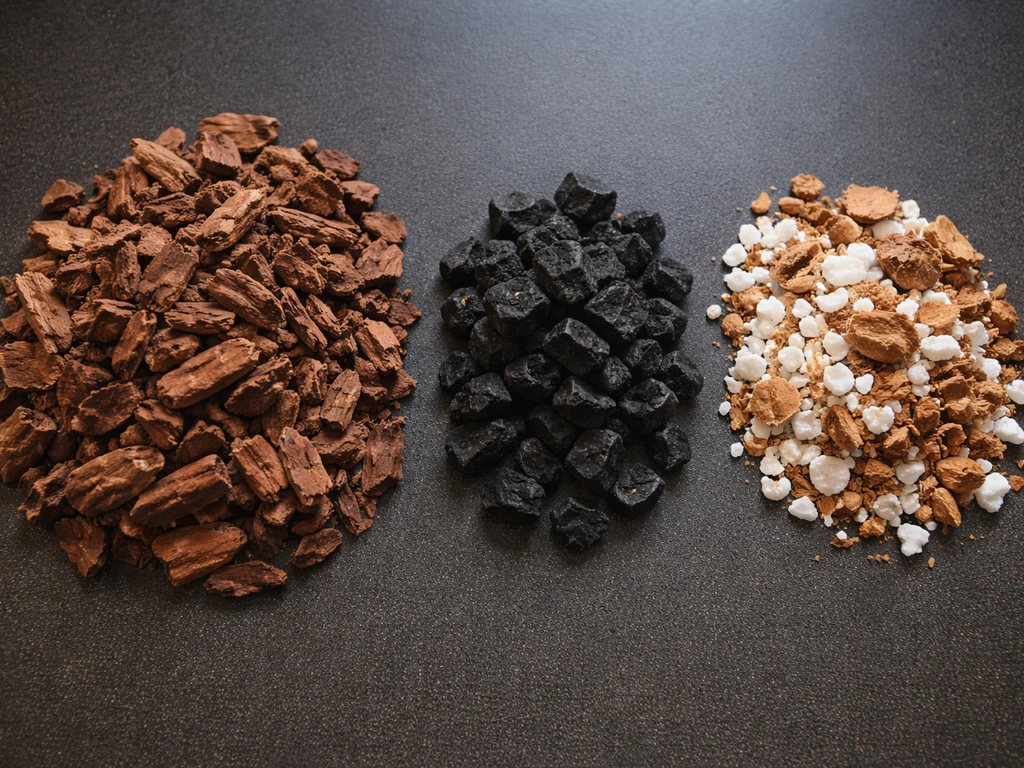
A good orchid bag mix combines medium or large fir bark (or orchid bark) as the base with some additions to improve airflow and longevity. Horticultural charcoal slows the bark's breakdown and improves airflow inside the medium. Perlite adds drainage and keeps the mix from compacting over time. A small amount of sphagnum moss can help retain just enough moisture near the roots without making the overall mix soggy. Commercial mixes like Espoma Organic Orchid Mix (aged pine bark, charcoal, perlite, limestone, and yucca extract) are already formulated for this balance and work well in bag setups.
| Ingredient | Role in Bag Setup | Proportion (approximate) |
|---|---|---|
| Medium or large fir/orchid bark | Main structure; allows roots to grab and air to move | 60–70% |
| Horticultural charcoal | Slows bark decomposition; improves aeration; resists rot | 10–15% |
| Perlite | Drainage; prevents compaction over time | 15–20% |
| Sphagnum moss (optional) | Moderate moisture retention near root tips | 5–10% |
Avoid mixes that are too fine. Fine bark behaves almost like soil in a bag: it compacts against the fabric walls, reduces airflow, and holds moisture much longer than coarser grades. If your medium came in a bag at the garden center and it looks more like crumbled mulch than chunky bark pieces, mix in extra perlite and charcoal before using it.
How to actually pot and place your orchid in the bag
- Inspect and trim the roots first. Remove dead, mushy, or obviously rotted roots with sterile scissors or a blade. Healthy roots are firm and turn green when wet. Mushy roots that collapse when you squeeze them gently are dead and need to come out.
- If using a net pot insert, place it inside the fabric bag before adding any medium. The net pot should fit snugly so it doesn't shift around.
- Add a layer of coarse bark mix to the bottom of the net pot or bag (about 1–2 inches). Do not compress it.
- Position the orchid so the base of the stem or pseudobulb sits at or just below the rim of the bag. Roots spread naturally downward and outward; don't force them into a tight coil.
- Fill in around the roots with bark mix, tapping the bag gently to settle the medium between roots. You want medium to contact the roots without packing it down.
- Do not bury the crown of a Phalaenopsis or any growth point. The crown must stay at the surface and dry quickly after watering.
- Once potted, place the bag in its final location before doing anything else. Moving an orchid right after potting stresses the roots. Let it settle for 24–48 hours before watering.
Placement matters for airflow as much as light. Don't push the bag flush against a wall or group it tightly with other plants so the sides can't breathe. A fabric bag that can't exhale moisture through its walls loses most of its drainage advantage. Leave at least a few inches around the bag so air can circulate. If you're growing indoors, a small fan running on low nearby makes a significant difference, especially at higher humidity levels.
Watering and feeding schedule for bag-grown orchids
Forget rigid watering schedules when you're using a fabric bag. If you are growing potatoes in a grow bag, use a similar idea and check the soil moisture often to decide when to water how often to water potatoes in grow bags. Fabric dries faster than plastic, which means the interval that worked in a solid plastic pot will likely be too long for a bag. The correct approach is to check the medium, not the calendar. Stick your finger an inch below the surface: if it feels moist but not wet, wait. If it feels barely damp or dry, it's time to water. If it feels sodden, give it more time.
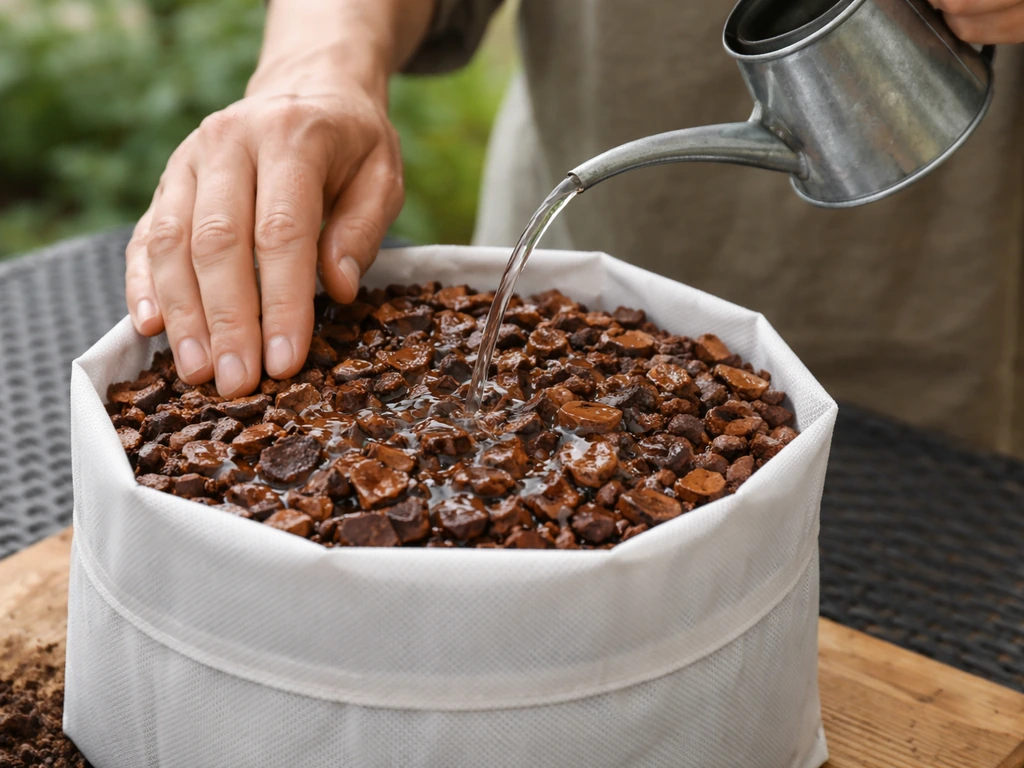
When you do water, use tepid water (room temperature or slightly warm, never cold) and water thoroughly until it runs freely from the bottom. This flushes accumulated salts from fertilizer and makes sure the entire medium gets wet, not just the top layer. Bark mixes can become hydrophobic if they dry out too much; if water is running straight through without soaking in, soak the bag in a basin of tepid water for 15–20 minutes to rehydrate the medium fully.
Water in the morning, not in the evening. This is one of the most important orchid care habits regardless of container type. Morning watering gives the crown, leaves, and medium time to dry before temperatures drop at night. Wet crowns in cool overnight conditions are the most common trigger for crown rot in Phalaenopsis. Do not let water pool in the center of the plant at any point.
For fertilizing, follow the standard orchid practice: water the medium first, then apply diluted fertilizer. This prevents fertilizer burn on dry roots. A diluted, balanced orchid fertilizer applied weakly and weekly (about one quarter of the label's recommended dose each week, rather than a full dose monthly) works well for bag setups. The faster drying of fabric means nutrients leach out more quickly than in plastic, so slightly more frequent, lighter feeding is appropriate. Skip a feeding once a month and flush with plain water to clear salt buildup.
Light, temperature, and humidity when growing orchids in a bag
A grow bag doesn't change what orchids need environmentally, but where you place the bag affects how well those targets are hit. Here are the core targets to work with:
| Factor | Phalaenopsis target | Cattleya target |
|---|---|---|
| Light intensity | Up to ~1,500 foot-candles (bright indirect) | Up to ~3,000 foot-candles (brighter indirect or filtered direct) |
| Day temperature | 65–85°F (18–29°C) | 60–85°F (15–29°C) |
| Night temperature drop | Modest drop encourages rebloom | 10–15°F (5.5–8.3°C) drop required for flowering |
| Humidity | ~50–70%, higher at warmer temperatures | 50–70% |
| Air movement | Continuous gentle airflow required | Continuous gentle airflow required |
Humidity is one area where bag placement genuinely changes things. Because fabric bags wick moisture from the sides, the immediate microclimate around the bag tends to be slightly more humid than with a solid pot. This is actually helpful if you're growing in a dry indoor environment. That said, if you're running high ambient humidity (above 70%) and low airflow, you're creating ideal conditions for fungal and bacterial problems. In that case, a small fan is not optional. Continuous air movement is what the AOS recommends for Phalaenopsis specifically to prevent fungal and bacterial disease.
For light, a bright east-facing window or a few feet back from a south-facing window works well for Phalaenopsis in bags. Cattleyas can handle more light and do well in south or west windows. If you're using grow lights, position them so the bag receives appropriate intensity without the fabric sides heating up excessively, which would dry the medium too fast and stress roots near the walls.
Troubleshooting: what to do when things go wrong
Root rot
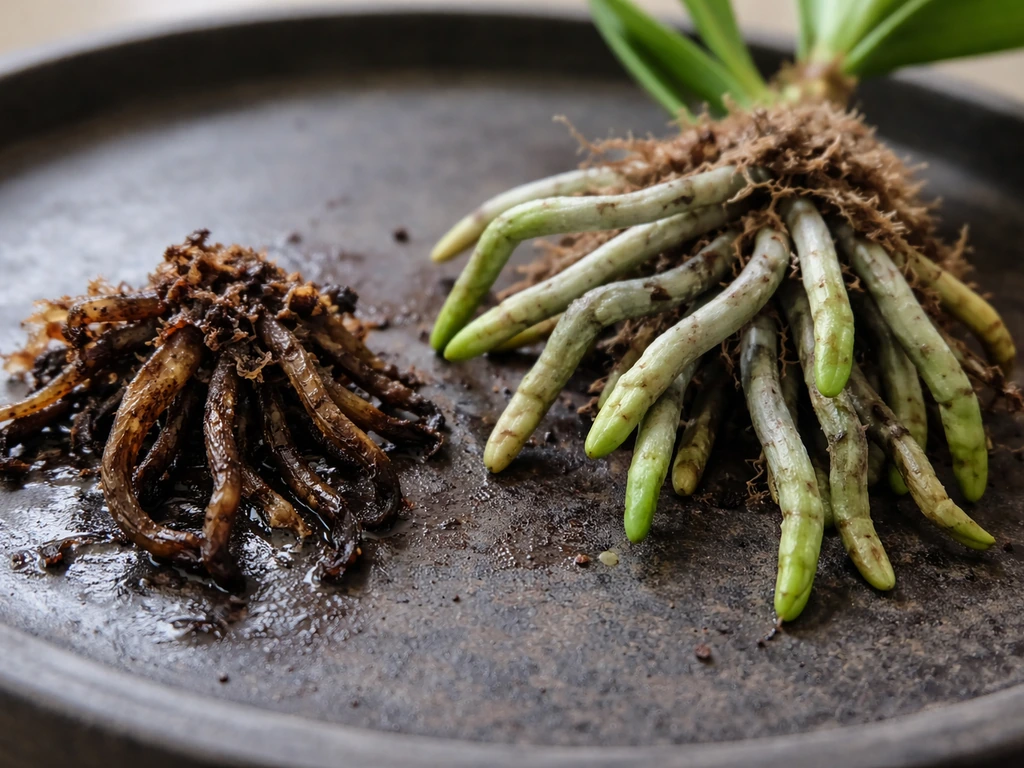
Root rot shows up as mushy, brown, or black roots that collapse when you squeeze them gently. Healthy roots are firm and plump; they turn bright green when wet and silvery-gray when dry. If you're finding rotted roots, the medium is staying wet too long. Unpot the orchid, remove all dead roots with sterile tools, let the root system air-dry for a few hours, then repot in fresh coarse medium in a clean bag. Check your watering interval and make sure the bag is not sitting in a pool of water. If rot is recurring, switch to a coarser medium mix or add more perlite.
Crown rot
Crown rot is a Phalaenopsis-specific disaster that happens when water pools in the center of the plant near the lowest leaves and doesn't dry. The crown turns soft, brown, and watery. If caught early, remove the affected tissue with a sterile blade, let it dry, and treat with a diluted fungicide like Physan 20 or Natriphene, which orchid growers commonly use for bacterial crown rot. Water only in the morning going forward, and angle your watering so it runs down through the medium rather than into the crown.
Fungus and bacterial soft rot
Bacterial soft rot shows up as watery, collapsed lesions that spread fast, often with a foul smell. It spreads through splashing water, so watering practices matter. Cut out all affected tissue with a sterile tool, allow the cut surfaces to dry, and improve airflow immediately. Fungal issues are more likely when humidity is high and air is stagnant. Both problems are far more common in bag setups where the medium is compacted or where the bag is placed in a corner with no air circulation.
Fungus gnats
Fungus gnats thrive in moist organic media. In a fabric bag, if the top layer of bark mix stays consistently wet, you'll see adult gnats hovering around the plant. The larvae damage roots. Let the medium dry more thoroughly between waterings (this is usually the root cause), and hang yellow sticky traps near the bag to catch adults. If the infestation is established, a soil drench with an appropriate biological control can help. The cultural fix, reducing medium moisture, is more important than any chemical approach.
Scale insects and mealybugs
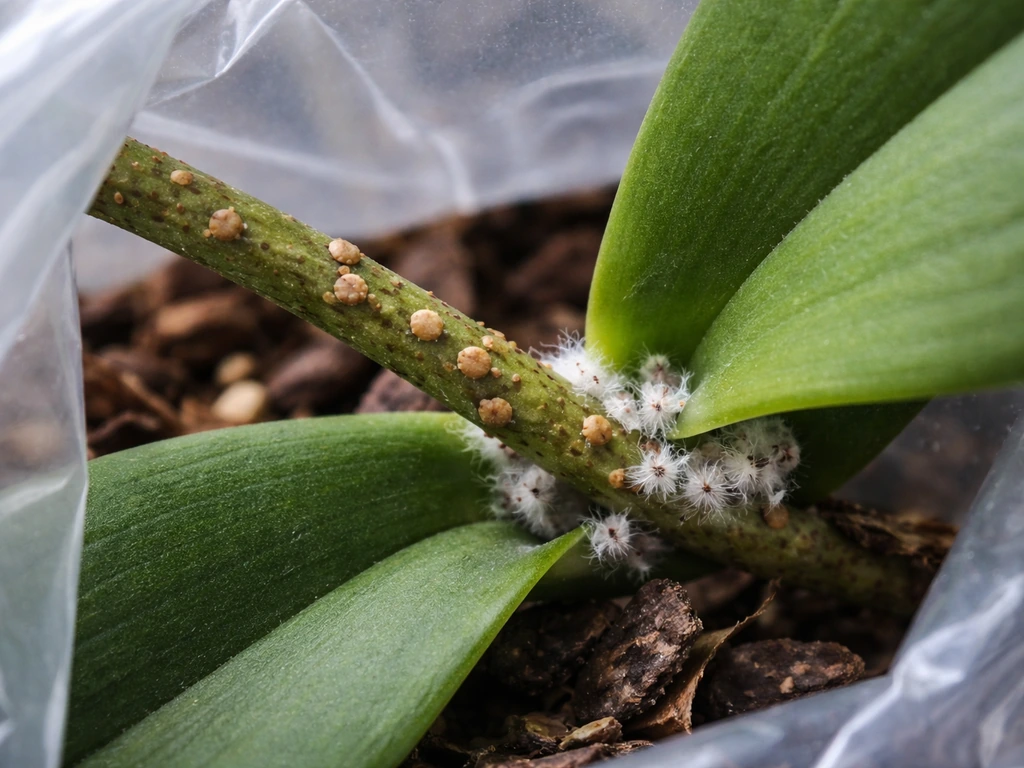
Scale insects look like small brown or tan bumps on stems, leaves, and roots. Mealybugs appear as white cottony clusters. Both can hide in the crevices of bark mix, making bag-grown orchids a slightly trickier environment to inspect thoroughly. Remove visible insects manually with a cotton swab dipped in rubbing alcohol, then wash the plant down, allow it to dry, and repot in fresh medium if the infestation is severe. Treat with an appropriate insecticidal soap or neem oil and repeat every 7–10 days for at least three cycles to break the life cycle.
Yellow leaves, no flowers, or sealed root tips
Yellow lower leaves on a Phalaenopsis can be normal (the oldest leaf naturally yellows and drops), but yellowing across multiple leaves usually signals overwatering, root rot, or too little light. Check the roots first: if they're mushy, treat for rot. If they're healthy, evaluate your light setup. No flowers after a year is usually a temperature issue: Phalaenopsis needs a modest night temperature drop to trigger a spike, and Cattleyas specifically need a 10 to 15°F drop at night. Root tips that look dried and sealed over mean the orchid is not getting watered often enough, not that you're overwatering. Increase frequency slightly and check whether the medium has become hydrophobic.
When bag-growing isn't working and what to switch to
Fabric grow bags are a great option for many orchids, but they're not always the right tool. Do potato grow bags work in the same way for orchids and other plants, or are their drainage and airflow limits different? Here are the clear signs that you should consider a different setup:
- Recurring root rot even after correcting watering: the bag may be too dense or too large, or your environment doesn't allow the medium to dry adequately between waterings. Switch to a net pot or open teak basket where airflow is maximized.
- The orchid is constantly dehydrated despite frequent watering: a very breathable bag in a hot, dry environment dries out too fast for the plant to absorb enough water. Add a saucer with a small amount of water below the bag (not touching the bottom of the net insert) or switch to a less porous container.
- You're growing an orchid type that prefers mounted or bare-root culture (like vandas or some dendrobiums): these genera do better mounted on cork or wood with open air around the roots, not enclosed in any container.
- The medium has broken down and the bag is holding dense, compacted material: repot into fresh medium. Fir bark breaks down over 1–2 years and needs replacing regardless of container type.
- You can't maintain adequate airflow in your growing space: if you're in a sealed room with no fan and high humidity, any moist container becomes a disease risk. Address the environment before choosing any container style.
If you decide to move away from the bag, a clear plastic net pot or slotted orchid pot is a practical middle ground: you keep some of the aeration benefit, but the medium dries slightly more slowly, which suits lower-humidity indoor environments. For the most control, a standard terracotta orchid pot with slotted sides gives you both airflow and a more forgiving drying rate than fabric. The key point is that the container is just one variable: getting the medium coarseness, watering timing, and airflow right matters more than the exact container type.
If you've worked with fabric grow bags for other crops like potatoes or vegetables, you already know how much faster they dry compared to plastic. The same principle applies here, just with different plants and different stakes when you get the moisture balance wrong. Orchids are less forgiving than most vegetable crops when roots stay wet, so the fabric bag's drying advantage is genuinely useful as long as you set up the medium and watering routine to match it.
FAQ
Can I mist orchids grown in a fabric bag instead of watering the medium?
Yes, but only if you keep the crown dry. If you use a bag, water the medium thoroughly, then stop once excess drains out, and avoid pouring directly into the center of the plant. A simple safeguard is to water around the perimeter of the mesh insert so the stream runs down the bark rather than collecting in the lowest leaves.
How do I prevent water pooling under the orchid in a grow bag?
Use a mesh insert or net pot that drains freely, then confirm that water does not remain at the bottom of the fabric bag for long. A quick check is to lift the mesh insert after watering, the bottom should not be sitting in a visible puddle. If it does, add more medium clearance, use a larger outer bag, or elevate the bag so airflow reaches underneath.
Why does my fabric bag feel dry on top but my orchid roots still rot?
The safest indicator is root and medium condition, not pot feel. In a bag setup, the outer bark may feel dry while the inner mix is still wet, so lift the mesh insert slightly or weigh the bag right after watering, then compare weight later. If the mix is still cool and damp when you go to water, wait longer to avoid rot.
What should I do if my orchid bag mix seems too fine after I buy it?
For Phalaenopsis, stick to coarse bark and small particle sizes only if your airflow is strong. Fine bark compacts faster against the fabric walls and creates a moisture pocket, even if you start with good watering habits. If your medium is too fine, fix it by repotting into a chunkier mix, then adjust by feeding and watering slightly lighter until new roots establish.
How long should I wait to fertilize after repotting a bag-grown orchid with root rot?
Start with fewer roots being actively “rescued.” Remove all dead mushy roots, let healthy roots air out for a few hours, and repot into fresh coarse medium in a clean bag insert. Do not fertilize for the first 1 to 2 weeks because damaged roots are more likely to burn and the medium needs time to dry and re-aerate.
Is algae on the outside of the fabric bag a problem?
When the outer fabric dries quickly, algae often shows up where light and moisture hit the sides. Reduce direct sun on the bag walls and avoid keeping the bag flush against a bright surface. You can also rotate the plant weekly so one side does not stay wetter, but do not over-fixate on algae, focus on whether the medium inside stays properly aerated.
Can I treat pests in a fabric bag without triggering more fungal or bacterial issues?
Yes, but timing matters. Many orchid pests increase when foliage and medium remain damp, especially at night. If you must treat with insecticidal soap or neem, do it earlier in the day so the plant can fully dry before temperatures drop, and use diluted solutions with thorough rinsing if the label calls for it.
How can I tell if I used a bag that is too large?
A net pot or slotted insert reduces the risk of over-saturation, but the real limit is how much medium volume you give the roots. If you see new roots growing slowly and older ones turning dark, it usually means you went too large. Size down one increment or repot with a tighter fit, leaving about an inch of medium space at most.
What changes should I make for bag-grown orchids during cool weather?
If temperatures drop at night and the crown stays wet, crown rot risk increases. For Phalaenopsis, water earlier in the day, keep the plant near stable humidity with airflow, and avoid cold drafts near the bag. When the room is cool, reduce frequency because fabric drying can slow if airflow is also poor.
How do I adjust watering frequency if I live in a high-humidity climate?
Don’t rely on a single “once you feel moist it’s time” rule if you live in a very humid area, because the medium can stay damp for longer between waterings. Instead, combine touch with a visual check for bark breakdown and root color, and ensure you have constant low airflow, even if you water less often.
Next Articles
Where to Buy Grow Bags for Potatoes or Make One
Buy or DIY potato grow bags: where to shop, what to check, and steps to make, fill, plant, and troubleshoot.
Do Potato Grow Bags Work? Guide, Setup, Care, and Results
Know if potato grow bags work, plus bag choice, soil depth, hilling steps, care, troubleshooting, and yield expectations
How Often to Water Potatoes in Grow Bags
Practical watering schedule for potatoes in grow bags: how to water, avoid soggy soil, and when to stop before harvest.