Yes, you can absolutely use fabric grow bags outside, and in many ways they perform better outdoors than they do indoors. The breathable fabric that makes them work so well (air pruning roots, preventing waterlogging, keeping soil oxygenated) is designed for exactly this kind of open-air environment. That said, outdoor conditions do push grow bags harder than a sheltered indoor setup: sun heats up the fabric walls faster, wind pulls moisture out of the soil quickly, and rain can swing watering needs dramatically from week to week. Get the placement, watering rhythm, and feeding strategy right, and grow bags outdoors are genuinely excellent. Ignore those factors and you'll fight constant drought stress or nutrient deficiency all season. If you are wondering whether grow bags are worth it for your setup, the outdoors performance is all about matching size, material, and care to your conditions are grow bags worth it.
Can You Use Grow Bags Outside? Yes With These Conditions

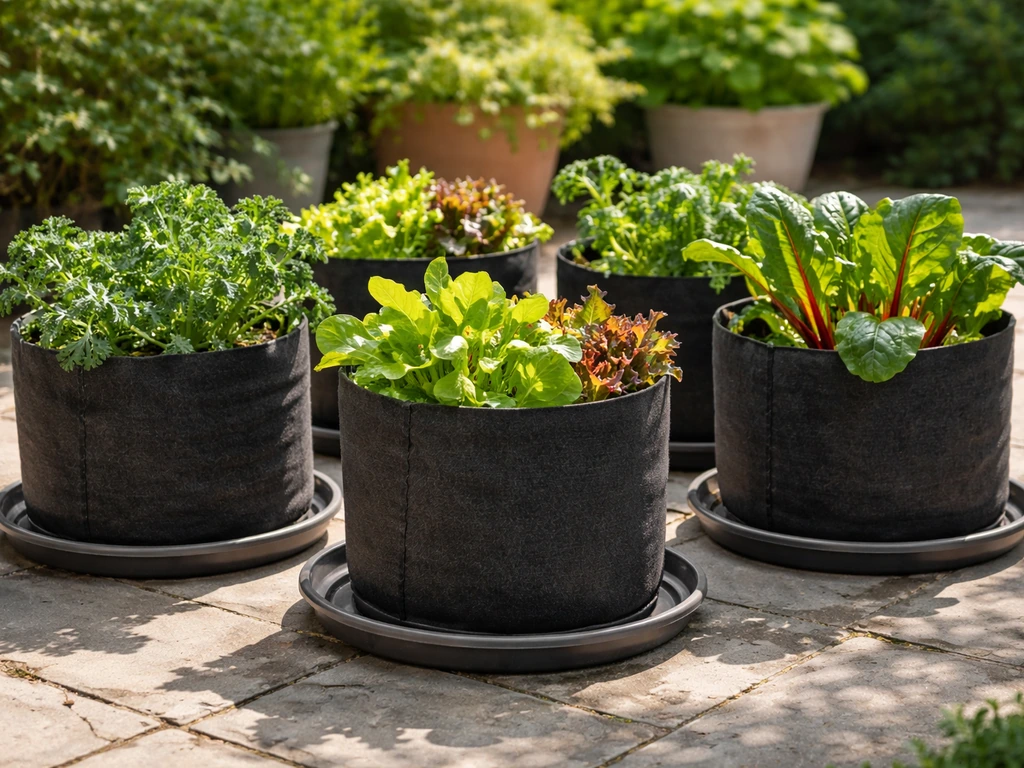
Choosing the right grow bag for outdoors
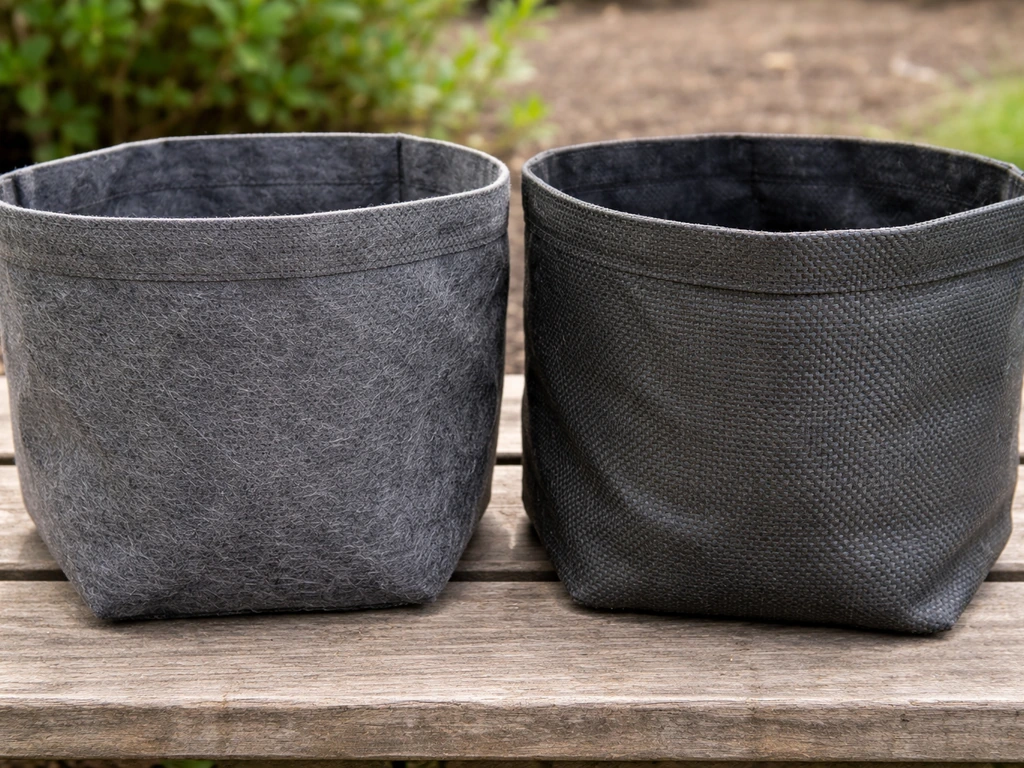
Not every grow bag handles outdoor conditions equally well. The two main fabric types you'll encounter are nonwoven felt-like polypropylene and woven geotextile fabric. For outdoor use, nonwoven polypropylene (the thick felt-style bags) is generally the better choice. It's more breathable than woven fabric, which means it aerates the root zone on all sides, not just from the top. That continuous side-aeration is what triggers air pruning and keeps roots healthy in warm outdoor soil. Woven bags are more durable against tears but tend to drain in a more channeled way and don't breathe quite as evenly.
UV resistance is a real concern outdoors. High-quality polypropylene grow bags that are UV-stabilized can last around three to five full outdoor growing seasons. Cheaper bags without UV stabilization can start breaking down within a single season of intense sun, which affects both their structural integrity and their drainage performance. If you're planning to reuse bags year after year, buy ones that specifically state UV-treated or UV-stabilized fabric. It's worth paying a little more upfront.
Size matters more outdoors than you might expect. The smaller the bag, the faster it dries out in the heat and wind. A 1-gallon bag sitting in full afternoon sun can become bone dry in a matter of hours on a hot day. For most vegetables, a minimum of 5 gallons is the practical floor outdoors, with tomatoes, peppers, and squash preferring 10 to 15 gallons or more. Trees and larger shrubs need at least 25 to 45 gallons to develop enough root mass and moisture reserve to handle outdoor temperature and moisture swings without constant stress.
You'll also see lined grow bags, which have a moisture-retaining inner liner while still allowing air pruning through the sides. These are genuinely useful in hot or dry climates where unlined fabric loses moisture too aggressively. The liner keeps more water in the root zone between waterings, which gives you a bit more flexibility on how often you need to water.
Placement and microclimate: sun, wind, and drainage
Where you put your grow bags outdoors has a huge impact on how often you water and how well your plants perform. Most vegetables need a minimum of six to eight hours of direct sun per day, so aim for a south- or west-facing spot where they'll get that. Flowers and herbs are often more flexible, and some actually prefer morning sun with afternoon shade, which also reduces how quickly the bags dry out in peak summer heat.
Wind is one of the most underestimated variables. Even a light breeze pulls moisture out of fabric bags consistently because the breathable walls wick moisture from every side. If your outdoor space is exposed and windy, either use a sheltered wall or fence as a windbreak, or accept that you'll be watering more often than the usual guidance suggests. A wall also reflects radiant heat, which can actually extend the season in cooler climates but creates heat stress risk in already hot summers.
Drainage is a strength of fabric grow bags, but placement still matters. Kentucky State University Extension Connections also notes that placement affects conditions for grow bags, including considerations about keeping the setup near a water source and reducing excess moisture on leaf surfaces KSU Extension Connections. Sitting bags directly on bare concrete or pavement can restrict airflow under the bag and reduce drainage efficiency. Worse, placing them directly on soil or grass can allow slugs, pillbugs, ants, and other soil-dwelling organisms to colonize the bag through the bottom. Elevating grow bags slightly on a pallet, a wooden board, or purpose-built grow bag risers solves both problems. It keeps the base ventilated, drains freely, and prevents pest access through the bottom.
If you're using saucers or trays under your bags to catch runoff (particularly on balconies or patios), empty them after each watering session. Roots sitting in pooled water in a tray undermine the whole point of using a breathable fabric container in the first place and create exactly the waterlogging risk you're trying to avoid.
Watering outdoors: the biggest adjustment you'll need to make
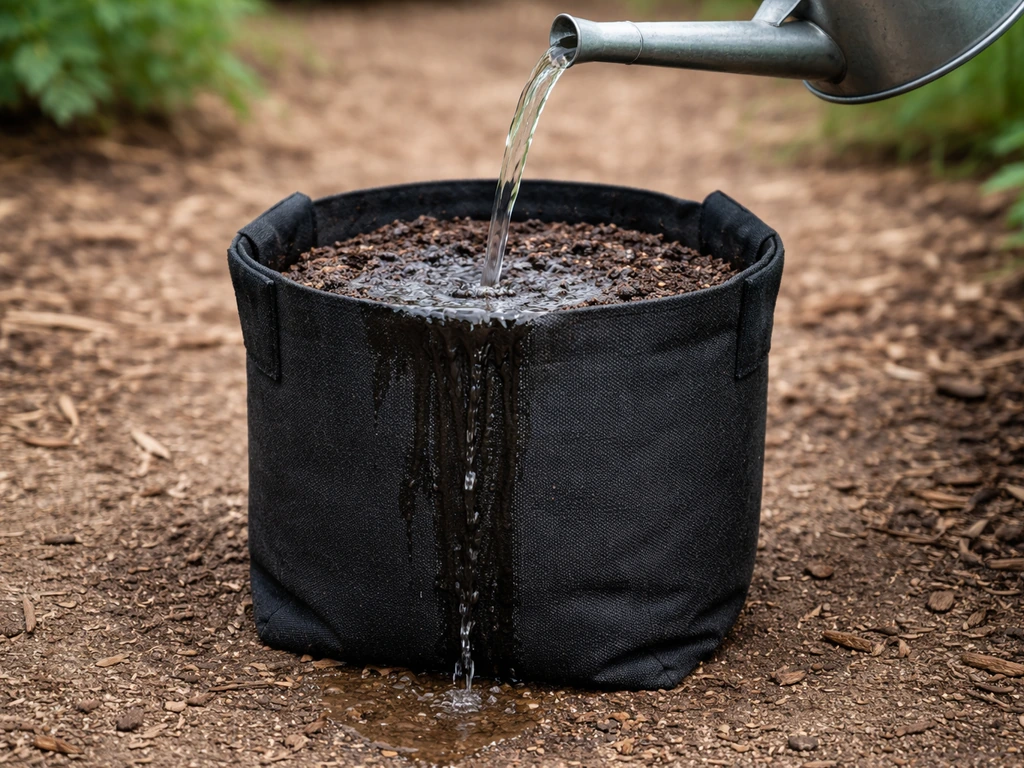
Outdoor grow bags dry out faster than any other container setup you'll use, and faster than most people expect the first time around. Grow bags and compost are different things: grow bags are containers for soil, while compost is the organic material that enriches soil for plant growth. There's no fixed watering schedule that works reliably. What works is checking the soil moisture before each watering session. Stick a finger two inches into the soil: if it feels dry at that depth, it's time to water. If it still feels moist, check again later. The squeeze test works too: if you can physically squeeze water out of a handful of potting mix, it's too wet. If it crumbles and feels bone dry, you've waited too long.
When you do water, water thoroughly. Add enough water that it flows freely from the bottom of the bag. This confirms you've saturated the full root zone rather than just wetting the top few inches. Shallow watering in a grow bag encourages roots to stay near the surface where they're most vulnerable to heat and drying. Water deeply, then wait until the finger test tells you to water again.
In peak summer heat, actively growing vegetables in large grow bags may need watering daily or even twice daily. Early morning is the best time: it gives the plant a moisture reservoir to draw from during the hottest part of the day and avoids leaving wet foliage overnight, which contributes to fungal problems. Watering in the evening is the second-best option if mornings aren't practical. Avoid watering in the midday heat when evaporation is highest and the temperature shock to roots is greatest.
Drip irrigation is a practical upgrade if you're running multiple bags. A simple timer and a few emitters per bag dramatically reduces the daily workload and keeps moisture levels more consistent. If you use drip, position emitters so water distributes across the full width of the bag rather than concentrating in one spot, which can leave outer sections of the root zone dry while the center stays saturated.
Managing heat in fabric grow bags
The root zone in a dark-colored fabric bag sitting in full sun on a hot day can climb well above the ambient air temperature. This is one of the real downsides of outdoor fabric containers compared to in-ground growing. You can manage it a few ways: choose lighter-colored or natural-tone bags rather than black if heat is a regular issue in your climate, shade the bags (not the plants) with a piece of burlap or shade cloth around the sides, cluster multiple bags together so they shade each other's walls, or mulch the top of the bag with straw or wood chip to reduce surface evaporation and insulate the top layer of soil.
Feeding your plants: why outdoor grow bags need more frequent fertilizing
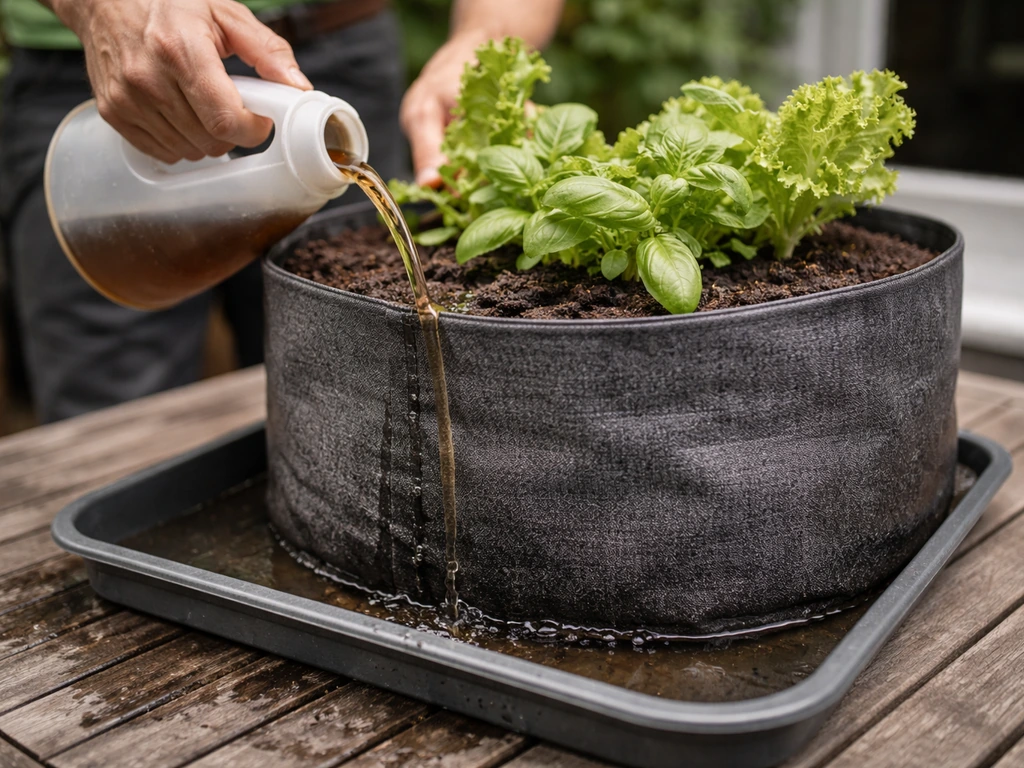
Every time you water a grow bag thoroughly (which is the correct way to water), some nutrients leach out through the fabric. Outdoors, where you're watering far more frequently than in a sheltered setup, this nutrient loss happens faster than most growers anticipate. A freshly filled bag of good potting mix might sustain a plant for a couple of waterings, but nutritional levels drop off quickly after that due to a combination of plant uptake and drainage losses.
The practical approach most extension horticulturists recommend is to start regular fertilizer applications somewhere between two and six weeks after planting, depending on what your potting mix already contains. If your mix came with a slow-release fertilizer blended in, you have a buffer but it still won't last the season on its own in an outdoor bag with a heavy watering schedule. Plan to supplement with a liquid or water-soluble fertilizer, applied at roughly weekly intervals at a dilute concentration once plants are actively growing.
A good rule of thumb for liquid fertilizer: apply enough that about 10% of the solution drains from the bottom of the bag. This ensures you've flushed through the root zone properly and prevents salt accumulation. Over time, soluble fertilizer salts can build up in containers even when you're watering regularly, so doing a plain-water flush occasionally helps clear the excess. Signs of salt buildup include white crusty deposits on the fabric or soil surface and leaf tip burn despite normal-looking soil moisture.
Avoid the temptation to double up on fertilizer to compensate for leaching. Over-fertilization burns roots and causes exactly the salt buildup you're trying to prevent. More frequent low-rate applications are more effective than occasional heavy doses.
Dealing with pests, disease, and weeds outside
Outdoor grow bags are exposed to all the same pests and diseases as any garden bed, with a few extra wrinkles specific to containers. The good news is that fabric grow bags have a natural advantage: because they're elevated from the ground (or should be) and sit as discrete units, you can inspect them easily from all angles and move them if a location isn't working. You may also wonder whether you can reuse grow bags after harvest, and the right cleaning and storage steps make a big difference.
Common pests and how to handle them
Aphids, spider mites, and whiteflies are the most common outdoor container pests, particularly in warm, dry conditions. Because grow bags are portable, you can physically relocate a badly affected bag away from others to prevent spread. Regular inspection of leaf undersides and new growth catches infestations early when they're easiest to manage. A strong blast of water knocks back aphid populations effectively. Placing bags on risers keeps slugs and pillbugs from colonizing the base and working their way up into the root zone.
Disease prevention
The biggest disease risk in outdoor grow bags is fungal, specifically powdery mildew and root rot. Powdery mildew thrives when foliage stays wet and airflow is poor. Water at the base of plants rather than overhead, avoid crowding bags together too tightly (the same bags that benefit from mutual shading still need some airflow between them), and remove any affected leaves promptly. Root rot is a risk if bags sit in standing water or drainage is compromised in any way. Fabric bags are inherently resistant to waterlogging compared to solid plastic pots, but a blocked or restricted base on a flat surface can still cause problems.
Weed management
Weeds in grow bags are surprisingly manageable. Wind-dispersed seeds (like dandelion) can land on the soil surface and germinate, but because the bag volume is small and you have direct access to the whole surface, pulling weeds early is quick and easy. A thin layer of mulch on the soil surface suppresses most surface germination and also helps with moisture retention. Because fabric bags sit above ground rather than connecting to surrounding soil, you don't get the lateral weed encroachment you'd deal with in a raised bed or garden plot. You can also use compost inside grow bags, but keep in mind it may break down faster and needs regular moisture checks use grow bags as compost.
What to grow: vegetables, flowers, and trees in outdoor grow bags
Vegetables
Vegetables are the most demanding outdoor grow bag crop because they're generally intolerant of moisture stress and need consistent water and nutrients throughout the season. Tomatoes, peppers, and cucumbers do well in 10 to 15-gallon bags with daily watering and weekly liquid feeding once they're in active growth. Potatoes are particularly well suited to grow bags: a 10-gallon bag is a standard size, the contained environment makes harvest easy, and the breathable fabric prevents the waterlogging that causes potato rot. Salad greens, radishes, and herbs are well suited to smaller bags (5 to 7 gallons) and are more forgiving of brief dry spells. Squash and pumpkins are productive in grow bags but need the largest containers you can manage (15 to 20 gallons minimum) given their vigorous root systems.
Flowers
Flowers in outdoor grow bags are often easier to manage than vegetables because most ornamentals are more tolerant of brief water stress. Annuals like petunias, marigolds, geraniums, and nasturtiums thrive in 5 to 10-gallon bags and produce excellent displays through the season. Perennial flowers can be grown in bags too, though they'll need winterizing consideration (more on that below). One of the real advantages for flowers is portability: you can reposition bags as plants hit their peak, move them to sheltered spots during extreme weather, or shuffle arrangements on a patio without replanting. If you're interested in growing flowers in grow bags, there's more specific guidance in a dedicated article on this topic.
Trees and shrubs
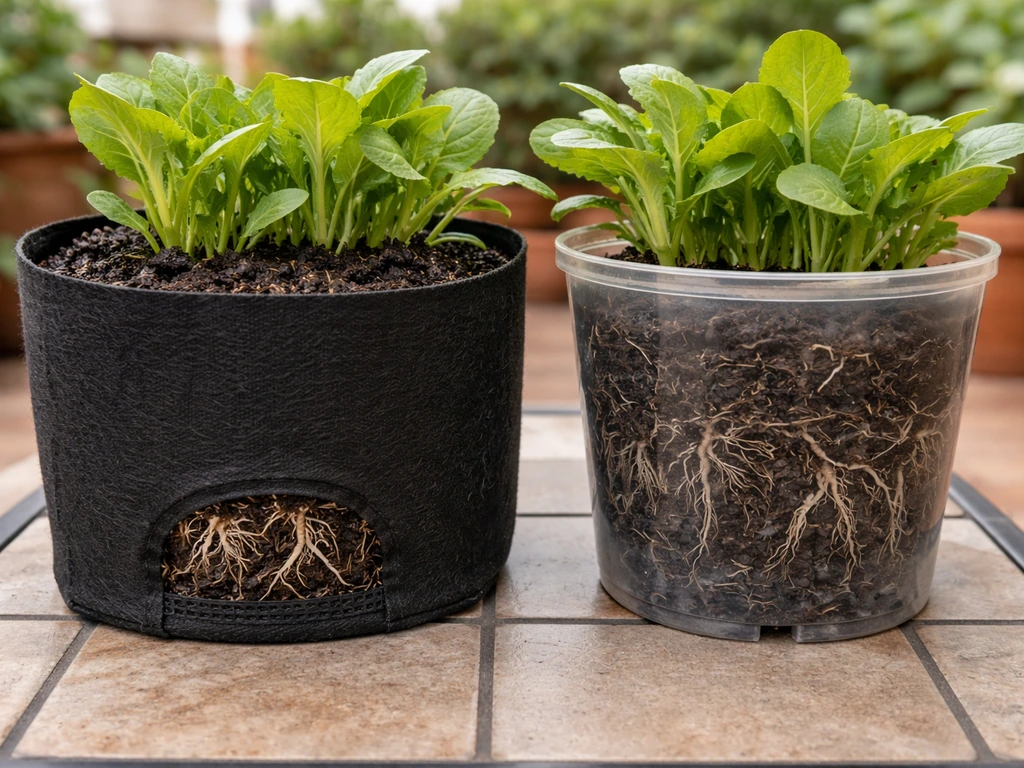
Dwarf fruit trees, citrus, figs, blueberries, and ornamental shrubs all grow successfully in large outdoor fabric bags. The air-pruning effect of the fabric is particularly valuable for trees because it prevents the root circling that causes long-term structural problems in solid containers. A 25-gallon bag suits dwarf apple or citrus trees well; larger varieties or established blueberries benefit from 45 gallons or more. The trade-off with trees is that large bags need significantly more watering in summer heat, and trees are slow to show stress, so by the time a tree looks wilted, the root zone is already very dry. Checking moisture at depth rather than just at the surface is important for large bags.
What about leaving bags outside through winter?
Whether you can leave grow bags out through winter depends heavily on your climate and what's growing in them. Fabric walls provide virtually no insulation, which means root zones in outdoor bags are far more exposed to freeze-thaw cycles than in-ground roots would be. For annual vegetables, end-of-season is typically when you'd empty and clean the bags anyway. For perennial plants and trees overwintering in bags, they usually need protection: wrapping the bags with bubble wrap or burlap, moving them to a sheltered spot, or bringing them into an unheated greenhouse or shed for the coldest months. There's a full breakdown of winter storage options and what happens to bags left outside in freezing conditions covered in a dedicated article on leaving grow bags out all winter.
A quick comparison: outdoor fabric bags vs. plastic pots vs. raised beds
| Feature | Fabric Grow Bags | Plastic Pots | Raised Beds |
|---|---|---|---|
| Drainage | Excellent: drains through all walls | Depends on drainage holes | Good if well-built |
| Root health | Air pruning prevents circling | Root circling common | Unrestricted spread |
| Heat management | Fabric breathes; still heats in sun | Overheats quickly, especially black plastic | Stable soil temps |
| Watering frequency | More frequent (dries fast) | Moderate | Less frequent |
| Portability | Lightweight, handles make moving easy | Easy to moderate | Not portable |
| Nutrient leaching | Higher due to drainage and frequency | Moderate | Lower |
| Pest access from below | Risk if placed directly on ground | Low | Higher from soil |
| Lifespan outdoors | 3–5 seasons (UV-stabilized) | Many years | 5–20+ years |
For most home growers with limited outdoor space, fabric grow bags beat plastic pots on root health and drainage, and they beat raised beds on flexibility and cost of entry. The trade-off is higher maintenance around watering and feeding, which is manageable once you build a routine around it. If you're weighing the investment more broadly, there's a detailed honest assessment in the article covering whether grow bags are worth it. Many gardeners also wonder whether grow bags are reusable, and the short answer is yes if you clean and store them properly between seasons are grow bags reusable.
FAQ
Can you use grow bags outside on a balcony or patio?
Yes, but only if the bag can drain freely and you have a plan for rapid drying. Use risers and empty any runoff-catching trays after watering. In small, enclosed balconies, also keep a close eye on irrigation timing because wind can dry the bag faster than you expect, especially with afternoon sun.
Do grow bags stay pest-free outdoors since they are elevated?
Usually, for ground-level pests and weed seeds, yes. Fabric bags sit above surrounding soil, but you still need to prevent access from below by using risers, and it helps to keep the area under and around the bags clear to reduce slugs, pillbugs, and ants getting started.
How do you know when outdoor grow bags should be replaced?
They can, but you should treat them like a short-lived container in practice. Even UV-stabilized bags weaken over time, and the fabric can lose its drainage uniformity. A good rule is to replace bags once you see thinning, ragged edges, or persistent drainage problems even after careful placement and watering.
Can you fill outdoor grow bags with garden soil?
Yes, as long as you confirm you are using a container-appropriate mix. Outdoor grow bags perform best with lightweight, well-draining potting mix, not garden soil, because garden soil compacts and reduces airflow, which can increase root rot risk in wet spells.
Is there a fixed watering schedule for grow bags outdoors?
Not reliably. Any “calendar” schedule tends to fail outdoors because heat, wind, and rain change evaporation. Instead, use the finger test at the depth you plant at (around 2 inches for many crops), then water thoroughly only when that depth reads dry.
When should you start fertilizing outdoor grow bags, especially if the potting mix is pre-fertilized?
Start feeding later than you might for in-ground beds. If your mix includes slow-release fertilizer, you can extend the first feeding window, but outdoors you generally still need supplementary liquid fertilizer within a couple of weeks once plants are actively growing and watering is frequent.
What are common signs that I’m over-fertilizing outdoor grow bags?
Yes, and it is often the biggest cause of container plant decline. If you fertilize to “make up for leaching” you can burn roots and increase salt crusting. Use the dilution approach you can measure, and plan occasional plain-water flushes if you notice white deposits or tip burn.
My outdoor grow bag dries out too quickly, what’s the best way to fix it?
If the bag is drying too fast, the best fix is usually larger volume and insulation of the top, not just more frequent watering. In hot weather, choose a lighter or natural-tone bag, mulch the top surface, and shade the bag walls with a cover or clustering, because root-zone overheating accelerates dry-out.
Can drip irrigation work well for grow bags outdoors, and how do I set it up correctly?
Yes, but adjust it to your crop and container size. For even watering, emitters should distribute across the full width, and you still need periodic moisture checks. Drip can under-water outer sections if the emitter spacing or flow rate is too limited.
Are outdoor grow bags reusable every year if they held diseased plants?
Sometimes you can, but only with careful cleaning and pest management. Remove spent plant material, scrub and disinfect if you had disease issues, let the bags dry fully, and store them in a way that prevents mold or pests. Also note that bags can degrade over multiple seasons even if reused.
What should I do with outdoor grow bags during freezing weather?
For freezing climates, most growers do not leave them fully exposed if they contain perennials or trees. Fabric has little insulation, so freeze-thaw can damage roots, and the right approach is to wrap the bag, move it to a sheltered spot, or bring it into an unheated but protected space for the coldest period.
Grow bags are fabric plant containers; compost is decomposed matter. Learn how to choose mixes, water, and feed.
Yes for growing media, not for composting: use grow bags with the right soil mix and moisture, avoid composting inside.
See when grow bags are worth it: fabric drainage, root health, yields, watering needs, and setup tips for veggies, flowe