MycoHaus grow bags are worth buying if you want a clean, ready-to-inoculate setup that removes most of the prep work from home mushroom cultivation. If you want a more apples-to-apples comparison, check our gardzen grow bag reviews next. The All-in-One bag gives you five pounds of sterilized rye grain and fruitable substrate in a single durable polypropylene bag with a self-healing injection port and a 0.5 micron filter patch. You add your own liquid culture, wait for colonization, introduce fruiting conditions, and harvest. That said, they aren't magic. Yields are modest if you fruit right in the bag, contamination risk climbs fast if you open the bag too early or too often, and you'll get the best results if you understand what you're actually doing and why.
MycoHaus Grow Bag Review: Setup, Yields, Pros and Tips

What the MycoHaus grow bag actually is
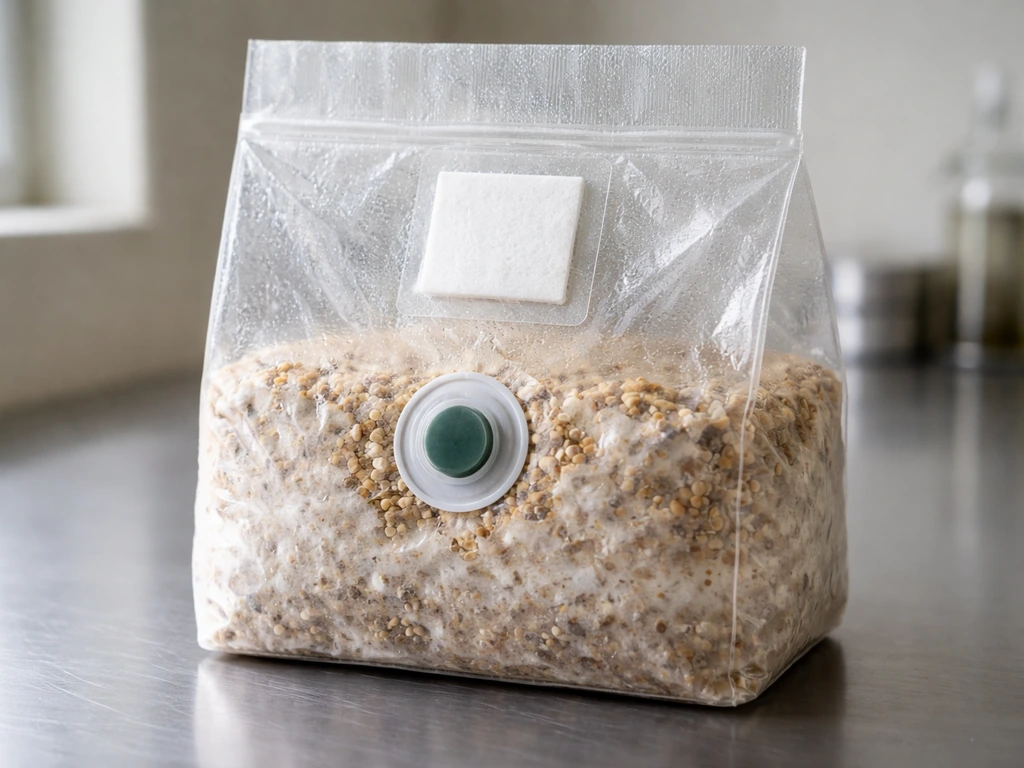
MycoHaus makes a few different bag formats aimed at home and hobbyist mushroom growers. Their spawn bags are made from 3.0 mil polypropylene, stand up on their own thanks to a gusseted base, and come in sizes like 4" x 3" x 18". Each bag has a self-healing injection port (so you can push a needle through without permanently breaking the seal) and a breathable filter patch. The filter patches are rated at either 0.2 or 0.5 microns depending on the product, which is tight enough to block contaminating molds and bacteria while still allowing gas exchange. MycoHaus specifically claims the breathable technology allows CO2 out and oxygen in without letting moisture escape, so your substrate doesn't dry out during incubation.
The flagship product for most home growers is the All-in-One sterile mushroom grow bag. It ships pre-packed with five pounds of fruitable substrate (a combination of rye grain for spawn and a bulk substrate layer), fully sterilized and shrink-wrapped for extra protection during shipping. The idea is simple: the bag is pre-done, you inoculate it yourself, and you can fruit mushrooms right in the same bag without ever transferring to another container. MycoHaus also sells standalone one-pound and two-pound sterilized rye grain bags for people who want just the grain spawn component.
Compatible species listed by MycoHaus include Lion's Mane, Wine Cap, Shiitake, Maitake, all Oyster varieties (Pleurotus), and Chicken of the Woods. That's a solid lineup of gourmet edibles, each with slightly different fruiting requirements, so the species you choose will partly determine how you manage conditions.
Unboxing, setup, and what to expect on day one
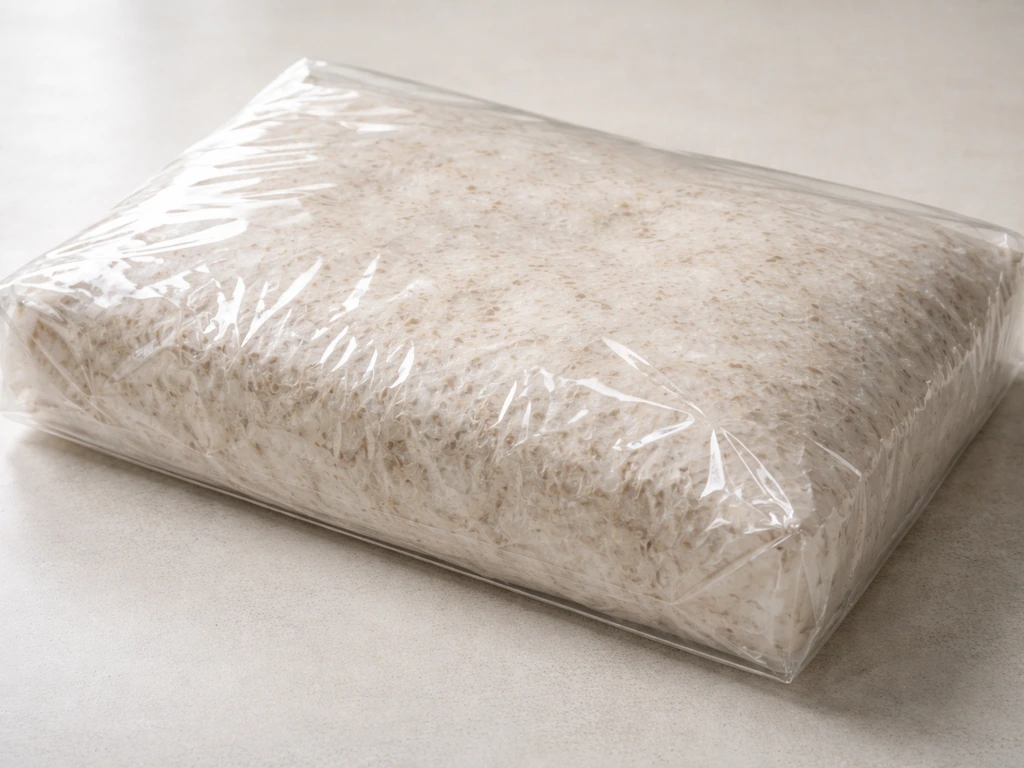
When your bag arrives, it should be firm, white or off-white, and sealed with shrink wrap around the outside. Before you do anything, inspect it carefully. Look for any visible discoloration, green or black patches, or a sour smell coming through the packaging. Those are signs of contamination during shipping, which does happen occasionally. If everything looks clean, you're ready to inoculate.
MycoHaus provides detailed inoculation instructions on their site, but the core process is: sterilize the injection port with isopropyl alcohol, draw your liquid culture into a syringe, push through the port, and inject. The key note here is that even though the bag holds five pounds of material, you only need enough liquid culture to inoculate the grain portion, not the entire contents. Over-injecting doesn't help and can introduce unnecessary moisture. After inoculation, place the bag somewhere dark and within the right temperature range for your species and let it colonize.
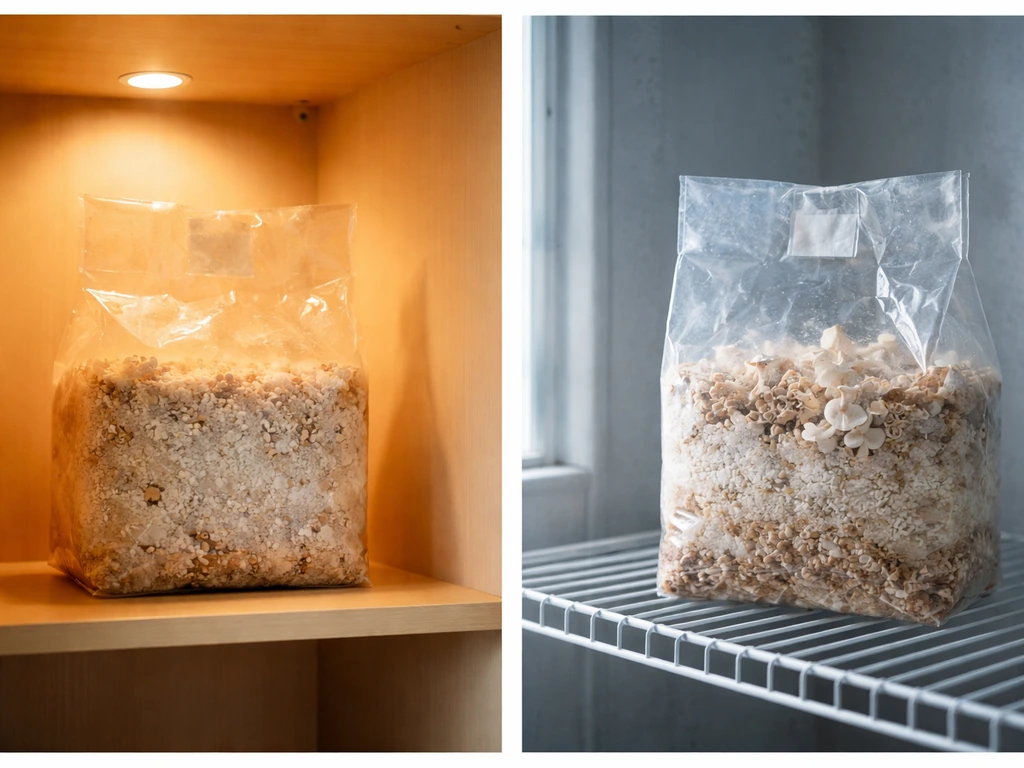
One step that catches beginners off guard: after inoculation, MycoHaus recommends opening the bag to uncompress and mix the compost layer. This improves aeration throughout the substrate and gives your mycelium a better environment to spread. Do this in the cleanest area you can manage, preferably in front of a flow hood if you have one. Even without a flow hood, minimizing the time the bag is open and working in a still, clean space makes a real difference.
MycoHaus says bags are best used within 30 days of purchase, though unopened and stored at room temperature they can last six months or longer. The caveat is that grain breaks down and releases moisture over time, and they don't recommend using very old bags even if they appear clean. If you're not ready to inoculate soon after receiving, keep them sealed and out of direct light.
The conditions your bag needs to actually produce mushrooms
Temperature
MycoHaus gives 75 to 85°F as a general incubation rule of thumb, and that covers most species reasonably well for the colonization phase. Fruiting temperatures are species-dependent and generally cooler. For something like blue oysters, you're targeting roughly 60 to 75°F during fruiting. Shiitake and Lion's Mane have their own preferred ranges. The practical takeaway: look up your specific strain's preferred temperatures and try to match them, because guessing wrong is one of the most common reasons yields disappoint.
Humidity and fresh air exchange
During incubation, humidity management is largely handled by the filter patch and the sealed bag. You don't need to mist or spray anything. The grow-kit instruction PDF also emphasizes that the bag must remain closed until the first pinheads form, then you follow a routine of daily monitoring and moistening for later flushes blank" rel="noopener noreferrer">You don't need to mist or spray anything.. Once you switch to fruiting conditions, though, you need to actively maintain humidity in the 85 to 95% relative humidity range. If you’re also researching rain science grow bags reviews, humidity control is one of the biggest factors that can make or break results. For most growers fruiting in a bag, this means cutting slits or opening the top, then misting the exposed surface and the surrounding air two to three times a day. Fan the bag briefly after misting to encourage fresh air exchange without letting humidity crash.
Fresh air exchange (FAE) is especially important for oyster mushrooms, which need significantly more airflow than most other edible species. If you see long, leggy stems with tiny caps, that's a classic sign of not enough FAE. Conversely, if caps are browning at the edges or drying out, you're fanning too aggressively and humidity is dropping too low. It's a balance, and it takes a flush or two to dial in.
Light
No direct light during incubation. MycoHaus specifically warns that excessive light can damage mycelium at this stage. Indirect or ambient light is fine, but don't sit the bag on a windowsill. During fruiting, a few hours of indirect light or a simple grow light on a timer helps signal the mycelium to pin. Mushrooms don't photosynthesize, so you're using light as a cue rather than a food source.
Performance, ease of use, and how it compares
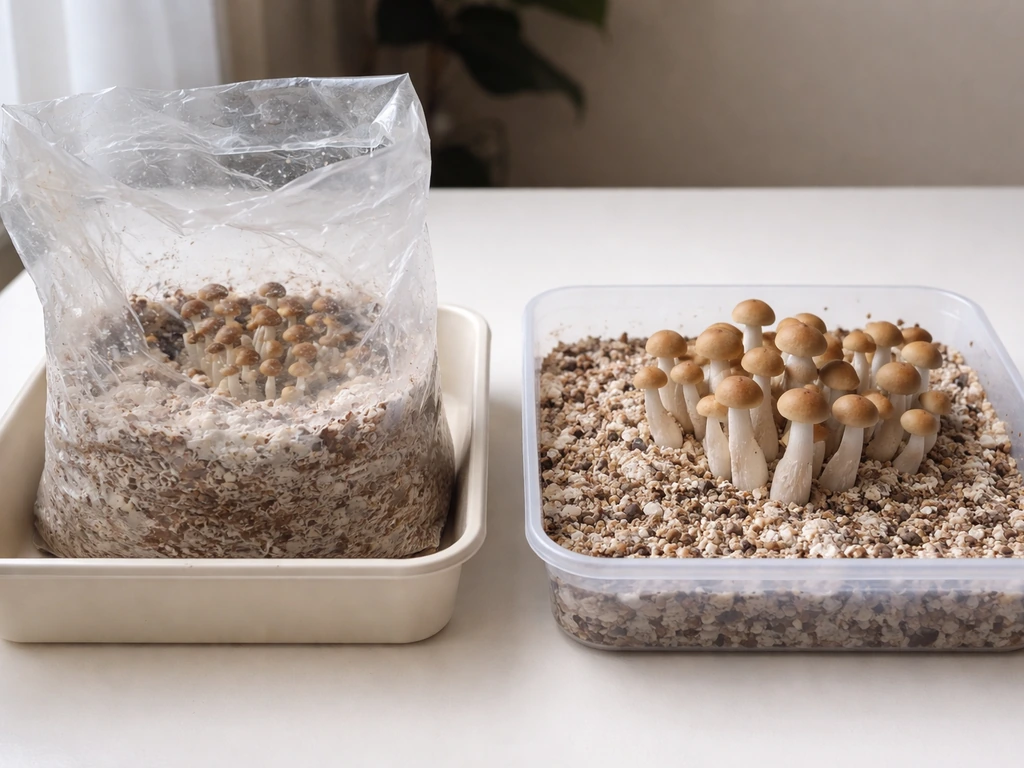
Let's talk about what you actually get out of a MycoHaus All-in-One bag. MycoHaus themselves acknowledge that fruiting right in the bag works, but they note yields are larger if you transfer colonized grain spawn to a bulk substrate like straw or compost. That's a meaningful caveat. Real-world numbers from growers using all-in-one bags cluster around 100 to 120 grams fresh weight per flush, with some variation depending on species and conditions. In dry weight terms, the competitor benchmark of 1 to 2 oz per flush is a reasonable expectation if you're fruiting in-bag. Across multiple flushes, most growers see three to five total, so total dry yield for an entire bag run might be in the range of 3 to 8 oz depending on how well conditions are managed.
For a first-time grower, those numbers are genuinely satisfying. For an experienced grower who already runs bulk tubs or straw logs, the yield-per-dollar of an all-in-one bag is lower than building out your own substrate. That's not a knock on MycoHaus specifically; it's true of all all-in-one formats.
| Feature | MycoHaus All-in-One Bag | DIY Grain + Bulk Substrate | Competitor All-in-One Bags |
|---|---|---|---|
| Setup effort | Low (inoculate only) | High (sterilize, mix, pack) | Low (inoculate only) |
| Sterility assurance | Pre-sterilized, filter patch | User-dependent | Pre-sterilized, varies by brand |
| Yield potential (in-bag) | Moderate (1–2 oz dry per flush) | High (scales with volume) | Similar (1–2 oz dry per flush) |
| Flushes expected | 3–5 | 3–5+ | 3–5 |
| Contamination risk | Low if handled correctly | Higher during prep | Low if handled correctly |
| Transfer option | Yes (to bulk substrate) | N/A (already bulk) | Yes |
| Best for | Beginners, convenience | Experienced growers | Beginners, convenience |
Compared to other grow bag brands reviewed on this site, MycoHaus sits in a solid middle ground. If you’re specifically looking for root pouch grow bags reviews, you can use the same comparisons here to judge material quality and expected performance. If you want a broader look at different styles and brands, reading grow bags reviews can help you compare results, not just features. The 3.0 mil polypropylene is sturdier than thinner bags you'll find from some budget suppliers, and the filter patch pore ratings are competitive. The self-healing injection port is a genuine convenience feature. Where MycoHaus differs from something like a straight grain spawn bag (which is just one component of a grow system) is that the All-in-One format tries to collapse the whole process into a single purchase. That's useful for beginners but less customizable for experienced growers who already know their substrate preferences.
Honest pros and cons
- Pre-sterilized and ready to inoculate straight from the box, no pressure cooker needed
- Self-healing injection port makes inoculation clean and low-risk
- 0.5 micron filter patch allows gas exchange while blocking contaminants
- Durable 3.0 mil polypropylene holds up to handling and won't tear easily
- Can be used as-is for fruiting or transferred to bulk substrate for higher yields
- Compatible with a wide range of gourmet species
- Shrink-wrap outer packaging adds a layer of protection during shipping
- Yields are modest if fruiting directly in-bag vs. transferring to bulk
- Contamination risk rises significantly with each unnecessary bag opening
- No liquid culture included, so you still need to source your own inoculum
- Shelf life is limited once bags are old or if stored improperly
- All-in-one format is harder to optimize for specific species vs. building your own mix
- Per-pound cost is higher than DIY once you have sterilization equipment
Contamination: what causes it and how to fix it
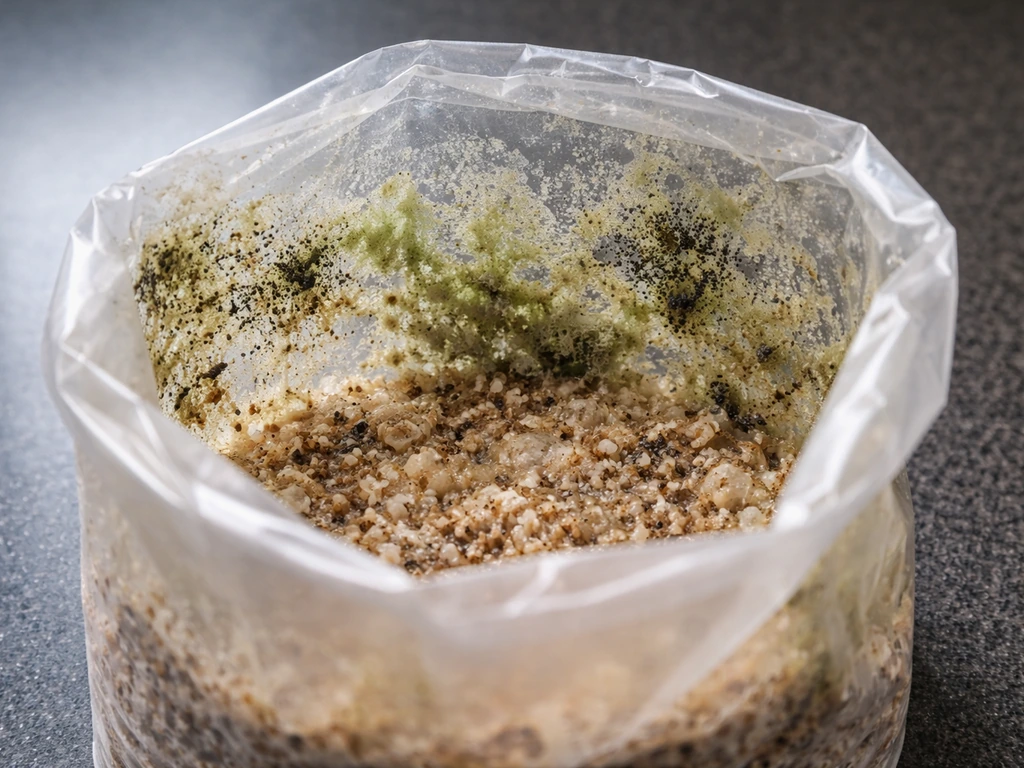
Contamination is the most common failure mode for any mushroom grow bag, and MycoHaus bags are not immune. The most visible sign is colored growth inside the bag: green is typically Trichoderma mold, black suggests Aspergillus or similar. Any unexpected color other than white mycelium is a red flag. Other signs include a sour or off smell when you open or sniff near the filter patch, slimy patches, or mycelium that stalls completely and never spreads.
If you see green or black inside the bag, remove it from your grow space immediately and dispose of it outside in a sealed bag. Don't try to save a visibly contaminated bag. The mold will spread to your other grows if you leave it nearby.
The biggest source of contamination in MycoHaus-style bags isn't the bag itself, it's handling. Every time you open the bag, you expose the substrate to airborne contaminants. MycoHaus specifically cautions that burping or venting a stalled bag increases contamination risk and should be done in a very clean environment, ideally in front of a flow hood. A Reddit community thread specifically discussing MycoHaus bags repeatedly circles back to one debate: whether and when to break and shake the bag to redistribute colonized grain into the substrate. The answer that works best for most growers is to wait until the grain is substantially colonized before shaking, and to minimize the number of times you open or disturb the bag before that point.
If your bag is stalling but there's no visible contamination, the likely culprits are CO2 buildup (check that the filter patch isn't folded or blocked), temperatures outside the ideal range, or a weak inoculation. Stalled but clean bags can sometimes be recovered by gently shaking to redistribute mycelium and ensuring the filter patch has unobstructed airflow. If the stall persists beyond a few weeks with no visible growth at all, that batch is likely a loss.
Common failure scenarios and what to do
| Symptom | Likely cause | What to do |
|---|---|---|
| Green or black patches | Contamination (mold) | Seal and discard outside immediately |
| Mycelium stalled, no color change | CO2 buildup, wrong temp, weak inoculum | Check filter patch, adjust temperature, consider gentle shake if no contam |
| Long stems, tiny caps at fruiting | Insufficient fresh air exchange | Increase fanning frequency, cut larger openings |
| Caps drying out or browning at edges | Too much airflow, low humidity | Reduce fanning, increase misting frequency |
| Sour or off smell | Contamination or rotting substrate | Remove from grow space, inspect closely, discard if confirmed |
| No pins after full colonization | Fruiting trigger not applied | Introduce temperature drop, increase FAE, ensure indirect light |
Harvesting your first flush and getting more out of the bag
Timing your harvest right is important for both yield and bag longevity. Pick mushrooms just before or as the caps begin to flatten out and the veil (if present) starts to tear. Waiting until caps are fully open and spores drop means you've passed peak quality, and spore release inside a small grow space can cause its own irritation issues. Twist and pull gently at the base rather than cutting, which leaves less dead tissue behind to rot and invite contamination.
For timing expectations: MycoHaus bags typically take around six to twelve weeks from inoculation to first harvest, with user reports clustering around the two-month mark for pinning on five-pound bags. Your first flush is usually the largest. From there, you can expect two to four more flushes with progressively smaller yields as the substrate is consumed.
After your first harvest, rehydrate the block to trigger subsequent flushes. The standard approach is to fill the bag or container with enough clean water to submerge the substrate, soak for several hours (or overnight), then drain thoroughly before returning to fruiting conditions. Some growers place a pan of water nearby during the soak to keep humidity high. After draining, tape or fold the top closed again and resume your misting and fanning routine. Most bags will yield three to five flushes total before the substrate is spent, though yields drop noticeably after the second or third flush.
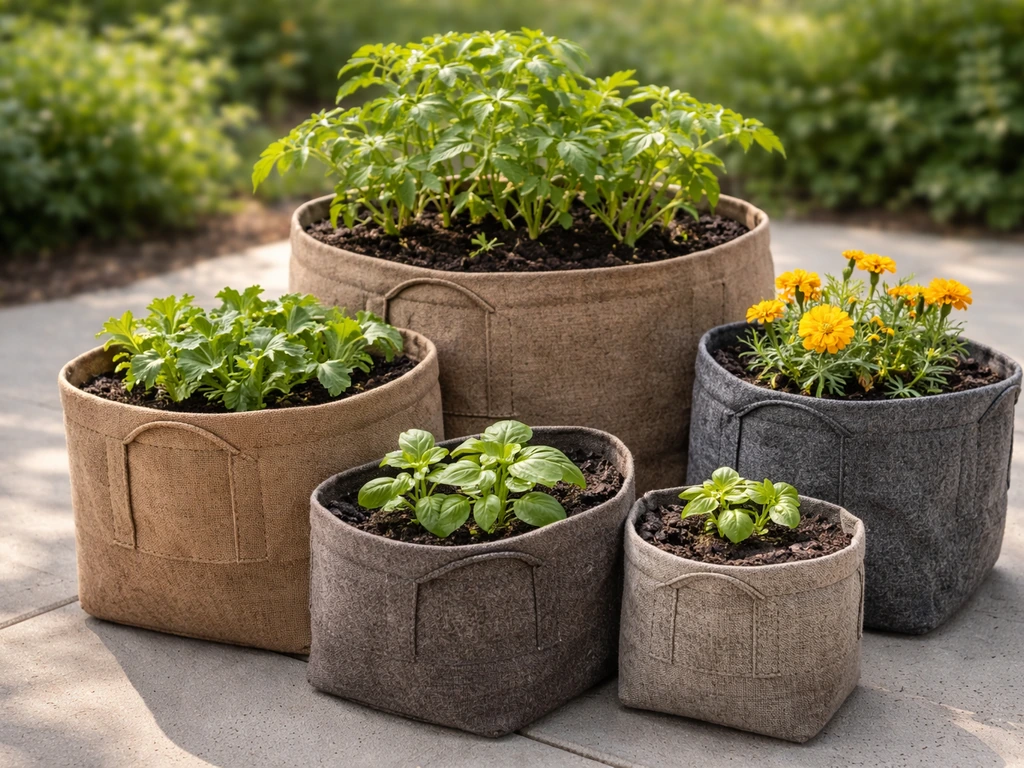
One practical note: if you've been fruiting in-bag and the substrate looks depleted after two flushes, consider breaking the block out and burying it in outdoor compost or a wood chip bed. Some species like Wine Cap and Chicken of the Woods will continue producing outdoors in the right conditions even after the bag run is over.
Who should buy a MycoHaus bag and which option to choose
MycoHaus All-in-One bags are genuinely well-suited for beginners who want to try home mushroom cultivation without investing in a pressure cooker, sterilization setup, or bulk substrate sourcing. The pre-sterilized format removes the hardest and most failure-prone step, and the injection port makes inoculation approachable for anyone with a liquid culture syringe. If you've been curious about growing gourmet edibles at home and don't want to build out a full DIY setup, this is a reasonable starting point.
Experienced growers who already have sterilization equipment and prefer to dial in their own substrate mixes will get less marginal value from the All-in-One format. For them, the standalone grain spawn bags (one-pound or two-pound sterilized rye) are more useful as a clean grain base that pairs with custom bulk substrate. Those bags follow the same filter patch and injection port design, just without the fruiting substrate layer.
For choosing between species or variants: match the species to your home conditions before anything else. If your space stays in the mid-60s°F, oysters (especially blue oysters) are your easiest win. If you want a midwest grow kits spawn bag review style deep dive on which species perform best in typical home conditions, look for results specifically tied to oyster grows oysters (especially blue oysters). If you can maintain warmer temperatures closer to 70 to 75°F, Lion's Mane and Shiitake are excellent options with strong culinary appeal. Maitake and Chicken of the Woods are more demanding and less forgiving for first-timers. Stick with oysters or Lion's Mane for your first run.
If you're comparing MycoHaus against other reviewed options in this space, the decision usually comes down to what stage of the process you want handled for you. MycoHaus competes on the all-in-one convenience angle, similar to what you'd evaluate when comparing other grow bag brands side by side. The quality of the bags themselves is solid, the filter technology is legitimate, and the self-healing injection port is a meaningful design advantage over plain filter-only bags. The honest caveat is that no pre-made bag completely eliminates the need to understand your conditions, manage humidity and FAE, and handle the bag carefully. The bag does the sterilization work; you still do the growing.
FAQ
Can I use a syringe to inoculate the spawn portion without contaminating the rest of the bag?
Yes, but only if you inject through the self-healing port quickly and keep the needle and port clean (wipe with isopropyl alcohol right before inoculation). Also, avoid “rinsing” the port with extra liquid culture, since excess fluid can create wet spots that increase contamination risk later.
How do I know if my filter patch is blocked or folded?
Check the patch area after you move the bag into your incubation spot. If you see creasing, the patch pressed flat against the bag wall, or any residue buildup around the patch, gently reposition the bag so the patch has open airflow. A blocked patch often shows up as a stall plus unusual odors, even if the mycelium looks mostly white.
Should I open the bag at any point during incubation to “check progress”?
Try not to. Every opening adds airborne contaminants and disrupts the sealed humidity microclimate. If you need to inspect, do it briefly, use clean handling, and keep openings to the minimum recommended by your inoculation and mixing steps.
What’s the difference between a stalled bag and a contaminated bag?
A stall usually looks like slow or stopped white growth with no distinct colored colonies, no foul sour smell, and no slimy spots. Contamination typically shows green or black growth, off or sour odors near the filter patch, or wet, deteriorating areas that expand. If in doubt, separate the bag immediately from other grows.
Is it normal for mycelium to look uneven or for some grain to colonize faster than others?
Yes. Early colonization often progresses unevenly, especially in mixed or layered setups. The key indicator is whether it expands steadily over time. If one side is fully colonized while the rest stays untouched for weeks, that can point to suboptimal temperature, poor airflow through the filter patch, or weak initial inoculation.
When should I break and shake (redistribute) the bag if my growth seems uneven?
Wait until the grain is substantially colonized before shaking, and disturb the bag as few times as possible. Shaking too early can spread microbes or free up uncolonized material into a more oxygen-exposed state, increasing failure likelihood.
How tightly should I close the bag after misting during fruiting?
You want the bag closed enough to hold humidity, but not so sealed that fresh air exchange stops. If you cut slits or lift the top for misting, re-secure or realign openings after misting so airflow remains consistent. If you seal it fully between misting sessions, leggy growth and poor cap development can follow.
My oysters are getting long stems, what should I adjust first?
Start with fresh air exchange. Increase fanning briefly and keep the misting targeted to the exposed surface and surrounding air rather than flooding the bag. The goal is more airflow without dropping humidity below the mid to high 80s% range.
What causes “browning edges” or drying out, and how do I correct it?
Usually humidity is too low for too long, or misting is too infrequent or too light. Increase misting frequency (keeping it controlled), and fan only briefly after misting so you refresh air without rapidly stripping moisture from the caps.
Can I use tap water for rehydrating and misting?
It depends on your local water. If your tap has high chlorine or heavy minerals, it can stress the grow surface. If you notice repeated drying issues or weak growth after rehydration, switch to filtered or dechlorinated water for misting and soak steps.
How long should I soak the bag after the first flush before trying to fruit again?
A common approach is several hours to overnight, but avoid soaking so long that the substrate becomes sludgy or starts to smell sour. After draining thoroughly, return to fruiting conditions promptly, and keep humidity and FAE balanced because over-saturated blocks can stall.
Should I throw the bag away after the “expected” number of flushes?
Not always. If you’re still seeing healthy primordia or small mushrooms after the second or third flush, you may be able to continue with careful rehydration and condition tuning. Stop when yields drop to near zero and the substrate looks truly depleted and dry, or when signs of contamination appear.
Can I bury the spent block outdoors for species like Wine Cap or Chicken of the Woods?
Yes, if conditions are suitable and you keep it as a low-intervention outdoor grow. Burying in compost or wood chips can allow continued production, but results vary by climate and season. The main benefit is sustainability rather than predictable bag-style flush timing.
What’s the safest way to deal with a contaminated bag?
Isolate it from your other mushrooms immediately. Seal it in a bag for disposal, and avoid carrying it through your main grow area. Clean and sanitize any tools or surfaces that contacted the bag, especially around the port and filter patch area.
How should I store MycoHaus bags if I can’t inoculate right away?
Keep them unopened, sealed, and out of direct light at room temperature when possible. Don’t “pre-open” to check contents, since that defeats the purpose of maintaining a controlled, sterile internal environment.
Root pouch grow bags reviews with size picks, key features, tradeoffs, and troubleshooting for vegetables, flowers, tree
Expert grow bags reviews for fabric and plastic types, drainage, durability, sizing, setup, and troubleshooting by plant
Best soil for grow bags: mix recipes, how much to add by bag size, and vegetable tweaks for strong drainage and yield.