Midwest Grow Kits spawn bags are pressure-sterilized grain bags designed to be injected with a spore syringe or liquid culture, colonized at room temperature, and then broken up and mixed into a bulk substrate like coco coir or pasteurized straw. They're one of the most beginner-friendly ways to start growing gourmet or medicinal mushrooms at home because the hard part (sterilization) is already done for you.
Midwest Grow Kits Spawn Bag Review and How to Use It

Marcus Holloway
12 Jun 2026
What's in the bag and what it's actually for
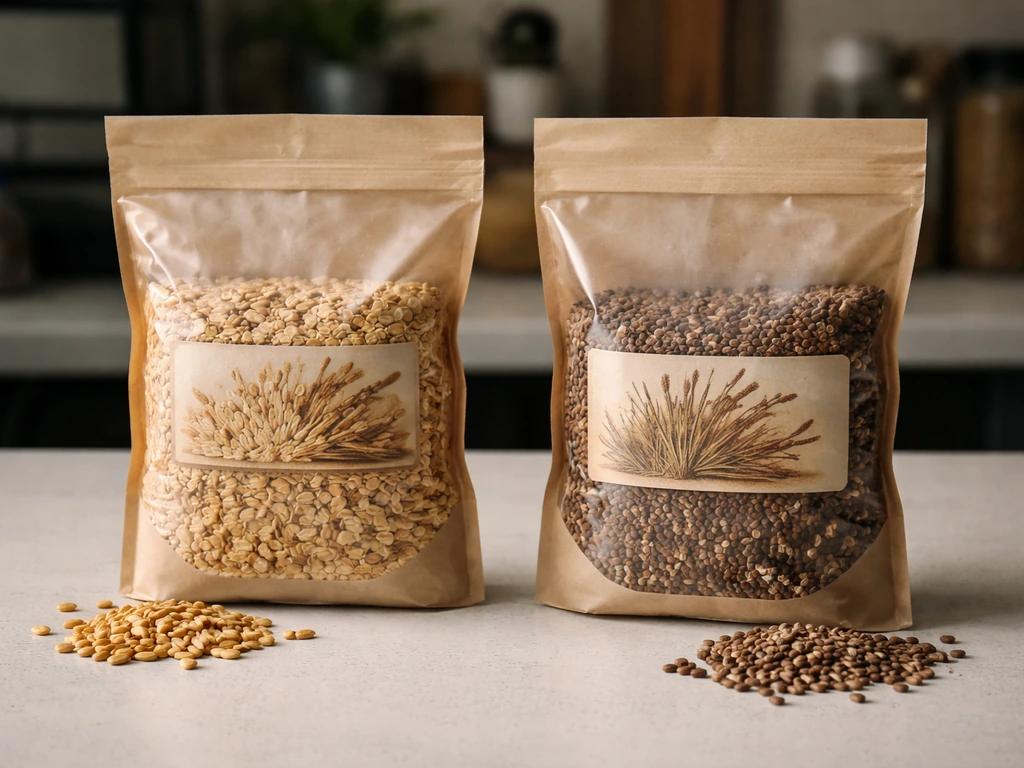
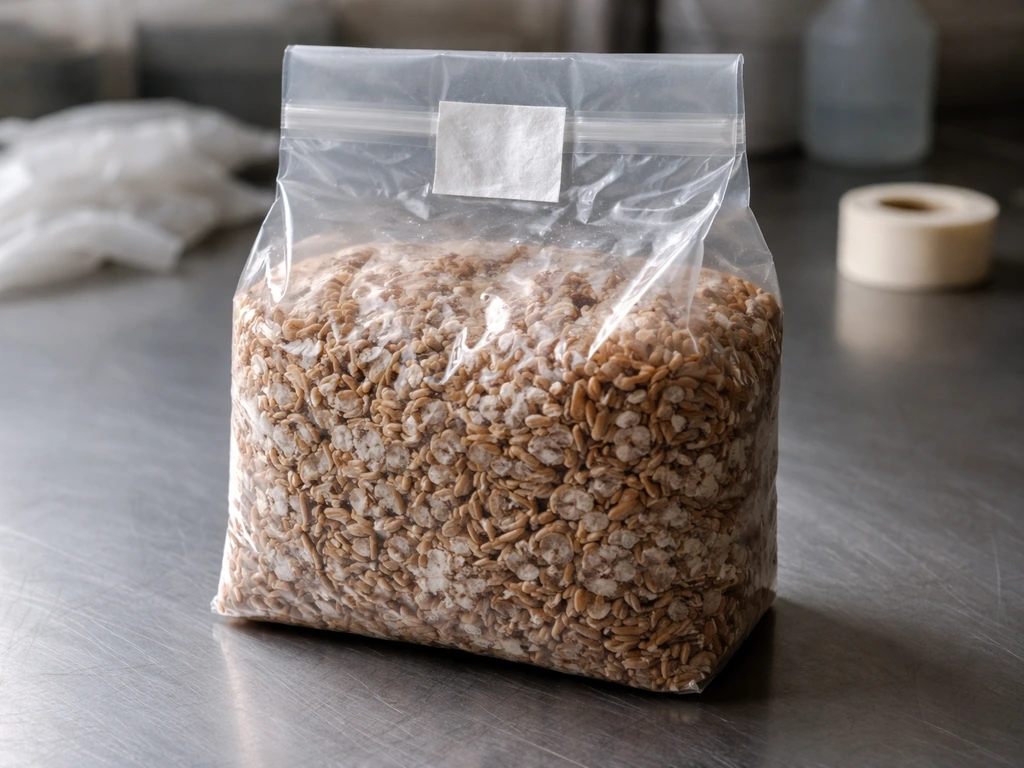
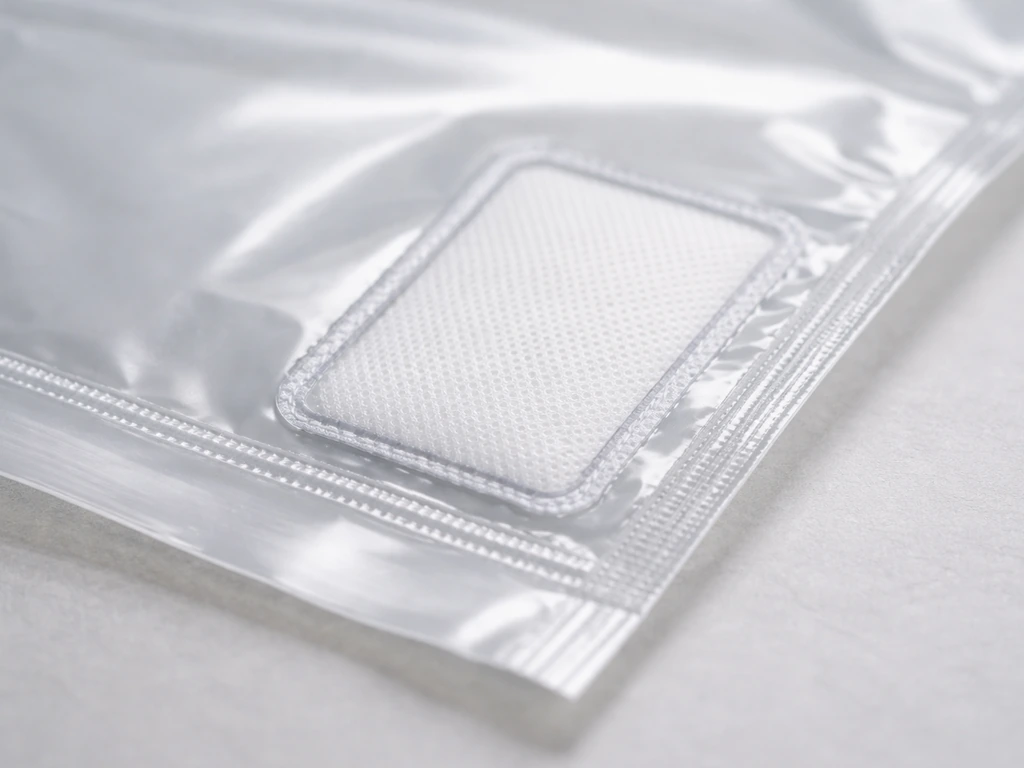
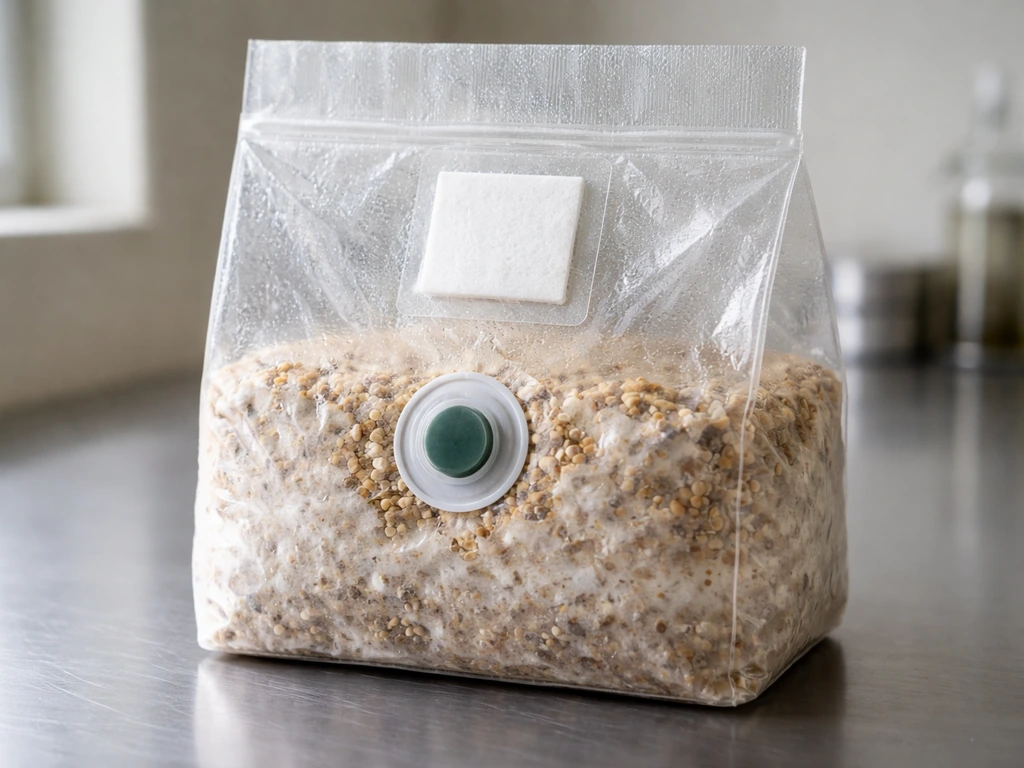
Midwest Grow Kits offers two main grain formulations: the Premium 5-Grain Spawn Bag, a 2-quart bag weighing roughly 2.25 to 2.5 lbs, and the Original Rye Berry Spawn Bag, a single-grain option sold in packs of two bags at the same weight range. Both bags use blank" rel="noopener noreferrer">Unicorn 10T film (3-mil construction), which is a well-regarded bag in the mushroom cultivation world for its durability and clean sealing. Each bag comes with a 0.blank" rel="noopener noreferrer">22-micron filter patch to allow gas exchange during colonization and a self-healing injection port so you can inject your syringe without cutting or opening the bag.
The whole point of a spawn bag is to give you a sterile grain medium that mycelium can colonize quickly and thoroughly. Once fully colonized, the grain spawn acts as a "seed" that you mix into a larger bulk substrate to trigger fruiting. The spawn bag itself is not where mushrooms grow. It's the colonization vessel that gets you to the fruiting stage faster and with much less contamination risk than trying to sterilize grain at home without proper equipment.
Midwest states their bags are made fresh daily in-house. The grain is soaked overnight, simmered, dried, and then pressure-sterilized in autoclaves for a full three hours. That's a meaningful detail because short sterilization cycles are one of the most common causes of contaminated spawn bags across the industry. Three hours at pressure is thorough, and it shows in the consistency of their product.
Step-by-step: how to set up and use your spawn bag
The process from receiving the bag to mixing it into substrate is straightforward, but a few steps are easy to rush or skip. Here's how to do it right from the start.
- Inspect the bag when it arrives. Look for any visible mold (green, black, or orange patches), unusual smells, or signs of damage to the bag film. Healthy sterilized grain will look clean and have a faint, neutral grain smell. If you see any color other than white mycelium or natural grain color, contact Midwest before proceeding.
- Store it properly if you're not injecting immediately. Keep the bag at room temperature (65 to 75°F) in a dark, clean area. Avoid refrigerating it, which can stress the grain and slow colonization once inoculated. Try to inoculate within a week or two of receiving it for best results.
- Set up a still air box (SAB) or work in front of a still laminar flow hood. This is your contamination control step. A SAB is just a clear tote with arm holes cut in the side. Let dust settle for 10 minutes before working.
- Flame-sterilize your syringe needle until glowing red, then let it cool for 10 seconds. Wipe the injection port on the spawn bag with an isopropyl alcohol swab (70% IPA works best) and let it dry for 5 seconds.
- Insert your spore syringe or liquid culture syringe through the self-healing injection port. Inject 2 to 3 cc of liquid culture or 3 to 5 cc of spore solution per bag. Liquid culture colonizes faster, so if you have the option, use it.
- Gently massage the bag to distribute the inoculant throughout the grain. This spreads the spores or mycelium fragments across more grain contact points, which speeds up colonization significantly.
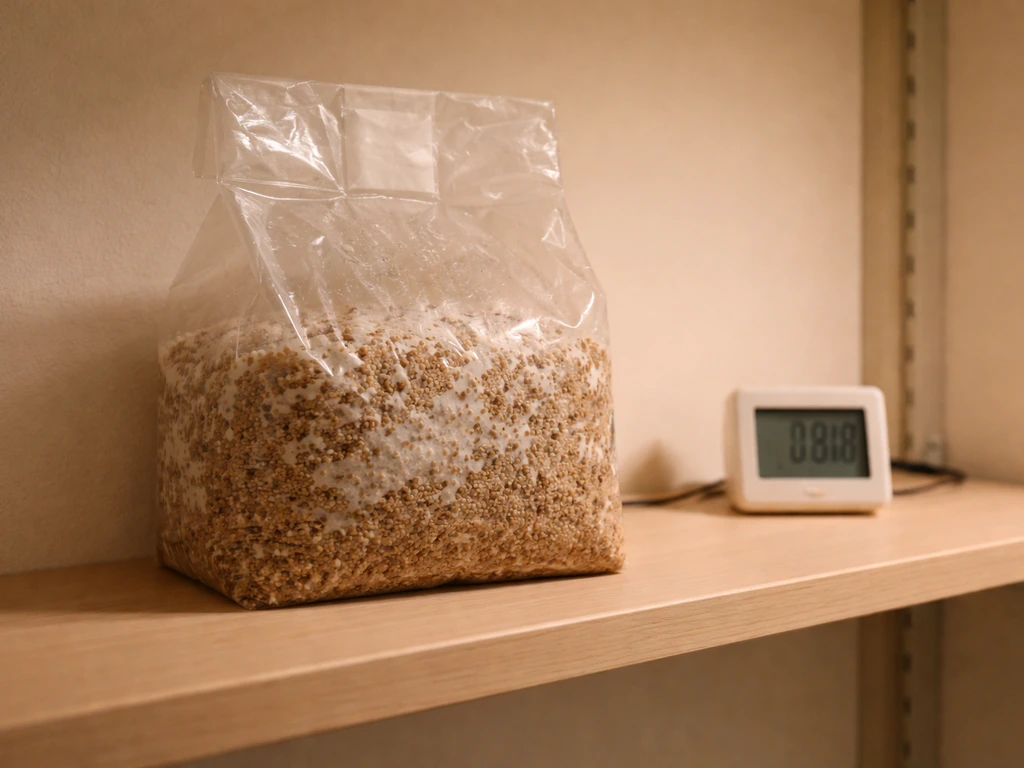
- Label the bag with the strain name and inoculation date, then move it to your colonization space.
- Place the bag in a warm (70 to 75°F), dark location. Do not disturb it for the first week. Check once daily after day 7 for signs of white mycelium growth starting from the injection site.
- Once roughly 30% of the bag is colonized with white mycelium, give the bag a gentle break-and-shake to redistribute the colonized grain with uncolonized grain. Reseal and return it to the colonization space. This speeds up full colonization by several days.
- When the bag is 100% colonized (fully white, no green or black patches), it's ready to use as spawn. Break it up thoroughly inside the bag and then mix it into your bulk substrate at a 1:3 to 1:5 spawn-to-substrate ratio by volume.
Conditions, timing, and troubleshooting
Recommended conditions for colonization
| Parameter | Recommended Range | Notes |
|---|---|---|
| Temperature | 70 to 76°F (21 to 24°C) | Avoid going above 80°F; mycelium can die or stress above that threshold |
| Light | Indirect or dark | Mycelium does not need light during colonization; darkness keeps temps stable |
| Humidity | Not critical in sealed bag | The sealed bag maintains its own internal moisture balance |
| Colonization time | 10 to 21 days | Liquid culture is faster (10 to 14 days); spore syringes average 14 to 21 days |
| Air exchange | Handled by 0.22-micron filter | Do not puncture or cut the bag; the filter manages CO2 exchange |
Common problems and what to do about them
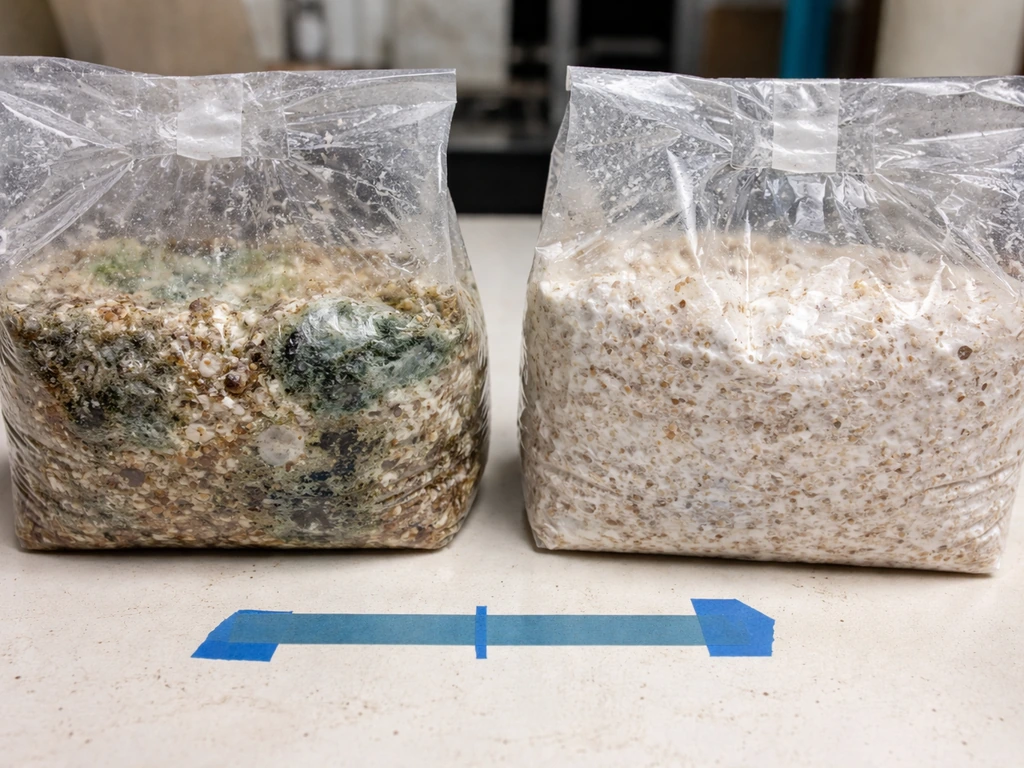
Green or black patches: This is almost always Trichoderma or Aspergillus contamination. If you see it within the first 3 to 5 days, the contamination likely entered during inoculation. If it appears after the 10-day mark, it can sometimes be a surface issue that gets overtaken by fast-moving mycelium, but don't count on that. Discard any bag with significant green growth into an outdoor trash bag and clean your work area thoroughly.
No visible growth after 2 weeks: First, check your temperature. Too cold and colonization stalls. If temperature is fine, the problem was likely a dead or weak spore syringe. Liquid culture is almost always more reliable than spore syringes for this reason. You can try re-inoculating with a new syringe, or if the bag still looks clean and uncontaminated, mix a small piece of colonized agar or a grain-to-grain transfer into it.
Yellowing or metabolite secretion: Seeing yellow or amber liquid pooling in areas of the bag is usually a stress response, often from temperature swings or being handled too much early on. It's not automatically a death sentence. Mycelium that's metabolite-stressed can still colonize and fruit, but results will be less vigorous. Stabilize your temps and leave it alone.
Grain clumping that won't break apart: Completely normal after full colonization. The mycelium physically binds the grains together. Do your break-and-shake while the bag is still only 30 to 50% colonized to prevent a solid grain brick. If it's already fully colonized and clumped, knead the bag firmly by hand before opening.
Slow colonization after break-and-shake: Give it another 5 to 7 days. The break-and-shake causes temporary visible regression as the mycelium reknits, but growth usually accelerates meaningfully within a week.
Honest quality, performance, and value assessment
Build quality and reliability
The Unicorn 10T bag construction is genuinely good. The 3-mil film doesn't puncture easily during handling, the seals hold cleanly, and the filter patches stay intact through a full colonization run without peeling or clogging. The self-healing injection port works as advertised: multiple injections through the same port are possible without leaks or significant contamination risk if you're working clean. This isn't the cheapest bag format on the market, but the materials choice reflects real quality control rather than cost-cutting.
Midwest's in-house three-hour autoclave sterilization cycle is the most meaningful quality differentiator. A lot of spawn bag sellers use shorter sterilization runs to speed up production, and that shows up as elevated contamination rates. Midwest's approach produces consistently clean grain, and the fresh-daily production claim means you're not getting bags that sat in a warehouse for months before arriving.
For beginners
If you're doing your first or second mushroom grow, Midwest Grow Kits spawn bags are one of the safest starting points available. If you want to judge whether a bag is worth it before buying, you can also look up gardzen grow bag reviews for real-world user experiences and results. If you're looking for more detailed grow bags reviews, it's worth comparing how different brands perform in real home setups. The combination of reliable sterilization, good bag construction, a self-healing port (no flame-sterilized scalpel cuts needed), and accessible pricing makes the learning curve much shorter. You can realistically get your first successful flush by following the steps above without any specialized equipment beyond a still air box and a syringe. If you want the full walkthrough and a hands-on mycohaus grow bag review-style assessment, keep reading for performance, reliability, and value. Expect colonization times of 2 to 3 weeks with spore syringes and 10 to 14 days with liquid culture.
For experienced growers
If you're already comfortable with grain-to-grain transfers, agar work, or running your own pressure cooker, you might find pre-sterilized spawn bags most useful as a time-saving backup rather than your primary production method. That said, the consistent quality makes them worth keeping on hand, especially for cultures you don't want to risk on a home-sterilized batch. The 5-grain formulation is slightly more interesting for experienced growers because the variety of grain types (typically including wheat berries, oats, millet, and sorghum) creates more surface area and faster mycelium spread compared to single-grain rye.
Value compared to DIY
The honest comparison is this: if you already own a pressure cooker and polyfill jars, you can sterilize your own grain for less per quart. But when you factor in the time, the failure rate of home sterilization, and the cost of contaminated batches that get thrown out, the pre-sterilized bags often pay for themselves. For most home growers running fewer than 10 bags at a time, buying from Midwest is the more cost-effective and less frustrating approach. For high-volume production, DIY sterilization becomes worth the investment in equipment.
Who it's best for
- First-time mushroom growers who want to minimize contamination variables and focus on learning the colonization and fruiting process
- Growers who don't own a pressure cooker and want a clean starting point without the equipment investment
- Experienced growers who want a reliable, consistent spawn source for valuable or hard-to-source cultures
- Anyone running oyster mushrooms, shiitake, lion's mane, or cubensis strains that colonize grain well
- Growers scaling up slowly who don't yet have the production volume to justify home sterilization equipment
A few practical tips to improve your results
Always use liquid culture over spore syringes when you can. The speed difference (often a full week faster) and consistency improvement are significant. If you're using spore syringes, make sure they're from a reputable source and have been stored correctly, because a weak or clumped spore syringe is one of the most common causes of poor colonization that gets blamed on the spawn bag itself.
Keep your colonization temperature consistent. If you're trying to dial in your setup with the right humidity and airflow, researching rain science grow bags reviews can help you compare real-world performance across bag styles. Swings between warm days and cold nights are more damaging than a steady temperature that's slightly outside the ideal range. A seedling heat mat set to 72°F under the bag works well if your room temps fluctuate.
Don't skip the break-and-shake step. It's the single biggest variable between a 14-day colonization and a 25-day colonization. Do it around the 30 to 40% colonization mark and you'll cut your total colonization time substantially.
If you're comparing spawn bag options across brands, the key variables worth checking are sterilization time and method, bag film quality and filter micron size, and freshness at the time of shipping. Midwest scores well on all three, which is why they've maintained a consistent reputation among home growers. If you want to narrow it down to the best choice, it helps to read root pouch grow bags reviews and compare results from real growers maintained a consistent reputation among home growers. Other grow bag suppliers offer products for different growing applications, from fabric grow bags for vegetables and herbs to specialty containers for trees and flowers, but for mushroom spawn specifically, Midwest's setup is purpose-built and well-optimized for the task.
FAQ
Can I store a Midwest spawn bag after inoculation if it’s not ready yet?
Yes, but only if you do it cleanly and promptly. If you’re moving or storing a partially colonized bag, keep it sealed and stable in temperature, avoid opening it, and do not introduce fresh injection holes. After storage, allow a few extra days for reknitting before you judge colonization speed, and discard any bag that develops new contamination patterns.
Is it okay to open the spawn bag to check the grain condition early?
Don’t. If you open the bag to inspect, you remove the controlled sterile environment and greatly increase contamination risk, especially for the first week. If you need to confirm progress, rely on the window and the filter patch area, and only use external observations to decide when to break-and-shake.
What should I do if the filter patch looks damaged or clogged?
Filter patch performance matters. If the filter patch gets clogged (for example from wet grain leaking onto it) or damaged, gas exchange can drop and colonization stalls or goes uneven. Handle the bag gently during shaking, keep it upright, and if you see obvious filter damage at arrival, treat that bag as higher risk and consider not using it for valuable cultures.
How do I tell stress metabolites from contamination when I see yellow liquid?
A small amount of yellowing or minor pooling can be normal stress, but large, widespread wet areas are a warning sign. Look for consistency: if liquid keeps expanding, grain texture turns slimy, or you smell sour or rotten odors, treat it as contamination or severe stress and discard rather than trying to salvage it.
If all my spawn bags fail, what are the most common causes besides the bag quality?
Your bag can fail even if it’s a good product. The most common causes are weak or improperly stored inoculants, temperature swings, and poor injection technique (over-injection, dirty work, or injecting too close to the outside seam). If multiple bags inoculated with the same batch show the same issue, the inoculant is usually the culprit.
Does break-and-shake timing differ when using liquid culture versus spore syringes?
Yes, and it changes your timeline. With liquid culture, you typically get faster, more uniform colonization, and you should be ready to break-and-shake a bit sooner. If you wait the usual timing from spore syringe grows, you can end up with tighter clumps than necessary and slower reknitting after shaking.
Can I mix a spawn bag into substrate if it’s not fully colonized?
You generally can, but avoid mixing a partially colonized bag blindly into bulk. The safer approach is to confirm it’s mostly clean and at least at the stage where it’s clearly colonizing the grain (not just cloudy liquid or slight haze). If you’re unsure, pause and troubleshoot temperature, then re-inoculate a replacement bag rather than risking the whole bulk substrate.
Is it worth saving a bag with small patches of green mold?
If you see green growth after the bag is otherwise thriving, sometimes it’s localized, but you cannot reliably “cut out” contamination from the grain. For best results, discard the entire bag into sealed trash and sterilize your work surfaces. Cutting out spots usually leaves contaminant fragments that spread into the bulk.
Can a contaminated spore syringe or liquid culture look fine at first?
Unlikely, but possible. Spores or LC can be contaminated and still look normal at first, especially if contamination is slow to develop. If you suspect your inoculant, test it on a small, separate setup (like a small agar or test spawn) before using it widely.
Are there smell cues that reliably predict contamination in spawn bags?
You should not rely on smell as your only diagnostic, because mycelium can have mild earthy odors. However, strong sour, ammonia-like, or putrid smells, paired with wet, disintegrating grain, strongly indicates contamination. If odor is concerning, treat it as suspect and visually check for color changes and spreading growth.
What’s the best way to break up a fully colonized, clumped spawn bag before mixing?
If a bag is fully colonized and clumped, you can knead it by hand before opening as the article suggests, but be gentle. Excessive handling while fully colonized can create overly wet areas and increase stress during bulk mixing. Aim for even breakup, then move quickly to your substrate so the grains don’t sit exposed.
Why might my colonization be consistently slower than expected even with multiple bags?
Liquid culture can sometimes mature slowly if the LC was old or poorly aerated, and spores are more variable by nature. If you consistently see longer-than-expected timelines across multiple bags with the same inoculant, consider changing the culture source and reviewing storage conditions for the syringe (warm and dark storage issues can reduce viability).
What are the most common inoculation mistakes when using a still air box?
If you’re using a still air box, the biggest practical mistake is touching the injection port, filter area, or inside of the port with tools or your gloves. Keep the port clean, use a light touch, and avoid moving the bag around while injecting. Also, label bags by inoculant batch so you can identify which syringe or LC correlates with any issues.
Next Articles
MycoHaus Grow Bag Review: Setup, Yields, Pros and Tips
MycoHaus grow bag review with setup, expected yields, pros and cons, plus contamination tips and first flush steps
Root Pouch Grow Bags Reviews: Best Sizes, Features, and Tips
Root pouch grow bags reviews with size picks, key features, tradeoffs, and troubleshooting for vegetables, flowers, tree
Grow Bags Reviews: Best Fabric and Plastic Picks
Expert grow bags reviews for fabric and plastic types, drainage, durability, sizing, setup, and troubleshooting by plant