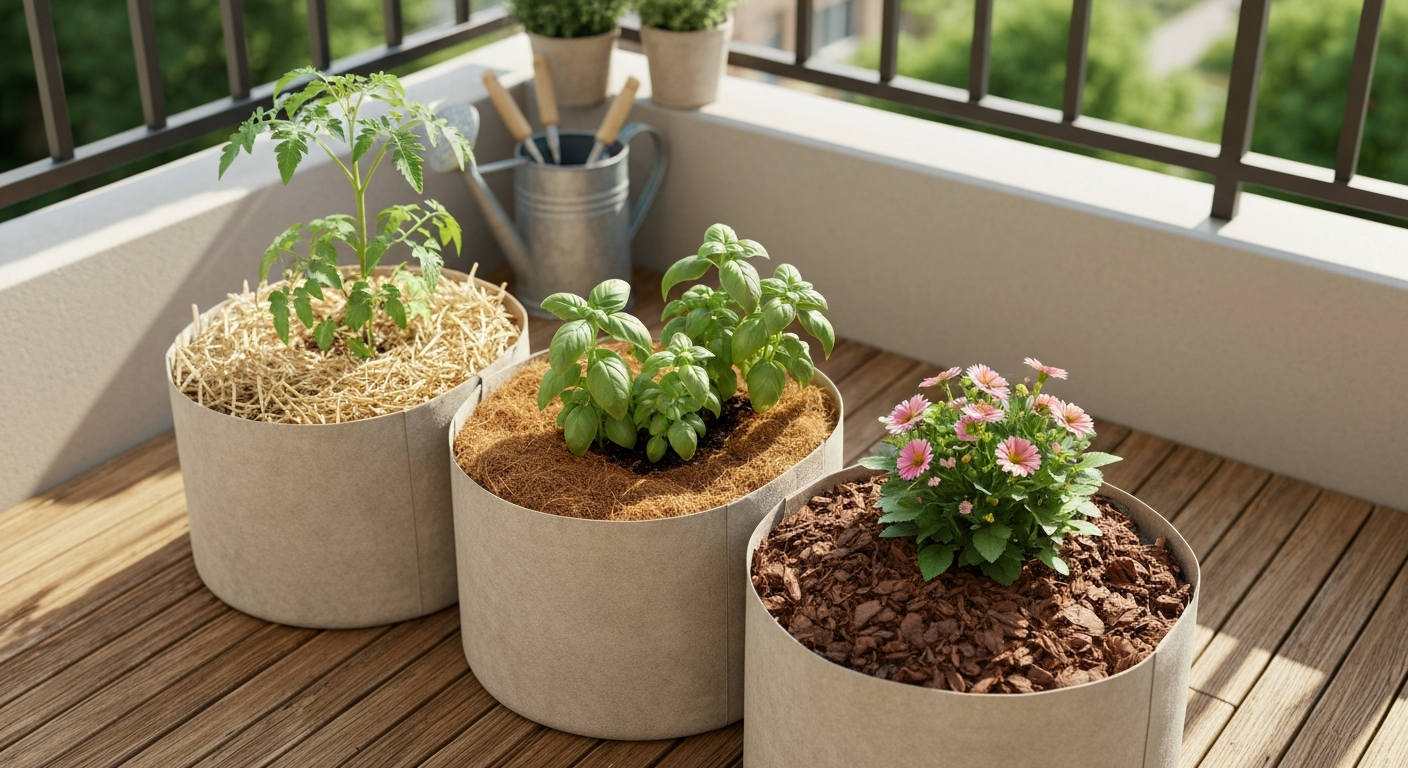
The best all-around mulch for fabric grow bags is straw or coconut coir applied in a 1 to 2 inch layer over the soil surface. Both materials hold moisture without matting, stay light enough to avoid compacting the mix below, and are easy to work with in a container context. That said, the right choice depends on what you are growing, where you are growing it, and how much maintenance you want to do. This article walks through every common mulch type, explains what actually happens when you mulch a grow bag, and gives you a clear recommendation for each growing goal.
Best Mulch for Grow Bags: Top Picks for Vegetables & Flowers
Marcus Holloway
7 Aug 2026
Quick picks by goal
| Goal | Best mulch | Notes |
|---|---|---|
| Best for moisture retention | Coconut coir | Holds roughly 4 lb of water per lb of dry material; outperforms most organic mulches on water retention |
| Best for hot climates | Straw | Reflective and loose; keeps roots cooler than wood chips or gravel; easy to replace mid-season |
| Best low-maintenance | Shredded bark (aged) | Breaks down slowly; needs refreshing once or twice a season rather than every few weeks |
| Best for flowering plants | Compost top-dress | Feeds and mulches in one step; pairs well with a dedicated fertilizer schedule |
| Best budget option | Straw | Widely available, cheap by the bale, and can be composted at end of season |
Why mulching a grow bag actually matters
Grow bags already have better drainage and air pruning than plastic pots, but those same properties mean they dry out faster. Fabric walls wick moisture outward, and the open-weave surface exposes the growing medium to air from every direction. On a hot day, a 7-gallon fabric grow bag sitting in full sun can lose water at a rate that would leave roots stressed before you get home from work. Mulch addresses this, but it works differently in a small container than it does in a garden bed, so it is worth understanding exactly what it does and does not do.
Moisture retention
A mulch layer on top of your growing mix reduces surface evaporation by shading the soil and slowing air movement across it. Research by Gilman et al. found that surface evaporation is actually a small fraction of total water loss from containerized root balls compared with transpiration through plant leaves. That is useful context: mulch is not a replacement for regular watering. What it does do is smooth out the spike-and-crash cycle between waterings, giving roots a more consistent environment. In practice, most growers report needing to water 20 to 30 percent less frequently after mulching, especially in summer.
Temperature moderation
The walls of a fabric grow bag absorb heat quickly in direct sun. An organic mulch layer on the surface buffers that thermal swing, keeping the root zone a few degrees cooler on hot days. Gravel or stone does the opposite: studies consistently show that gravel mulch raises daytime surface and near-surface soil temperatures compared with organic mulches or bare soil. If you are growing heat-sensitive crops like lettuce, herbs, or strawberries, a light organic mulch is genuinely helpful. For heat-lovers like tomatoes and peppers, the temperature benefit is less critical, but moisture consistency still matters.
Weed suppression
Weeds in grow bags are less of a problem than in garden beds, but wind-blown seeds do land in exposed soil and germinate readily in the warm, fertile mix you have built. A 2023 Frontiers in Agronomy review found that applying tree-derived mulch at around 2 inches (5 cm) provides effective long-term weed control in container production. A 1-inch layer of coarse bark reduced weed seedling counts by roughly 90 percent in UC Davis nursery trials. You do not need to go thick: 1 to 2 inches handles weeds in a grow bag without creating the aeration problems that come with deeper layers.
Root zone protection
Roots in grow bags sit close to the surface because most containerized mixes are relatively shallow compared to open ground. A mulch layer acts as a physical buffer against temperature extremes, heavy irrigation impact (which can compact the surface and splash mix out of the bag), and the drying effect of wind. For perennial crops you overwinter in bags, like dwarf fruit trees or ornamental grasses, mulch also provides modest frost protection for the uppermost root layer.
How to choose the right mulch for your grow bags
Not every mulch that works in a garden bed translates well to a grow bag. The volume is small, the mix is already engineered for drainage and aeration, and anything you add to the surface affects that balance. Here are the criteria I weigh when picking a mulch for a specific grow bag setup.
- Moisture control: Does the mulch hold water without forming an impermeable mat? Finely textured materials like fresh grass clippings and uncomposted straw can mat down and actually intercept irrigation, leaving the root zone drier than expected.
- Weight: Heavy mulches like gravel add significant mass to a bag you may need to move. Straw, coir, and shredded leaves keep things manageable.
- Decomposition rate: Fast-decomposing materials like compost and grass clippings need more frequent topping off. Slow materials like bark or gravel need less attention but contribute fewer nutrients.
- Nutrient effects: Wood-derived mulches (chips, bark, sawdust) have high carbon-to-nitrogen ratios. Research shows they can immobilize nitrogen in the substrate beneath them, so if you are using wood-based mulch on edible crops, plan to supplement nitrogen more frequently.
- Pest risk: Dense organic mulches close to the soil surface can harbor slugs, pill bugs, and fungus gnats. Keep the mulch loose and avoid piling it against plant stems.
- Aesthetics: For patio or deck grow bags, appearance matters. Shredded bark and coconut coir look tidy; straw looks rustic; grass clippings look messy within a week.
Comparing common mulch types at a glance
| Mulch | Moisture retention | Weight | Decomposition | N tie-up risk | Pest risk | Best for |
|---|---|---|---|---|---|---|
| Straw | Good | Light | Moderate (1 season) | Low | Low-moderate | Vegetables, herbs, hot climates |
| Coconut coir | Excellent | Light | Slow | Low | Low | Any crop; especially moisture-sensitive |
| Wood chips | Moderate | Medium | Slow (1-3 yrs) | High | Moderate | Perennials, small trees in bags |
| Shredded bark | Moderate | Medium | Slow | Moderate | Low-moderate | Ornamentals, low-maintenance setups |
| Compost | Good | Medium | Fast | None (adds N) | Low | Flowering plants, edibles needing a feed boost |
| Leaf mulch (shredded) | Good | Light | Moderate | Low-moderate | Moderate | Budget option; great for fall/winter bags |
| Grass clippings | Poor-moderate (mats) | Light | Very fast | Low | Moderate-high | Avoid unless dried and thinly applied |
| Gravel/decorative stone | Poor | Heavy | None | None | Low | Decorative pots; avoid for edibles in heat |
| Landscape fabric | Poor (blocks water if wrong type) | Light | None | None | Low | Not recommended inside grow bags |
Straw: the reliable workhorse
Straw is my go-to recommendation for most vegetable grow bags, especially tomatoes, peppers, cucumbers, and squash. It is loose enough that water moves through it freely, light enough that you can replenish it without adding much weight, and cheap enough that you can replace it whenever it gets matted or breaks down. A bale costs a few dollars and covers a lot of bags. Use wheat or oat straw rather than hay: hay contains seeds that will germinate enthusiastically in your grow bag mix.
Benefits of straw in grow bags
- Stays loose and does not compact easily, so water infiltration remains consistent
- Reflective color keeps the root zone noticeably cooler in direct summer sun
- Breaks down slowly enough to last most of a growing season with one or two top-offs
- Carbon-to-nitrogen ratio is lower than wood products, so nitrogen tie-up is minimal
- Compostable at end of season alongside the spent growing mix
Drawbacks of straw
- Can blow around on windy patios or balconies; tuck it in around plant stems to anchor it
- Looks informal, which some growers dislike on a deck or entryway
- Needs replacing more often than bark mulch because it breaks down within a season
- Hay (not straw) will introduce weed seeds; always check the label before buying
Apply straw at 1 to 2 inches deep, keeping it pulled back about half an inch from the main stem. For tomatoes and peppers in large grow bags (10 gallons and up), a 2-inch layer in midsummer makes a noticeable difference to how often you need to water. Refresh when the layer compresses to less than half an inch.
Wood chips and shredded bark: low effort, slow and steady
Wood chips and shredded bark are better suited to grow bags containing perennials, small ornamental trees, or shrubs than to annual vegetable crops. They decompose slowly, look tidy, and need topping off only once or twice a season. The trade-off is a real one though: the high carbon-to-nitrogen ratio in wood-based materials can tie up available nitrogen in the substrate, meaning your plants may show deficiency symptoms even when you have fertilized correctly. Research published in the International Journal of Agronomy confirms this nitrogen immobilization effect in container substrates with wood-derived components.
Benefits of wood chips and shredded bark
- Slow decomposition means less frequent replenishment compared with straw or compost
- Tidy, attractive appearance that suits ornamental containers on patios
- Good weed suppression at 2 inches, consistent with nursery trial findings
- Aged or partially composted bark has reduced nitrogen tie-up risk compared with fresh chips
Drawbacks of wood chips and shredded bark
- Fresh wood chips can immobilize soil nitrogen, causing yellowing leaves in nitrogen-sensitive crops
- Heavier than straw or coir, which matters if you move your grow bags regularly
- Can harbor fungus gnats and slater bugs if kept too moist and thick
- Not ideal for annual vegetables where rapid nutrient cycling is important
If you do use wood chips on vegetable grow bags, use aged or double-shredded bark and increase your nitrogen feeding to compensate. Extension guidance and the research consistently align on 1 to 2 inches as the target depth for containers: deep enough for weed control, shallow enough that aeration and soil warming are not compromised. Keep the mulch away from stems entirely, as piling bark against a stem creates conditions for rot. For perennial trees and shrubs in large fabric grow bags, a 2-inch layer of aged bark chips is a genuinely practical, low-maintenance choice.
Compost as a mulch and top-dress: when it feeds as much as it protects
Using a thin layer of finished compost on the surface of a grow bag blurs the line between mulching and amending. At half an inch to 1 inch thick, it acts as a light mulch while simultaneously releasing nutrients into the mix with every watering. This is particularly effective for flowering plants and heavy-feeding edibles mid-season when the original growing mix is starting to run low on nutrients. It is not a replacement for a structured fertilizer plan, but it complements one nicely.
Benefits of compost top-dressing
- Adds organic matter and nutrients with every watering cycle
- Improves surface structure of the mix over time, reducing crusting
- Works well for flowering annuals and perennials that benefit from mid-season nutrition
- No nitrogen tie-up; mature compost typically adds available nitrogen
Drawbacks and cautions with compost
- Decomposes quickly, so mulching benefit is short-lived compared with bark or coir
- Some municipal and food-waste composts may contain PFAS contaminants or persistent herbicide residues; for edible crops, use well-sourced compost from a trusted supplier
- Compost made from grass clippings or manure from properties where pyridine herbicides (clopyralid, aminopyralid) were used can cause distorted growth in susceptible plants; if in doubt, do a quick bioassay before applying to edibles
- Can become hydrophobic if it dries out completely; water thoroughly before applying as a surface layer
For flowering plants, a half-inch compost top-dress every four to six weeks works well alongside a dedicated fertilizer schedule. For vegetables, I treat compost as a light amendment rather than a primary mulch: apply it, then add a thin layer of straw or coir on top to capture the actual moisture-retention benefit while the compost feeds from below. Recent EPA technical reviews note that municipal and some food‑waste composts can contain persistent contaminants such as PFAS and recommend using tested, well‑documented compost sources for edible crops and avoiding biosolids‑derived amendments when concerned. When soil composition matters for your grow bag setup, choosing a quality growing mix upfront reduces how much corrective top-dressing you will need throughout the season.
Other mulch options worth knowing about
Coconut coir
Coir deserves special mention because its water-holding capacity is genuinely impressive. UF/IFAS data puts it at around 4 lb of water per lb of dry material, compared with roughly 0.8 lb for peat. As a surface mulch in a grow bag, coir holds moisture longer than almost any other option, stays loose, and looks clean and neutral. The one watch-out is salt content: commercial coir products can have elevated electrical conductivity, and some suppliers recommend buffering or rinsing it before using on salt-sensitive crops. Source low-EC coir if you are growing leafy greens, herbs, or strawberries.
Shredded leaves
Shredded autumn leaves are a free, effective mulch that most gardeners overlook. Run them through a mower or leaf shredder first: whole leaves can form a wet, matted layer that blocks water the same way grass clippings do. Shredded, they stay loose and decompose at a moderate rate, adding a bit of organic matter back to the mix. They work well for fall and winter grow bags and for any edible crop where you want a budget-friendly moisture buffer.
Grass clippings
Fresh grass clippings mat down within a few days, forming a layer that intercepts water rather than letting it through. Gilman et al. Gilman et al. (2012), in Impact of Mulch on Water Loss from a Container Substrate and Native Soil, Gilman et al. (2012), note that fine, matted mulches can impede water infiltration and intercept irrigation or rainfall, producing dry root-balls in containers Impact of Mulch on Water Loss from a Container Substrate and Native Soil — Gilman et al. (2012). specifically identified matting as a practical cause of dry root balls in mulched containers. If you want to use clippings, dry them first and apply very thinly (half an inch or less). Also avoid clippings from any lawn treated with broadleaf herbicides in the past year, as pyridine-class herbicides like clopyralid and aminopyralid can survive composting and cause damage to tomatoes, peppers, and other sensitive edibles.
Gravel and decorative stone
Gravel looks sharp on ornamental patio containers, but it is a poor choice for most grow bags. It adds weight, does not retain moisture, and research consistently shows it raises near-surface soil temperatures during the day rather than moderating them. It is worth noting that gravel placed at the bottom of a container (a common DIY practice) actually creates a perched water table and worsens drainage, as NC State Extension has documented. Gravel on the surface is not harmful in the same way, but it provides minimal functional benefit for edible grow bags.
Landscape fabric and plastic
Landscape fabric is a useful tool in certain grow bag contexts, particularly for weed suppression around bags placed directly on the ground, but it does not belong inside a grow bag as a surface mulch. Plastic mulch raises soil temperatures (which benefits heat-loving crops in cold climates but harms them in summer heat), and both materials can block water infiltration if applied incorrectly. The grow bag format already handles many of the problems landscape fabric is designed to solve in garden beds.
Plant-specific recommendations
| Crop/Plant type | Recommended mulch | Depth | Notes |
|---|---|---|---|
| Tomatoes | Straw or coconut coir | 1.5–2 in | Prioritize moisture consistency; avoid piling against stem |
| Peppers | Straw | 1–2 in | Reflective straw helps keep roots cool on hot patios |
| Herbs (basil, cilantro, parsley) | Coconut coir or shredded leaves | 1 in | Low-EC coir for salt-sensitive herbs; thin layer to avoid stem rot |
| Leafy greens (lettuce, spinach) | Coconut coir or straw | 1 in | Keep loose; greens need consistent moisture but hate waterlogging |
| Flowering annuals | Compost top-dress + light straw layer | 0.5–1 in compost + 0.5–1 in straw | Compost feeds; straw layer on top retains moisture |
| Strawberries | Straw | 1–1.5 in | Classic combination; tuck under fruits to keep them clean |
| Dwarf fruit trees / perennials in bags | Aged shredded bark | 2 in | Slow decomposition suits long-term growing; supplement N |
| Potatoes | Straw (also useful for hilling) | 1.5–2 in on top and around sides | Straw can be used to hill up around foliage as well as mulch |
How to apply mulch to a grow bag: step by step
- Water the grow bag thoroughly before mulching. Applying mulch to dry soil traps the dry condition underneath and makes it harder to re-wet the mix.
- Check the soil surface for any debris, old root material, or fungal growth and clear it off before adding a fresh layer.
- Apply 1 to 2 inches of your chosen mulch evenly across the surface. For fine-textured materials like coir or shredded compost, stay closer to 1 inch. For loose materials like straw, 2 inches is fine.
- Keep mulch at least half an inch away from plant stems and pulled back from the rim of the bag by an inch so water from overhead irrigation enters the mix rather than running off the outside.
- Water again gently after applying the mulch layer to settle it slightly and confirm water is penetrating through to the root zone below rather than running off the surface.
- Check the mulch every 2 to 3 weeks. Top off when the layer has compressed below half an inch or when the surface looks bare.
- At end of season, remove the mulch and either compost it (for organic types) or store it for reuse next season (for coir or bark).
Mulch and fertilizer: how they interact in grow bags
Grow bags have limited soil volume, which means nutrients deplete faster than in garden beds. Extension guidance consistently recommends either incorporating a slow-release fertilizer into the mix at planting or feeding with a water-soluble product every two to three weeks throughout the growing season. For specific fertilizer recommendations, see our guide to the best fertilizer for grow bags, which covers slow-release mixes and water-soluble options. Mulch does not change that calculus much for most organic types, but wood-derived mulches are a notable exception: their high carbon-to-nitrogen ratio draws available nitrogen out of the substrate as they decompose. If you are using wood chips or fresh bark on vegetable grow bags, increase your nitrogen feeding frequency to compensate. Compost top-dressing does the opposite, adding a small but useful nitrogen contribution with each watering cycle, which can reduce (but not eliminate) the need for supplemental feeding.
Troubleshooting common mulch problems in grow bags
Mulch is dry on top but the root zone is also dry
This is the matting problem identified in container research. Fine-textured or wet-applied mulches (fresh grass clippings, compressed straw, fine compost that has dried into a crust) can intercept irrigation water and shed it over the sides of the bag. The fix is to remove the matted layer, loosen the surface, water the root zone directly, and replace with a coarser, looser mulch. You can also poke a few holes through the mulch layer with a finger or pencil before watering to help water penetrate.
White mold or fungal growth on the mulch surface
Superficial white mycelium on organic mulches (especially straw and bark) is usually harmless saprophytic fungi breaking down the mulch. It becomes a problem when mulch is applied too thickly, stays continuously wet, or is piled against stems. Thin the layer to 1 inch, improve air circulation around the bag, and pull the mulch slightly away from stems. If you are seeing damping off or crown rot at the soil line, that is a separate issue related to overwatering rather than the mulch itself.
Slugs and pill bugs
Moist organic mulch is good slug habitat. On a patio, this is manageable: keep the mulch layer on the drier side (1 inch rather than 2), elevate bags on pot feet or a stand if slugs are a persistent issue, and avoid mulching right up against low-hanging foliage. Iron phosphate slug bait is safe to use around edibles and can be scattered on the mulch surface if you are getting damage.
Yellowing leaves after adding wood chip mulch
Almost certainly nitrogen deficiency from the nitrogen immobilization effect described above. Switch to a nitrogen-rich liquid feed (a fish emulsion or balanced NPK soluble feed works well), increase feeding frequency temporarily, and consider replacing the wood chip mulch with straw or coir for vegetable crops. Aged or composted bark mulch has a reduced but not eliminated version of this issue.
A simple decision guide for choosing your mulch
If you are not sure where to start, run through these three questions. First: is the grow bag in a hot, exposed location where roots will cook in summer? Choose straw or coir. Second: are you growing perennials or ornamentals that you want to look tidy with minimal upkeep? Choose aged shredded bark. Third: are you growing heavy-feeding flowering plants or fruiting vegetables in the second half of the season? Use a thin compost top-dress with a light straw or coir layer on top. For everything else, straw is the practical default: cheap, effective, and forgiving.
Putting it all together
Mulching a fabric grow bag is a small effort with a meaningful payoff, especially in summer heat. The main rules are simple: keep the layer at 1 to 2 inches, choose a loose open-textured material that lets water through freely, stay away from plant stems, and top it off when it compresses. Match the mulch to your crop (straw or coir for vegetables, aged bark for ornamentals and perennials, compost top-dress for flowering plants needing a nutritional boost) and you will see the difference in how consistently your plants grow between waterings. See our guide to the best flowers for grow bags for specific plant recommendations and care tips. Pair your mulching approach with a solid growing mix and a consistent fertilizer schedule, and your grow bags will perform well through the whole season. For recommendations on selecting a solid growing mix, see our guide to the best soil for grow bags.
FAQ
What's the single best mulch for fabric grow bags?
There isn't a one-size-fits-all single best mulch. For most home gardeners aiming to retain moisture, suppress weeds, and moderate temperature in fabric grow bags, a 1–2 in. top layer of aged, coarse coconut coir or shredded bark/pine bark is the best compromise: coir holds water very well and is low‑mess; shredded bark provides durable weed control and resists matting. Choose coir for maximum moisture, shredded bark for long‑lasting, low‑maintenance coverage.
Which mulches are best for specific goals (moisture retention, hot climates, low maintenance, flowering plants, budget)?
Best for moisture retention: coconut coir (or coir + compost topdress). Best for hot climates/temperature moderation: organic, light-colored mulches (straw or shredded bark) — avoid dark rocks that increase heat. Best low‑maintenance: coarse wood chips or shredded bark at 1–2 in. Best for flowering ornamentals: fine shredded bark or well‑aged compost (thin topdress) to encourage blooms without matting. Best budget option: well‑aged leaf mulch or clean straw (ensure no herbicide contamination).
How do organic and inorganic mulches compare in grow bags?
Organic mulches (bark, straw, leaf mulch, compost, coir, grass clippings) generally retain moisture, moderate temperature, improve over time, and suppress weeds; they may slowly release nutrients or, if high C:N (fresh wood chips), temporarily immobilize nitrogen unless supplemented. Inorganic mulches (gravel, landscape fabric, plastic) suppress weeds but retain less moisture, can increase soil temperatures (gravel/black plastic), and do not improve substrate structure. In containers, avoid heavy gravel layers intended to increase drainage — they create a perched water table and don't help root health.
How thick should mulch be on fabric grow bags and does mulch depth differ by type?
Recommended mulch depths for fabric grow bags: fine‑textured or shredded materials (coir, compost, grass clippings): 1–2 in. Coarse materials (wood chips, coarse bark): 1–3 in. Straw or leaf mulch: 1–3 in. Very thick layers (>4 in.) risk reducing aeration, warming problems, or matting; very thin layers (<1 in.) give limited weed control. Avoid piling mulch against stems/trunks.
Will mulch prevent watering? How do I water through mulch in grow bags?
Some mulches (fresh straw, uncomposted grass clippings, paper layers) can form a mat that repels or intercepts water; in containers this can cause the root zone to dry. To avoid that: use well‑shredded or aged materials, keep mulch layers looser, poke a few small holes through the mulch before irrigating, or periodically water until you see even drainage from the bag. If matting occurs, rake aside, loosen or replace the material.
Do mulches interact with fertilizers or cause nutrient problems in grow bags?
Yes. High C:N wood materials and fresh wood chips can immobilize mineral nitrogen as they decompose — offset by using aged/processed bark or supplying extra nitrogen (fertilizer). Coconut coir is neutral but can have elevated soluble salts (EC) in some commercial products; rinse or source low‑EC coir for sensitive edibles. Compost/topdress adds nutrients but use tested, reputable compost (avoid suspected PFAS or persistent herbicide contamination). For container crops, follow a container‑appropriate fertilization program (incorporated slow‑release fertilizer or regular soluble feedings) because potting media have limited nutrient reserves.
Next Articles
Best Flowers for Grow Bags: Top Picks, Soil & Care Guide DIY
Best flowers for grow bags: top annuals, perennials, bulbs & trailers; soil, fertilizer, planting and care checklists.
Best Landscape Fabric for Grow Bags: Buy and Install Guide
Choose the best landscape fabric for grow bags with weed-blocking, drainage and aeration tips plus DIY install steps.
Best Soil for Grow Bags: Mix Recipes and How Much to Add
Best soil for grow bags: mix recipes, how much to add by bag size, and vegetable tweaks for strong drainage and yield.