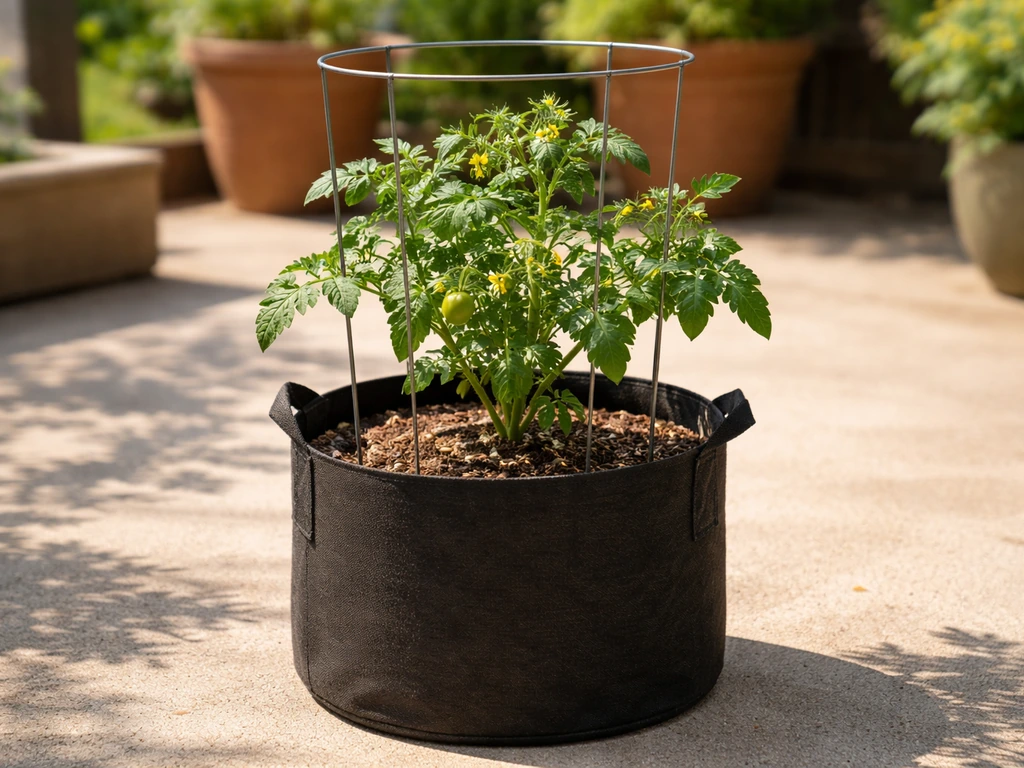
The Gardener's Best Tomato Grow Bag Kit from Gardener's Supply is a 12.5-inch diameter, 20-quart fabric grow bag paired with their Power Tower cage, a 5-foot integrated support system that anchors directly into four sewn channels inside the bag. It's a self-contained setup designed for one compact tomato plant per bag, and it works best for determinate or bush varieties. If you want to skip sourcing a separate cage and a separate bag and just get growing, this kit makes that easy. But knowing how to set it up correctly, water it consistently, and troubleshoot the issues specific to fabric containers is what separates a disappointing harvest from a genuinely productive one.
Gardener's Best Tomato Grow Bag Kit: Setup and Care Guide

Marcus Holloway
1 Jun 2026
What the kit includes and who it's actually for
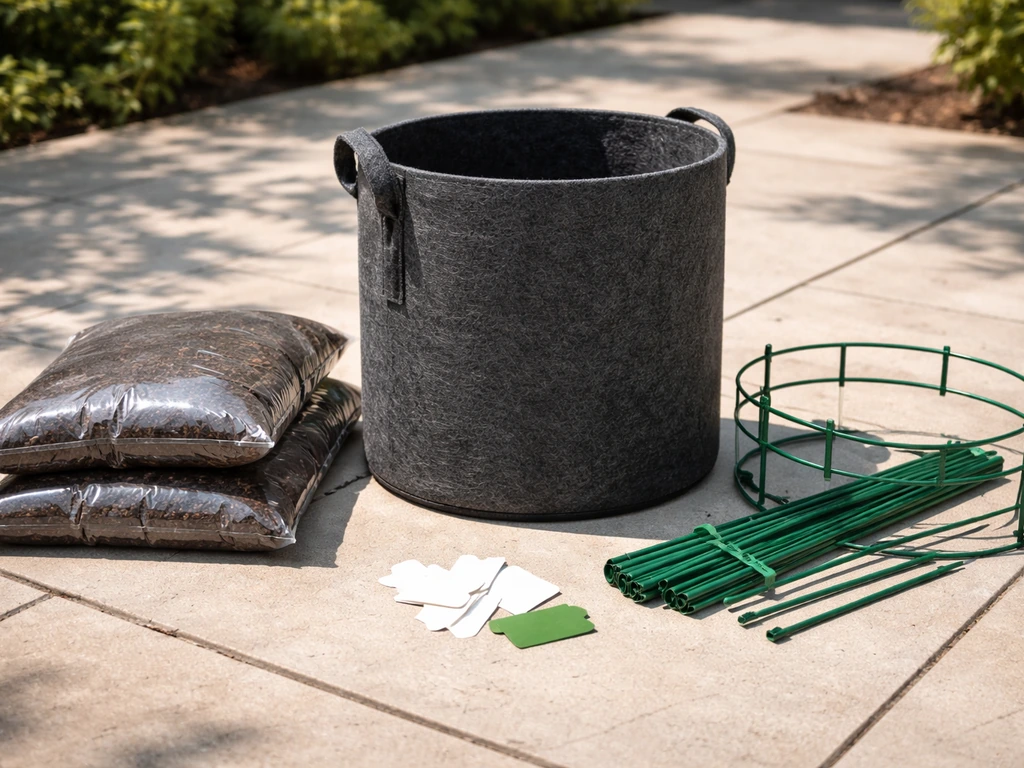
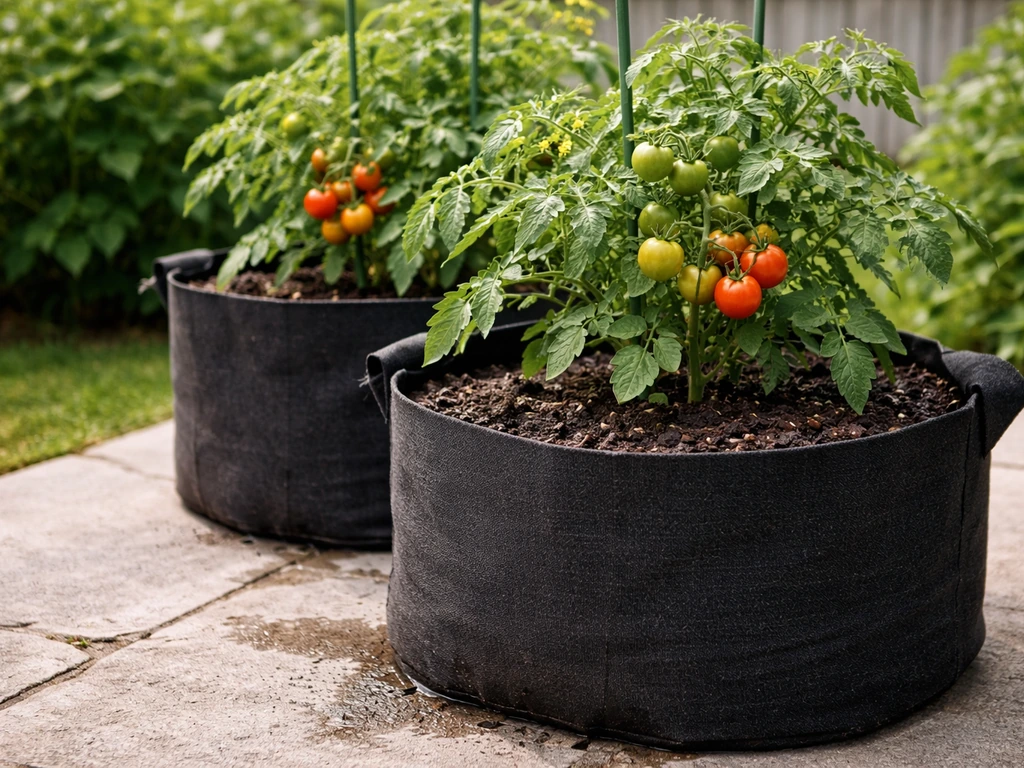
The core of the kit is that fabric grow bag made from BPA-free polypropylene with a thick, felt-like texture. It has double-sewn internal channels specifically sized for the Power Tower cage poles, plus nylon handles that run top to bottom so you can actually move the bag once it's planted without the handles tearing off. The Power Tower cage itself consists of 5 support rings and 8 poles (4 lower poles with no connectors, 4 upper poles with connectors), assembling to a full 5-foot height. The brand also provides a downloadable PDF instruction sheet and links to companion articles on pruning, troubleshooting, and growing from seed.
This kit is genuinely well-suited to anyone without in-ground garden space: balcony growers, renters, people who want to move their tomatoes to chase sunlight, or anyone who has dealt with soil-borne disease in the ground and wants a clean start each year. The fabric's air-pruning effect stops roots from circling and getting root-bound the way they do in plastic pots, and the drainage prevents the waterlogged soil that kills more container tomatoes than almost anything else. That said, it's not the right choice for large indeterminate varieties like Brandywine or most heirloom beefsteaks, which need significantly more root volume than 20 quarts can support through a full season.
Choosing the right size and fabric setup for tomatoes
The kit bag is 12.5 inches in diameter and 11 inches tall, holding 20 quarts of potting mix. For compact determinates, cherry tomatoes, or patio varieties, that's workable. The fabric construction (BPA-free polypropylene with that felt-like wall) handles both aeration and drainage well. The patented fabric allows excess water to drain away and prevents heat build-up inside the root zone, which is a genuine advantage over black plastic containers sitting on a hot deck.
If you're planning to grow a larger indeterminate variety and want to use the Power Tower cage with it, you'd need a bigger grow bag than this kit provides. Indeterminate tomatoes benefit from at least 15 to 20 gallons of root space (roughly 60 to 75 quarts), and the kit's 20-quart bag just isn't enough for a plant that will keep producing until frost. For those varieties, you'd be better served looking at larger standalone fabric grow bags and adding your own support. The kit as sold is genuinely best for one determinate or bush plant per bag, as the instructions explicitly recommend.
| Tomato Type | Kit Suitable? | Recommended Volume | Notes |
|---|---|---|---|
| Determinate / Bush | Yes | 20 quarts (kit size) | One plant per bag; ideal use case |
| Cherry / Patio | Yes | 20 quarts minimum | Works well; may dry out faster in heat |
| Indeterminate / Heirloom | No | 60–75 quarts (15–20 gal) | Needs a larger grow bag than kit provides |
| Compact Indeterminate (e.g. Tumbling Tom) | Marginal | 20–40 quarts | Monitor closely for root restriction late season |
Setting up the kit and planting your tomato
The setup process is straightforward, but a few steps matter more than they look. If you need exact tomorite grow bag instructions, follow the steps in your kit's PDF sheet and adjust watering for your local temperature and sunlight. Follow this order and you'll avoid the most common assembly frustrations.
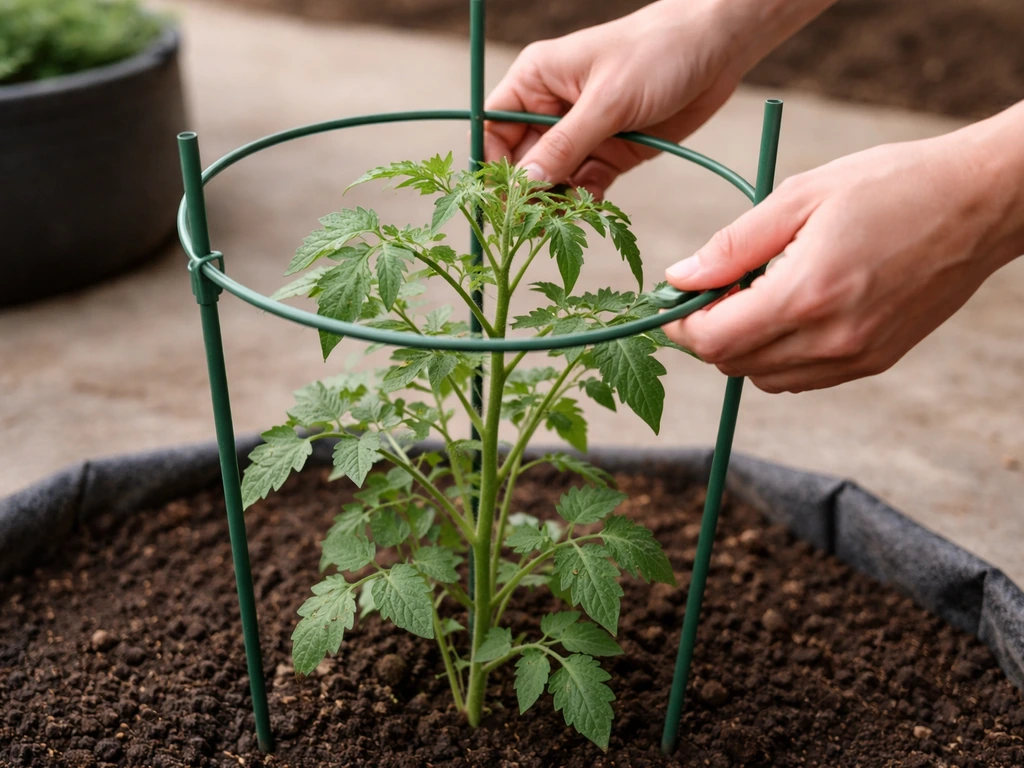
- Assemble the lower cage section first: insert the 4 lower poles (no connectors) into the four double-sewn channels on the inside of the grow bag, making sure each pole is fully seated at the bottom of its channel.
- Slide two support rings over the lower poles with the smooth side facing up and the ridged side facing down, then snap them into place at a low position to stabilize the structure.
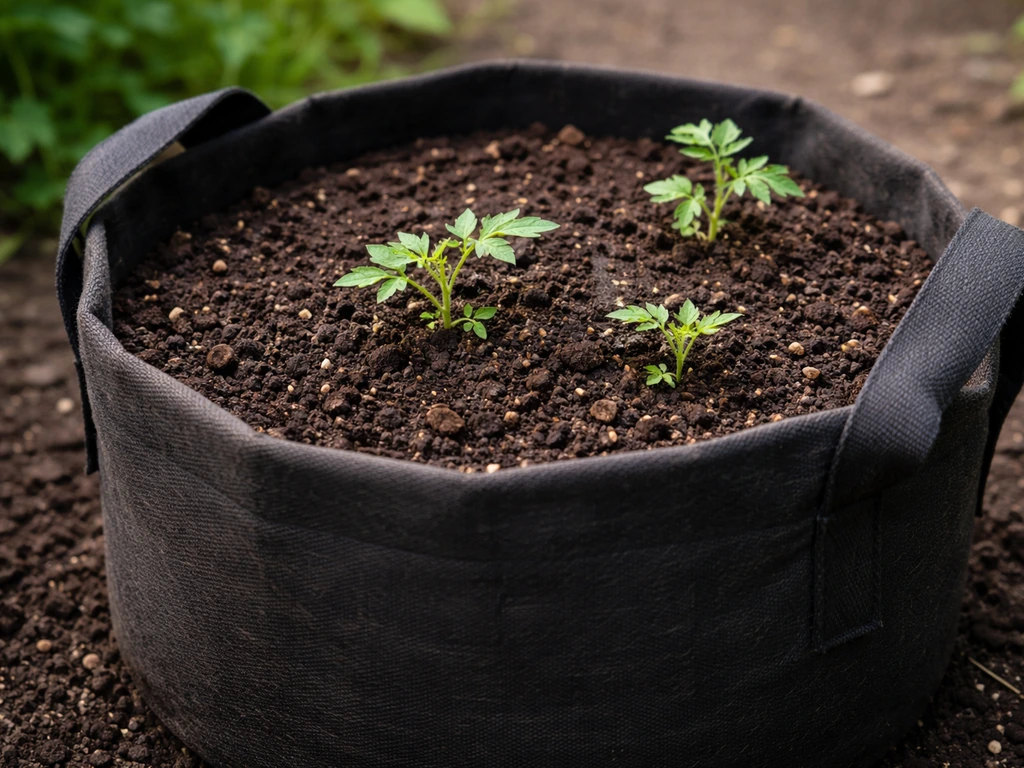
- Fill the grow bag with 20 quarts of soilless potting mix (the brand recommends their Container Mix or Organic Container Mix). Fill to within 1 to 2 inches of the top rim, not all the way to the edge.
- Plant one tomato plant per bag, centered. Bury the stem deeply if the transplant is leggy; tomatoes root along buried stem sections, which helps with stability in a smaller volume.
- Water thoroughly until water drains freely from the sides and base of the fabric bag. This confirms your mix is fully hydrated and the drainage is working.
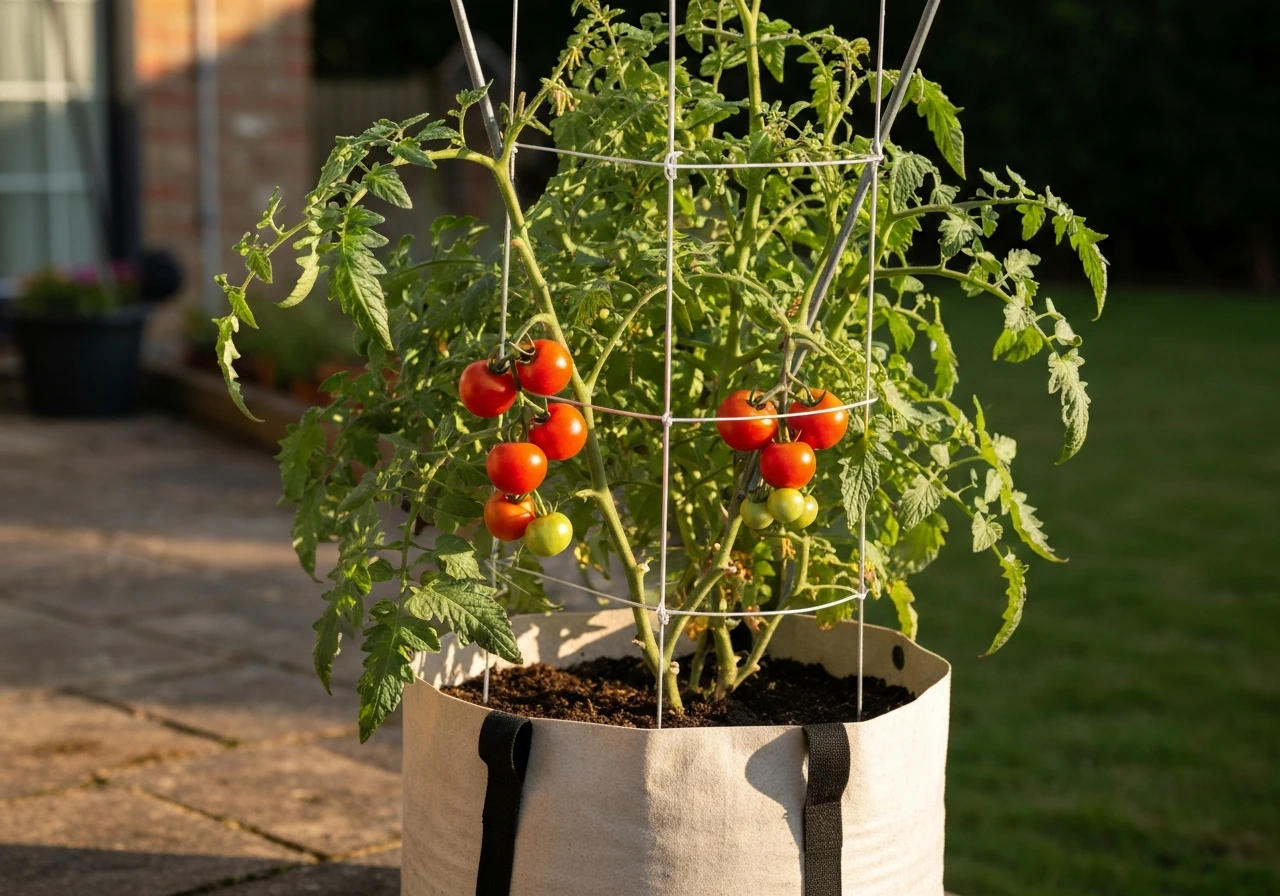
- Attach the 4 upper poles to the lower poles using the connectors, then slide the remaining 3 support rings up the upper poles at even intervals.
- If you're in a windy location, stake or anchor the cage to a nearby post or fence. The official instructions specifically warn about this, and a 5-foot cage in a relatively light 20-quart bag can tip in strong wind.
Place the planted bag in its final position before you fill it, if possible. Twenty quarts of wet potting mix is heavy. The nylon handles are built to handle the load, but it's easier to position first and fill in place. Also check your sunlight: tomatoes want at least 6 to 8 hours of direct sun per day, and one of the real advantages of grow bags is being able to shift them to track that.
Day-to-day care: watering, feeding, sunlight, and staking
Watering
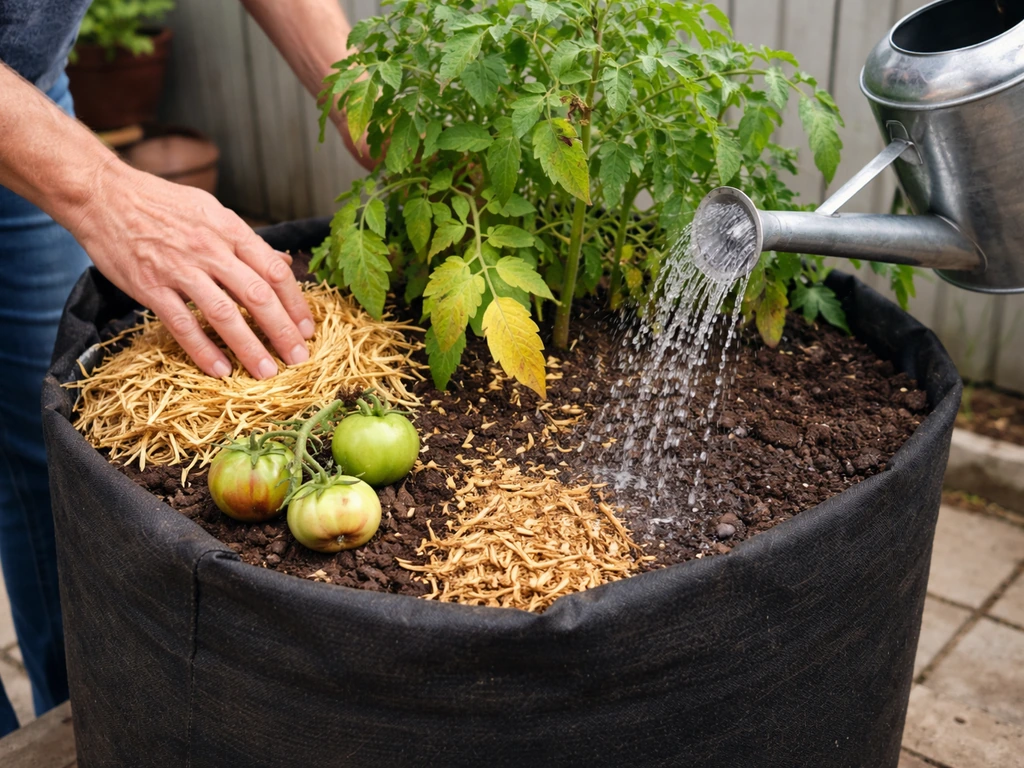
Fabric grow bags dry out faster than plastic pots because moisture evaporates through the walls, not just the top surface. In warm weather, a 20-quart bag in full sun can need watering once or even twice a day.
If you want a more exact schedule for your conditions, see how often to water tomatoes in grow bags based on sun, temperature, and bag size In warm weather, a 20-quart bag in full sun can need watering once or even twice a day. . The rule of thumb is simple: water until it drains freely from the base and sides, which confirms you've saturated the whole root zone rather than just the top few inches.
Inconsistent watering is the main cause of blossom-end rot in container tomatoes, and it also causes ripening fruit to split. Check the bag daily by pressing your finger an inch or two into the soil surface. If it's dry at that depth, water.
A drip irrigation system or self-watering insert makes consistency much easier and is worth considering if you're away from home regularly. You can also mulch the top of the bag with a thin layer of straw or shredded leaves to slow surface evaporation without blocking air exchange.
Feeding

Container tomatoes need more frequent feeding than in-ground plants because nutrients leach out with every watering. A liquid fertilizer with an N-P-K ratio in the 3-1-2 range works well for tomatoes in containers. You can apply a half-strength liquid fertilizer at every watering, or use a full-strength dose every two weeks. Once fruit has set, ease back on high-nitrogen formulas, which push leafy growth at the expense of fruit.
Slow-release granular fertilizers can supplement but generally need liquid feeding alongside them in a fast-draining fabric bag. Aim to keep plants consistently green and vigorous without pushing overly lush, dark growth, which can signal excess nitrogen and invite pest and disease problems. OSU Extension explains that blossom-end rot is linked to calcium availability and advises keeping tomato plants normally green and vigorous without over-fertilizing with nitrogen [Aim to keep plants consistently green and vigorous without pushing overly lush, dark growth](https://www.
extension. oregonstate. edu/catalog/fs-139-blossom-end-rot-tomatoes). Target soil pH of 6.
0 to 6. 8 for best nutrient availability.
Sunlight and heat management
Tomatoes need a minimum of 6 hours of direct sun daily, and 8 or more is better. The air-pruning fabric helps prevent heat build-up inside the root zone, which is a real issue with dark-colored plastic pots. Still, if your bags are on a reflective surface like a light-colored deck in intense summer heat, consider sitting them on a wooden pallet or board to reduce ground-level heat transfer. In extreme heat above 95 degrees Fahrenheit, tomatoes may drop blossoms temporarily, which is normal.
Staking and training
The Power Tower cage handles support well for compact determinates. As the plant grows, guide branches through or onto the support rings at each level. For determinate varieties, you generally don't need to prune suckers aggressively; let them grow and they'll set most of their fruit in a concentrated window. If you're growing a compact indeterminate in this kit, prune to a single or double main stem and tie to the cage poles, or it will outgrow the support quickly. Either way, check weekly and tuck or tie any stems that are flopping outside the cage before they get heavy with fruit.
Troubleshooting common grow-bag tomato problems
| Problem | Likely Cause | Fix |
|---|---|---|
| Bag drying out within hours | High heat, wind, or small bag volume | Water twice daily; add surface mulch; move bag out of wind |
| Blossom-end rot (dark sunken patch on fruit base) | Inconsistent watering causing calcium uptake failure | Water consistently; avoid excess nitrogen; consider calcium spray |
| Yellowing lower leaves | Nitrogen deficiency from nutrient leaching | Resume or increase liquid feeding schedule |
| Fruit splitting | Irregular watering after dry spell | Water consistently; never let bag fully dry out then flood it |
| Root restriction / stunted growth late season | Bag too small for vigorous indeterminate variety | Correct next season with larger bag; this season, feed more frequently |
| Soggy soil / root rot | Poor drainage or overwatering without drainage confirmation | Check that water drains freely; fabric bags should self-drain; inspect for blocked base |
| Cage tipping in wind | Insufficient anchoring of a tall cage in a light bag | Stake cage to post or fence as the instructions advise |
| Pest pressure (aphids, whitefly, hornworms) | Normal in outdoor growing | Inspect weekly; use insecticidal soap for soft-bodied insects; hand-pick hornworms |
| Dark or mottled foliage / mosaic pattern | Possible viral disease (tobacco mosaic etc.) | Remove and bag affected plants; do not compost; improve sanitation |
Blossom-end rot deserves a specific note because it's probably the most common complaint from grow-bag tomato growers. It isn't a disease and you can't spray it away after the fact. It's a calcium distribution problem almost always triggered by inconsistent watering. If your bottom fruits keep showing up with that dark, leathery patch, look at your watering routine before anything else.
What to expect at harvest, and how to finish the season
Yield expectations
A well-managed compact determinate in this kit can produce a good harvest, but realistic expectations matter. A single bush or patio tomato in 20 quarts of mix will give you fewer fruits than the same variety grown in 10 to 15 gallons, simply because root volume limits plant size. A typical compact determinate in this setup might yield 4 to 8 pounds of fruit depending on variety, sun, and how consistently you feed and water.
Cherry tomato varieties tend to be more forgiving and often outperform larger-fruited types in smaller bags. Don't expect the kind of production you'd get from a large in-ground plant; this kit is best thought of as balcony or patio gardening done right, not a replacement for a full garden bed.
Finishing up and end-of-season cleanup
When frost is approaching or the plant has finished setting fruit, pick any remaining tomatoes even if they're still green (they'll ripen indoors on a countertop) and cut the plant back to the soil level. Remove the plant material and discard or compost it away from the growing area, especially if there was any disease pressure during the season.
The spent potting mix is a more nuanced question. Tomatoes are heavy feeders and leave the mix depleted. The mix may also harbor soilborne pathogens if the plant had any disease issues. For disease-free seasons, you can amend and reuse the mix by adding fresh compost and slow-release fertilizer before next season. For seasons with disease problems, it's safer to start with fresh mix. The grow bag itself can be cleaned by emptying it, rinsing it out, and washing it in mild soapy water, then allowed to dry fully before folding flat for storage. The Power Tower cage can be disassembled, wiped down, and stored in the bag.
One thing worth thinking about at season's end: if your bag dried out constantly despite daily watering, or if you found the 20-quart volume limiting, that's useful information for next year. Moving up to a 10-gallon or 15-gallon grow bag with a separate cage gives more buffer for water and nutrients, particularly if you want to try a larger variety. If you're comparing options, look for the best tomato grow bags to match your variety and available root space. The fabric bag technology and air-pruning benefits still apply at larger sizes, you just have more room to work with.
Your next steps, whether you're just starting or refining your setup
If you're a beginner: buy the kit, fill it with a quality soilless container mix to within 1 to 2 inches of the top, plant one compact determinate or cherry tomato, and focus almost entirely on consistent watering. That single variable will determine most of your results. Feed every two weeks with a balanced liquid fertilizer and you're most of the way there.
If you're an experienced grower looking to tune the setup: consider pairing the kit's bag with a drip irrigation timer for watering consistency, and use a liquid calcium-magnesium supplement alongside your regular fertilizer to reduce blossom-end rot risk in hot weather. If you've already grown in this kit before and felt limited by yield or plant size, try a larger standalone fabric grow bag next season with your preferred indeterminate variety.
The soil mix you choose matters a lot in a bag this size, and exploring the best soil formulas for container tomatoes can make a real difference in what you get out of even a small volume. For grow bags, the best soil for tomatoes is a high-quality soilless potting mix formulated for containers, kept consistently moist and well-draining best soil formulas for container tomatoes.
Whichever direction you go, the core principle stays the same: consistent water, regular feeding, and enough sun.
FAQ
When should I start fertilizing after I set up the Gardener's Best tomato grow bag kit?
Most of the time, you should not start feeding with full strength immediately after planting. Use half-strength liquid fertilizer at the first feeding (after roots have settled, about 1 to 2 weeks), then move to your chosen schedule (half-strength every watering or full-strength every two weeks). This reduces salt buildup in a fabric bag that dries and re-wets quickly.
Can I put the grow bag on a tray or saucer to protect my balcony?
Place a saucer or tray underneath only if you are prepared for less evaporation, which can make the bag stay wet longer. Fabric grow bags are designed to drain freely, so a tray should not create a “water pooling” situation. If you do use one, empty it after watering and avoid letting the bottom sit in runoff for long periods.
My bag looks dry on top. How do I know if I actually need to water in the Gardener's Best kit?
If the bag is in a hot, wind-exposed spot, the surface can look dry while the root zone is still damp, or the reverse. Use the finger test at 1 to 2 inches deep, then confirm again right after a thorough watering (the bag should feel evenly heavy afterward). In very hot weather, take readings at the same times each day so you can adjust from a predictable baseline.
Can I use regular garden soil in the 20-quart Gardener's Best grow bag?
Use only container-appropriate potting mix, not garden soil. Garden soil compacts in fabric bags, drains poorly in the first portion of the root zone, and can block the air-pruning benefits. If you already have a mix you use for other containers, check that it is labeled soilless and designed for containers before refilling this kit.
Do I need to prune suckers in this kit, or should I just let the plant grow?
For cherry tomatoes and compact determinates, pruning should be light and targeted. Remove only suckers that are clearly crowding the plant or touching the cage in ways that won’t stay supported. Over-pruning can reduce the fruiting wood your determinate forms, which can cut your overall yield.
What should I change if my tomatoes split or ripen unevenly in the fabric grow bag?
When fruits split or you see uneven ripening, the most common cause is a cycle of drought stress followed by heavy watering. Instead of “catching up” with large amounts, water consistently and fully until it drains, then let the top layer approach dry before watering again. Mulching the surface helps prevent rapid swings.
I want to try an indeterminate tomato with this kit, can I make it work with better support?
If you want to grow a larger variety, treat the 20-quart bag as a limit on both root volume and your ability to maintain moisture consistency. For indeterminates, upgrade to a larger fabric grow bag (often in the 10 to 15 gallon range) so you get more water buffer and nutrient reservoir. You can still use a similar support system, but the key is matching root space to the variety.
How should I secure stems to the Power Tower cage without damaging the plant?
You can tie stems as they grow, but avoid cinching so tightly that it damages the stem. Use soft plant ties and check weekly, because fabric containers can drive faster growth bursts when weather turns. If you see stems rubbing against cage rings, guide them so the stem carries weight along the support rather than twisting.
Can I reuse the spent potting mix from the kit after a problem season?
Yes, but it depends on disease pressure. If you had blossom-end rot only, reuse can be fine. If you had soilborne disease, leaf spot, or recurring root problems, start with fresh potting mix because pathogens and weed seed can persist in reused mix. If you do amend reuse, refresh nutrients and consider discarding the mix from the densest root areas rather than using the whole bag evenly.
Why is my tomato dropping blossoms even though I water regularly?
The most effective “measure” is consistency. If your plant repeatedly drops blossoms, first confirm you have enough direct sun, then check watering timing so the bag is not swinging between very dry and very wet. In extreme heat, blossom drop can be temporary, but inconsistent moisture usually makes it worse, so prioritize steady saturation.
Is it okay to mulch the top of the grow bag, and what’s the downside?
Top-dress mulch can slow evaporation, but don’t pile it deep enough to block airflow at the surface. A thin layer helps, and keep it away from the stem base so you don’t create a constantly damp collar area. If you notice fungus gnats or persistent surface dampness, use less mulch or switch to watering earlier in the day to let the top dry slightly.
What is the best way to clean and store the fabric grow bag and Power Tower cage between seasons?
You can store the bag and cage as described, but make sure everything is fully dry to prevent mildew. Fold the empty bag flat only after it is completely dry, and store it in a dry, shaded location. When reusing the bag, inspect the seams and handles for any tears before planting again.
Next Articles
How Often to Water Tomatoes in Grow Bags: A Guide
Learn how often and how much to water tomatoes in fabric grow bags, plus feeding timing and quick troubleshooting.
Best Soil for Tomatoes in Grow Bags: Mix Recipes
Best grow-bag tomato soil mixes with exact ratios, amendments, and filling tips plus feeding and troubleshooting for hea
Best Tomato Grow Bags: How to Choose and Use Them
Choose the best tomato grow bags, compare to pots, sizing and setup, plus what to plant and costs for UK buyers.