Fruit your all-in-one grow bag when the substrate inside is fully colonized, meaning the entire block looks white or off-white with dense, rope-like mycelium, smells earthy and pleasant (not sour or off), and shows no signs of contamination. At that point, you open or cut the bag to introduce fresh air, keep humidity at 85–95% RH, drop the temperature slightly if needed, and add indirect light. That environmental shift is what triggers pins. The calendar is just a rough guide, the bag itself tells you when it's ready.
When to Fruit an All-in-One Grow Bag: Cues and Steps

Marcus Holloway
28 Jun 2026
What 'fruiting an all-in-one grow bag' actually means
An all-in-one (AIO) grow bag comes pre-loaded with colonization substrate, usually a blend of grain, sawdust, and/or supplemented bulk material, all sterilized and sealed in a single bag with a self-healing injection port and a filter patch. You inoculate it, let the mycelium colonize the substrate during incubation, and then shift the bag into fruiting conditions so mushrooms actually grow. That shift from colonization to fruiting is what people mean when they say 'fruiting the bag.'
During colonization, the mycelium spreads through the substrate in a warm, dark, relatively sealed environment. Fruiting is a completely different phase: you're now exposing that colonized block to a microclimate with fresh air exchange, high humidity, the right temperature range, and some indirect light. The bag transitions from being a sealed incubation vessel to an active fruiting chamber. Many growers fruit directly in the bag by cutting slits or openings; others transfer the colonized block to a dedicated fruiting setup. Either way, the trigger is environmental, not just time-based.
How to tell when the bag is ready to fruit
Don't go by days alone. The most reliable signal is visual and sensory. Your bag is ready to fruit when it passes all three of these checks:
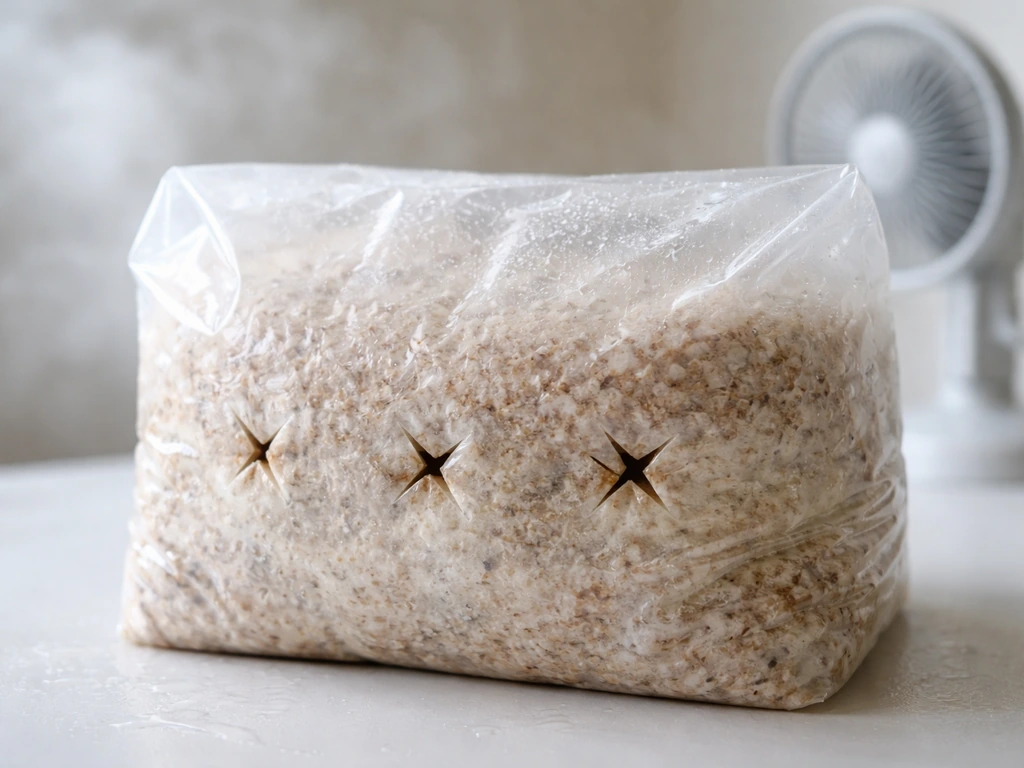
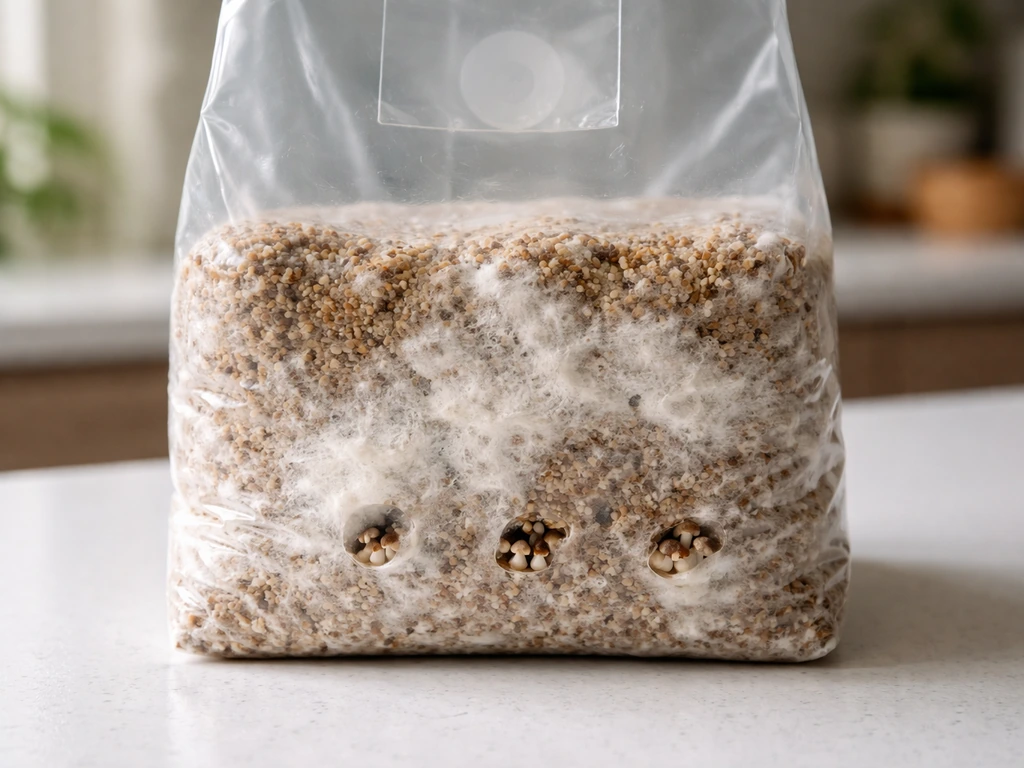
- Full colonization: The substrate looks uniformly white or off-white throughout. No brown, gray, or uncolonized patches should remain. The mycelium should look dense and rope-like, not thin and wispy.
- Good smell: It should have a clean, earthy, mushroom-like aroma. If it smells sour, like ammonia, or rotten, something is wrong.
- No contamination: No green, black, pink, or orange patches. No wet slimy areas. No unexpected colors that don't look like healthy mycelium.
- Block feels solid: A fully colonized block has structural integrity. The mycelium binds the substrate together, so the block feels firm when you gently squeeze the outside of the bag.
If any of those checks fail, wait. If there's still uncolonized substrate, give it more time in incubation. Fruiting a partially colonized block is one of the most common mistakes beginners make, and it significantly reduces your chances of getting a good flush. When you do need to break up or adjust the mycelium, do it only after full colonization so you do not interrupt the bag's ability to pin break up mycelium. If you see contamination, the bag is likely a loss and should be removed from your growing area before it spreads.
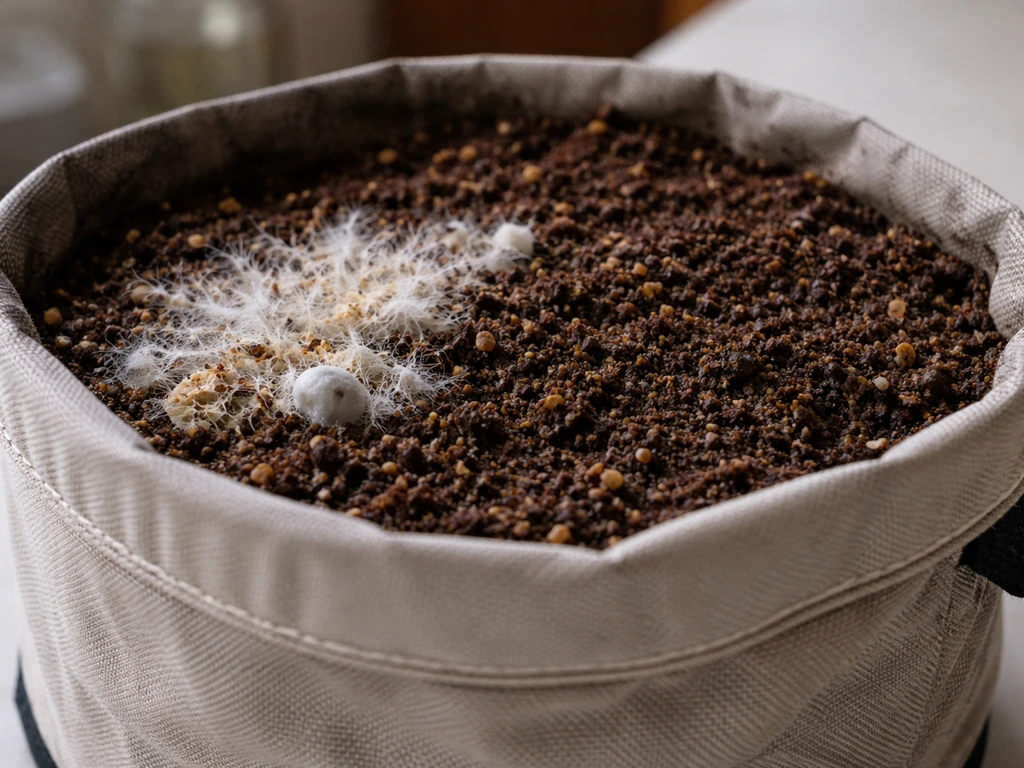
One additional cue worth watching for: some bags start showing hyphal knots, which look like tiny dense tangles forming on the surface of the substrate before you've even made any cuts. That's the mycelium already beginning to consolidate toward pinning. It means the bag is not only ready, it's eager. Cut it and introduce fruiting conditions right away.
General timeline and species ranges
Timelines vary a lot by species, inoculation density, temperature during colonization, and substrate composition. The ranges below are realistic starting points, not guarantees. If your bag takes longer, that's normal as long as the visual cues look healthy.
| Species | Colonization time (AIO bag) | Time to first pins after fruiting begins | Fruiting temp range |
|---|---|---|---|
| Oyster (Pleurotus spp.) | 10–21 days | 5–10 days | 55–75°F depending on variety |
| King oyster (P. eryngii) | 14–21 days | 7–14 days | 55–65°F |
| Lion's mane (H. erinaceus) | 14–21 days | 7–14 days | 65–75°F |
| Shiitake (L. edodes) | 30–60+ days | 7–14 days after cold shock | 55–65°F |
| Reishi (G. lucidum) | 30–60+ days | Variable (10–21 days) | 70–80°F |
Oysters are the fastest and most forgiving, making them the go-to for beginners using AIO bags. Shiitake takes significantly longer to colonize and often benefits from a temperature drop (sometimes called a cold shock) to trigger pinning. If you're growing shiitake and wondering why nothing is happening after three weeks, the bag likely isn't fully colonized yet. Be patient and keep checking the visual cues rather than watching the calendar.
How to transition from incubation to fruiting
Once the bag passes the readiness checks above, the transition is straightforward but every step matters. Here's the procedure that works reliably for most AIO bag setups:
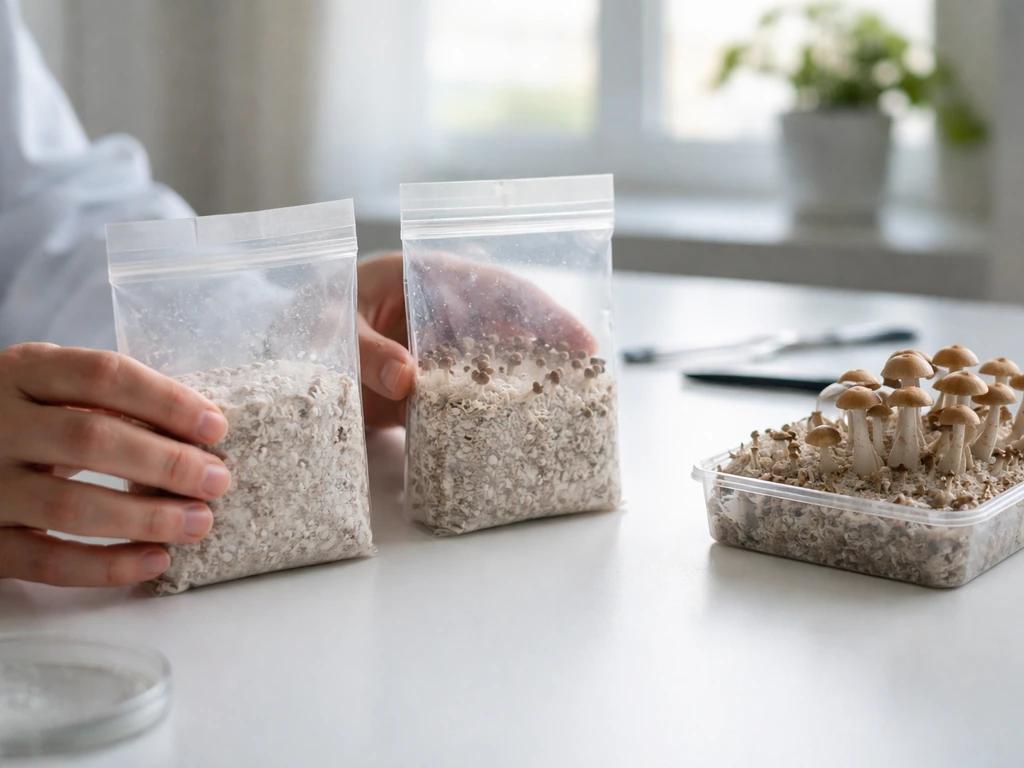
- Cut the bag open or make incisions. For most setups, you either fold down the top of the bag and fan-fold it open, or cut 1-inch by 1-inch slits in a staggered pattern on the side of the bag where you want pins to form. More surface area exposed means more potential pin sites. Don't just poke tiny holes; mushrooms need a real opening to push through.
- Move the bag to your fruiting space. If you incubated somewhere dark and warm, move the bag to a cooler spot with indirect light. A shelf near a window (not direct sun), a fruiting tent, or a humidity chamber all work.
- Drop the temperature slightly. For most edible species, fruiting happens best between 55–75°F. If you colonized at 70–75°F, try dropping to 60–68°F to help trigger pinning.
- Increase humidity to 85–95% RH. Start misting lightly 2–3 times per day with clean water, or use a humidity tent over the bag. Get a cheap hygrometer so you're not guessing.
- Introduce indirect light. Mushrooms don't photosynthesize, but light acts as a directional cue for pin development. 12 hours of indirect light per day is plenty. A simple LED grow light on a timer or a well-lit room works fine.
- Increase fresh air exchange immediately. This is the step most beginners underdo. Open the fruiting space briefly 2–3 times a day, or use a small fan on a very low setting aimed away from the bag to keep air moving. CO2 buildup is a major fruiting inhibitor.
The key thing to understand about this transition is that you're not doing one big action, you're changing the entire microclimate. Colonization was warm, dark, sealed, and relatively still. Fruiting needs fresh air, humidity, slightly cooler temps, and light. Make all of those changes together when the bag is ready, not one at a time over a week.
Fruiting setup checklist
Run through this before you expect to see pins. If one of these is off, it can stall or abort fruiting entirely.
| Parameter | Target range | How to check / adjust |
|---|---|---|
| Temperature | 55–75°F (species-dependent) | Thermometer in fruiting space; adjust with AC, fan, or heater |
| Relative humidity | 85–95% RH | Digital hygrometer; mist 2–3x daily or use humidity tent |
| Fresh air exchange (FAE) | CO2 below ~1,000 ppm; fresh air 2–3x daily minimum | Open fruiting space regularly or use small fan; avoid fully sealed setups |
| Light | 12 hrs indirect light per day | LED grow light on timer, or place near a window away from direct sun |
| Bag opening / cut size | At least 1"x1" incisions or open top | Check cuts aren't too small; pins need space to push through |
| Substrate smell | Earthy, clean | Sniff the open bag; any sour, ammonia, or rotten smell is a red flag |
The balance between humidity and fresh air exchange is the central challenge in fruiting. Aim for about 85, 95% relative humidity and control CO₂ by ensuring adequate fresh air exchange, with guidance often keeping CO₂ below roughly 1,000 ppm blank" rel="noopener noreferrer">The balance between humidity and fresh air exchange is the central challenge in fruiting.. More fresh air lowers CO2 and encourages healthy pins, but it also dries out the surface faster. MycoQR’s symptom-to-cause table also links blank" rel="noopener noreferrer">long stems and tiny caps with high CO₂, recommending more fresh air exchange (FAE). The fix is to mist more frequently when you're also increasing FAE. A humidity tent (a clear plastic bag or dome loosely draped over the AIO bag with the front open for airflow) can help you maintain high humidity while still allowing gas exchange.
Troubleshooting when nothing fruits (or fruits badly)

If you've been in fruiting conditions for 10–14 days and see nothing, or if pins are forming but look wrong, use this symptom-based diagnostic to find the problem quickly.
No pins at all
- Bag may not be fully colonized yet: Check for any remaining uncolonized brown patches. Return to incubation if needed.
- Temperature too high or too low: Oysters and king oysters pin best in the 55–68°F range. If your space is 78°F+, pinning is likely stalled.
- Not enough fresh air exchange: This is the most commonly missed issue. If the bag is in a sealed tent or box with no airflow, CO2 accumulates fast and suppresses pinning. Increase FAE immediately.
- Humidity too low: Below 80% RH, many species simply won't pin. Check your hygrometer and increase misting frequency.
- Incisions too small or missing: If you only poked tiny holes, the mycelium can't push through. Cut proper 1-inch openings.
- No light signal: Some species, especially oysters, use light as a directional cue. If the bag is in a completely dark space, add indirect light.
Pins forming but looking wrong
- Long, thin stems with tiny caps (leggy growth): Classic CO2 problem. Increase fresh air exchange right away. This is extremely common with oyster mushrooms grown in partially sealed environments.
- Fuzzy aerial mycelium growing from stems: Also a CO2 issue. More FAE is the fix, even if it means you need to mist more to compensate for the drying effect.
- Dry, cracked caps: Humidity too low. Mist more frequently or add a humidity tent.
- Brown blotches on caps or stalks: May indicate a bacterial contamination issue (brown blotch disease). Affected fruits should be removed. Check if water pooling on the surface is contributing to wet, stagnant conditions.
- Green, black, or pink patches on substrate: Contamination, not the fruiting mycelium. If it's spreading, the bag is compromised. Seal it in a plastic bag and dispose of it away from your growing area.
- Pins aborting before development: Often a combination of humidity drop and CO2 spike. Check both parameters together.
Quick fixes at a glance
| Symptom | Most likely cause | Quick fix |
|---|---|---|
| No pins after 14 days | Incomplete colonization or high CO2 | Check bag for uncolonized areas; increase FAE |
| Leggy stems, tiny caps | CO2 too high / FAE too low | Open fruiting space more often or add fan |
| Dry, cracked caps | Humidity too low | Mist 3–4x daily; add humidity tent |
| Fuzzy aerial mycelium | CO2 buildup | Increase fresh air exchange |
| Brown blotches on caps | Bacterial contamination | Remove affected fruits; reduce surface moisture pooling |
| Green/black/pink patches | Mold contamination | Isolate and dispose of bag immediately |
| Pins abort early | Humidity drop + CO2 spike | Stabilize RH at 85–95% and increase FAE together |
A few things worth knowing before your next bag
The fruiting phase of an AIO bag is really just a matter of reading the bag correctly and then making the right environmental changes at the right time. Most frustrations come from either cutting or opening the bag too early (before full colonization) or from one of the fruiting parameters being out of range. If you're seeing consistent issues with pinning, FAE is the first place to look, especially for oyster mushrooms, which are particularly sensitive to CO2 accumulation.
It's also worth noting that what happens before fruiting matters a lot. How you inoculate the bag, when you mix the substrate after inoculation, and how you manage colonization all affect how well the mycelium performs when you shift to fruiting conditions. Those earlier stages have their own timing considerations that feed directly into when the bag is actually ready to fruit. The better your colonization, the faster and more reliably you'll get pins when you make the environmental switch.
FAQ
What should I do if I accidentally cut/open my all-in-one grow bag too early?
If you opened or cut the bag early, check the uncolonized areas first. If you still see wet tan or brown substrate (not white/off-white), keep incubating and do not keep the bag in full fruiting conditions, because extra fresh air and light can stall growth. Once the readiness checks (fully colonized appearance, good earthy smell, no contamination) are met, make the full microclimate switch again (humidity, FAE, temperature, light).
If I see hyphal knots, does that mean I can fruit immediately even if the bag isn’t 100% white?
Yes, hyphal knots are a sign you can start fruiting even if the whole surface is not perfectly uniform, but only if the rest of the readiness checks are healthy. If you still have large uncolonized patches, missing dense mycelium, or any sour or unpleasant odor, wait. Knots indicate eagerness, not immunity to incomplete colonization.
Can I fruit a bag later than expected, like after it has been fully colonized for a while?
Aged bags can be trickier. If the substrate looks fully colonized and smells earthy, you can still fruit, but be extra strict about contamination checks and dry-out. If the bag has dried or the mycelium looks cracked or overly matte, rehydrate only by correcting your fruiting humidity and misting frequency, do not soak the block.
After I switch to fruiting conditions, how do I troubleshoot when pins never show up?
If you are fruiting for 10–14 days with no pins, the fastest way to narrow the cause is to treat it as a CO2 and humidity balance problem first. Increase fresh air exchange slightly while maintaining humidity using more frequent, light misting, then keep temperature and indirect light steady. If pins are forming but stalling, also check whether the surface is staying too wet or too dry.
How should I react if pins start forming but the mushrooms look deformed or stop growing?
It depends on what you mean by ‘wrong.’ If the surface is soggy or there is pooling water, reduce misting frequency and increase airflow a bit so the surface can recover. If you see very small, deformed, or stringy growth, you likely need better fresh air exchange and more stable humidity, not more misting at the same time. Overcorrecting humidity and FAE one at a time is a common mistake.
Does fruiting timing change if my room temperature fluctuates a lot?
Yes, temperature swings matter. If you cannot maintain a slightly cooler fruiting range consistently, pins can stall even when the bag is fully colonized. Use a stable spot away from drafts and direct sunlight, and aim for a gradual change into fruiting rather than large day to night jumps.
How often should I open or adjust an all-in-one grow bag during fruiting?
For most AIO setups, resist opening the bag repeatedly. Each opening causes a fresh-air and humidity reset. Make one readiness-confirmed switch, then keep handling minimal during the 10–14 day window unless you are correcting a specific parameter (like increasing airflow or adjusting misting frequency).
Is it ever worth trying to save a bag if I suspect contamination?
If contamination appears, act fast. Remove the bag from your growing area to prevent spread, and do not try to ‘salvage’ parts by cutting away infected areas, because contamination can spread through hidden sections. If you suspect contamination but cannot confirm it, isolate the bag and re-check smell and appearance before making more environmental changes.
For oyster mushrooms, what is the most likely cause if the bag looks healthy but won’t pin?
Some AIO bags are less tolerant of CO2 buildup than others, but oysters are especially sensitive. If you see a lot of mycelial activity yet no pins, increase fresh air exchange first, then support humidity with a humidity tent-style approach. Keep the tent partially open for airflow so you get gas exchange without drying.
Why might shiitake fail to pin after a few weeks, even if I think I started fruiting on time?
Shiitake often benefits from an intentional temperature drop to trigger pinning, but only after full colonization. If nothing happens after the readiness checks are met, confirm the bag is fully colonized and contamination-free first, then apply the temperature shift and keep humidity and indirect light stable. Do not rely on a calendar if visual cues still indicate slow or incomplete colonization.
Next Articles
When to Break Up Mycelium in a Grow Bag: Timing Guide
Learn when to break up mycelium in a grow bag, spot timing triggers, and safely redistribute for faster, even colonizati
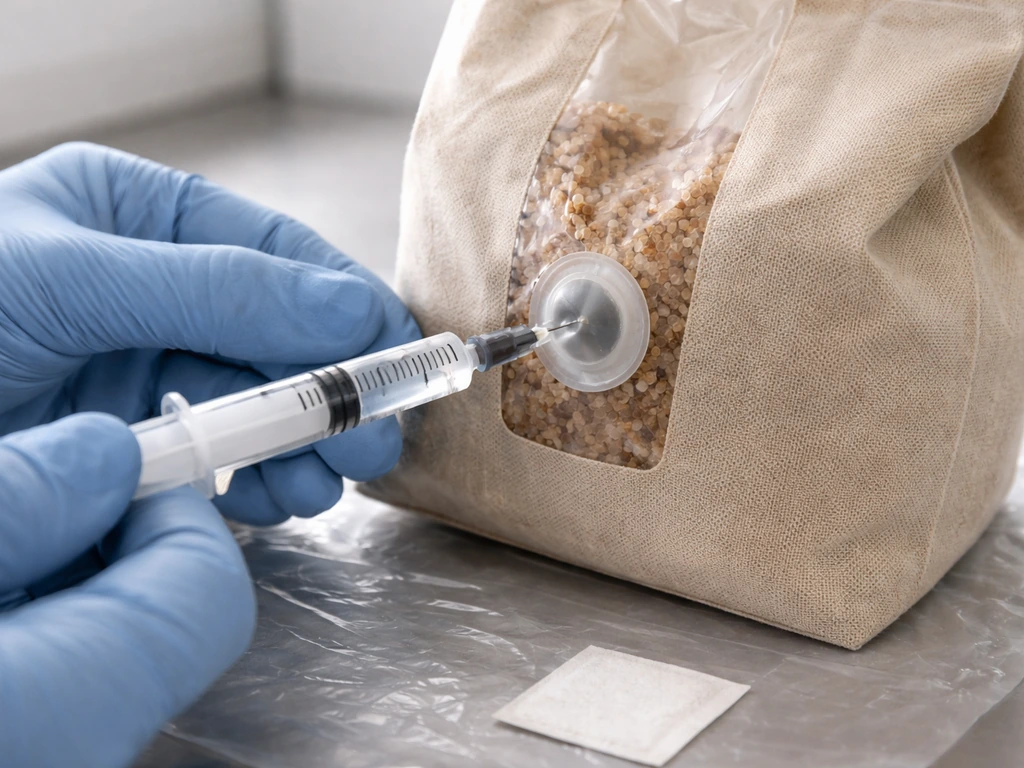
How to Inject Spores Into a Grow Bag Step by Step
Step-by-step how to inject mushroom spores into fabric grow bags, avoid contamination, verify colonization, then move to
Best Soil for Grow Bags: Mix Recipes and How Much to Add
Best soil for grow bags: mix recipes, how much to add by bag size, and vegetable tweaks for strong drainage and yield.