A spawn bag is a sealed polypropylene film bag pre-loaded with sterilized grain or sawdust substrate and inoculated with mushroom mycelium. It is the standard container for producing and transferring mushroom spawn at home or at scale. If you are coming to this guide from a fabric grow-bag background, the term can be confusing because the word 'bag' does a lot of different work in mushroom cultivation. This guide untangles the terminology, shows you exactly how spawn bags work and when to use them, and explains how they connect to fabric grow-bag systems for home growers who want to move mushrooms into a broader container garden.
Spawn Bag Grow Guide: From Prep to Fruiting in Fabric Bags
Marcus Holloway
17 Jul 2026
Who this guide is for and what you'll learn
Whether you have never grown a mushroom or you are already running grain-to-grain transfers, this guide covers the full workflow from choosing the right bag through to harvesting flushes. Beginners will get a clear vocabulary and a step-by-step process. More experienced growers will find the substrate recipes, environmental targets, and troubleshooting sections useful for dialing in their setup. Because this site focuses on fabric grow bags as a growing method, there is also a dedicated section on how spawn bags and fabric bags interact, when you use one versus the other, and how to transfer colonized spawn into a fabric-bag fruiting system.
What is a spawn bag, exactly?
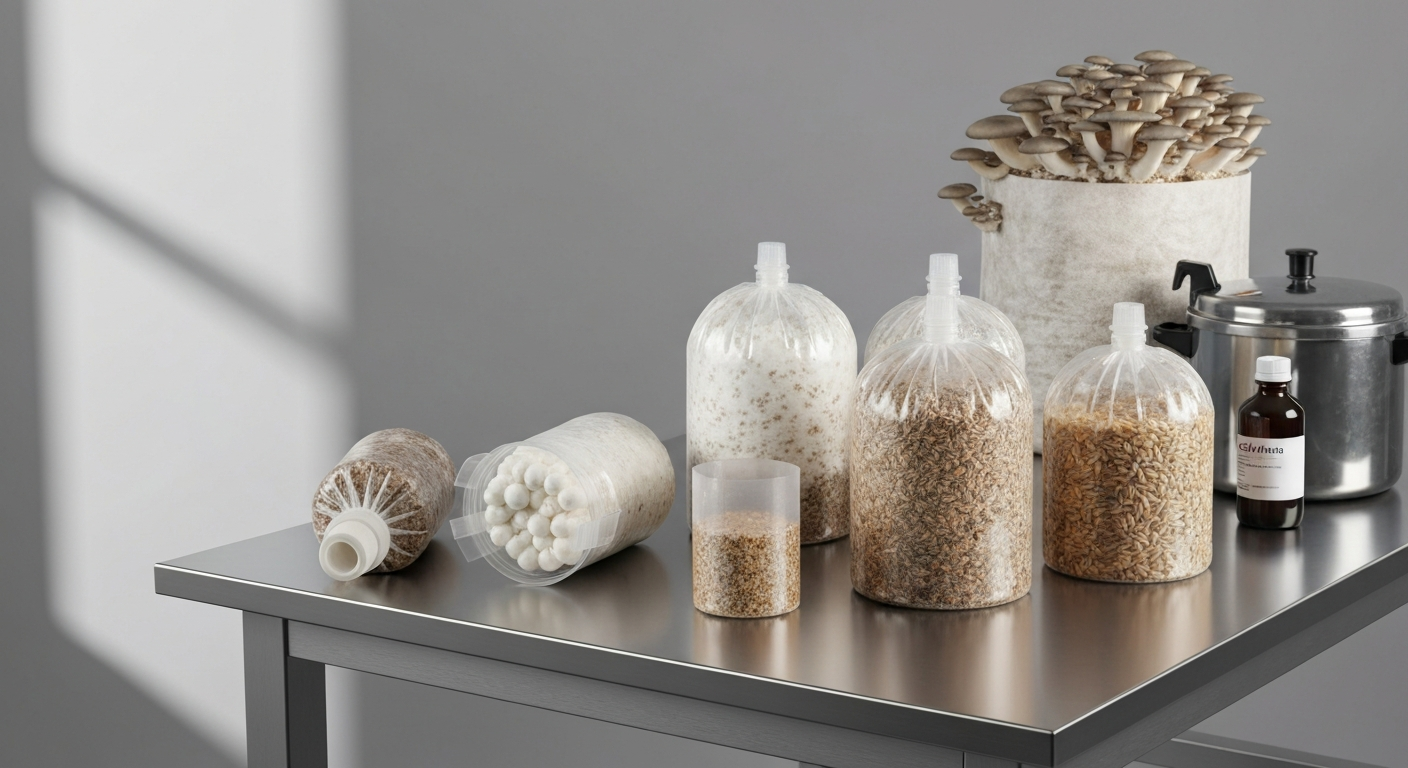
A spawn bag is a gusseted, heat-sealable bag made from polypropylene (PP) film, typically 2 to 6 mil thick (roughly 50 to 150 microns). Polypropylene is the material of choice because its melting point sits around 160 to 170°C, well above the 121°C used in standard steam sterilization cycles, so the bag survives an autoclave or pressure cooker without deforming. The bag is filled with a hydrated substrate, heat-sealed, sterilized, cooled, and then inoculated with a liquid culture or spore syringe through a self-healing injection port.
The three key parts of a spawn bag
- Polypropylene film body: the sealed chamber that protects the sterile substrate from outside contamination. Film gauge affects durability and puncture resistance; 4 to 6 mil is standard for grain spawn bags that get shaken and manipulated during colonization.
- Microporous filter patch: a multilayer laminate (usually non-woven layers with a 0.2 µm or 0.5 µm rating) bonded to a window cut in the bag wall. It allows CO2 out and fresh air in while blocking bacteria, mold spores, and dust. The 0.2 µm rating is the industry standard for sterilized grain spawn bags.
- Self-healing injection port: a thick silicone or rubber disc sealed into the bag that a needle can pierce and that reseals when the needle is withdrawn. This lets you inoculate the sterile contents without ever opening the bag, which is the single biggest contamination-control feature a spawn bag has.
Common spawn bag types
Spawn bags come in three functional categories. Grain spawn bags hold hydrated whole grains (rye, wheat, oats, millet) and are used to colonize with mycelium and then transfer that colonized grain into bulk substrate. Sawdust or wood-chip bags hold hardwood sawdust mixed with wheat bran or rice bran, and they serve as both a spawn intermediary and a ready-to-fruit block for wood-lovers like shiitake, lion's mane, and reishi. Ready-to-fruit supplemented bags (often called 'master's mix' blocks or monotubs precursors) are fully formulated, sterilized, and designed to go straight from inoculation to fruiting with no transfer step. Some vendors also sell pre-sterilized, pre-hydrated grain bags with the injection port already installed, which are a practical shortcut when you don't own a pressure cooker.
How spawn bags relate to fabric grow bags
Fabric grow bags, the kind used across this site for tomatoes, herbs, potatoes, and trees, are made from non-woven polypropylene, felt, or woven geotextile. They are fully porous, open to the environment, and designed for air pruning of roots and free drainage. Spawn bags are the near-opposite: they are sealed, sterile, and engineered to keep the outside world out until the mycelium is ready. Despite sharing the word 'bag' and often the base polymer (polypropylene), they solve different problems and are used at different stages of the mushroom-growing process.
Where fabric grow bags become relevant to mushroom cultivation is at the fruiting stage. Once a spawn bag is fully colonized, the dense myceliated block can be transferred into a fabric grow bag (or placed inside one) to fruit. The breathable walls of a fabric bag allow better fresh-air exchange than a rigid bucket, the porous sides can be misted without waterlogging the substrate, and the familiar container format fits neatly into an existing grow-bag garden setup. Some growers also use fabric bags filled with pasteurized straw for oyster mushrooms, skipping the polypropylene spawn-bag stage entirely for that particular species.
Spawn bags vs fabric grow bags: when to use each
The decision usually comes down to what stage of the cultivation cycle you are in and what species you are growing. Here is a practical breakdown:
| Factor | Spawn bag (PP film) | Fabric grow bag |
|---|---|---|
| Primary purpose | Colonization of sterilized substrate; spawn production | Fruiting container; low-tech bulk substrate |
| Sterility requirement | High (sterilized grain, supplemented sawdust) | Low to moderate (pasteurized straw works fine) |
| Gas exchange mechanism | 0.2 µm filter patch (controlled, sterile) | Fully porous walls (open, ambient) |
| Species best suited | Shiitake, lion's mane, reishi, king oyster, most gourmet species | Oyster (Pleurotus), wine cap (Stropharia), king stropharia |
| Equipment needed | Pressure cooker or autoclave, still-air box or flow hood | Hot-water pasteurization (75–82°C), no pressure equipment needed |
| Contamination risk | Low if sterilized and inoculated properly | Moderate; managed by fast colonization and competitive substrates |
| Reusability | Single use (sealed film) | Many growing seasons if washed and dried between uses |
| Cost per bag | Higher (specialized film, filter, port) | Lower (bulk geotextile; often under $1 per bag at volume) |
For beginners, oyster mushrooms on pasteurized straw in a fabric bag is the lowest-barrier path. For anyone wanting to grow shiitake, lion's mane, or species that need fully colonized hardwood blocks, you need the sterilized spawn-bag workflow. The two approaches are not mutually exclusive: many home growers use a spawn bag to colonize grain, then mix that colonized grain into a fabric bag of pasteurized straw to fruit.
Decision framework: picking the right bag for your situation
Before buying bags or building a setup, run through these six questions. They will land you at the right workflow without wasting money on equipment you don't need.
- Scale: How many bags do you plan to run per batch? For 1 to 5 bags, a 6-quart stovetop pressure cooker handles grain sterilization. Above 10 to 15 bags, a 23-quart or All American 25-quart autoclave saves time and handles larger loads more consistently.
- Species: Does your target species require sterilized hardwood or supplemented substrate (shiitake, lion's mane, reishi)? If yes, you need PP spawn bags and a pressure cooker. If you're starting with oyster mushrooms on plain straw, a fabric bag and hot-water pasteurization is enough.
- Substrate: Grain spawn and supplemented sawdust (e.g., hardwood + wheat bran) require true sterilization at 121°C and 15 psi. Plain straw and coir/vermiculite mixes can be pasteurized at 75 to 82°C for 1 to 2 hours, so no pressure equipment is needed.
- Sterilization capability: Do you own a pressure cooker and a still-air box or flow hood? If not, pre-sterilized grain bags with injection ports (available from suppliers like North Spore, Midwest Grow Kits, Olympus Myco) let you skip that equipment entirely and still run the spawn-bag workflow.
- Resources: Budget and time both matter. PP spawn bags are single-use. Fabric bags are reusable and cheaper per cycle but require more monitoring during fruiting. Factor this into your cost per harvest.
- Goals: Do you want to produce your own spawn for future grows (grain-to-grain transfers), or do you just want to fruit one or two blocks and stop? If you want to build a propagation chain, invest in proper sterilization equipment. If you want one or two harvests, a pre-sterilized ready-to-fruit block or a fabric-bag oyster setup is simpler.
Materials, sizes, and bag features
Film types and gauges
Standard spawn bags are made from polypropylene film in the 2 to 6 mil range. Thinner bags (2 to 3 mil) are adequate for fruiting blocks that won't be shaken much after sealing. For grain spawn that gets shaken daily to break up mycelium knots and distribute growth, a 4 to 6 mil bag is less likely to develop pinholes or stress cracks from repeated handling. Some vendors list bags in microns (50 to 150 µm), which is the same range expressed differently. Tyvek, a spunbond HDPE material from DuPont, is sometimes used for breathable sterile barriers in lab packaging because it tolerates controlled steam cycles and provides a microbial barrier, but it is not common in consumer spawn bags because microporous filter patches bonded to standard PP film achieve the same gas-exchange function at lower cost.
Filter patch specifications
The filter patch is arguably more important than the bag film itself. A 0.2 µm patch is the standard for grain spawn and sterilized hardwood blocks because it keeps bacterial and mold contamination out while the mycelium builds. Some vendors sell bags with 0.5 µm patches, which are slightly more breathable and appropriate for bulk pasteurized substrate that colonizes quickly. For slow-growing species or high-bran supplemented recipes, stick with 0.2 µm. The patch should cover at least a few square centimeters; small patches can become the gas-exchange bottleneck in large bags, which slows colonization and can drive elevated CO2 levels inside the bag. blank" rel="noopener noreferrer">Research on Pleurotus ostreatus confirms that elevated CO2 during fruiting distorts cap development and reduces yield quality, which is why adequate fresh-air exchange through the filter patch matters even before you open the bag. A ResearchGate study on oyster mushroom cultivation reported using polypropylene grow bags fitted with micropore filter patches for pasteurized substrates and obtained workable yields using hot‑water pasteurization protocols blank" rel="noopener noreferrer">A ResearchGate study on oyster mushroom cultivation reported using polypropylene grow bags fitted with micropore filter patches for pasteurized substrates and obtained workable yields using hot‑water pasteurization protocols..
Recommended bag sizes by use
| Bag size | Approximate dimensions | Substrate capacity | Best use |
|---|---|---|---|
| Small (e.g., 4T style) | 4" × 3" × 18" | 1–2 quarts / ~0.5 lb grain | Grain spawn, small culture transfers, agar work |
| Medium | 5" × 4" × 18" | ~3 quarts / ~1–1.5 lb grain | Grain spawn, small hardwood blocks |
| Large | 8" × 5" × 20" | ~5 lb substrate | Sawdust fruiting blocks, bulk hardwood blocks |
| Extra-large / gusseted | 10" × 5" × 24" or wider | 8–10 lb substrate | Commercial-scale blocks, straw fruiting bags |
Vendors consistently recommend matching bag volume to species and load: overfilling creates compaction problems that slow colonization and make the bag difficult to shake, while underfilling wastes sterilization energy and can cause the substrate to dry out faster. For fabric grow-bag fruiting, a colonized 5 lb hardwood block from a large spawn bag fits well into a 3-gallon fabric bag with room for casing layer or supplemental substrate.
Fabric grow bags for mushroom fruiting: breathability and insulation
When using fabric bags as fruiting containers, the porosity that makes them great for vegetables also makes humidity management more demanding. Thinner, more open-weave geotextile bags dry out faster, which is ideal for root air-pruning but needs correction for mushrooms that want 85 to 95% relative humidity at the fruiting surface. A few practical adjustments help: placing the fabric bag inside a plastic humidity tent, misting the outside of the bag twice daily, or using a thicker 300 to 400 GSM felt fabric that retains some moisture at the wall while still allowing gas exchange. For more on humidity management and fabric choices, see grow bag tips. Insulation is rarely a concern for fruiting because most gourmet mushrooms fruit best at 15 to 24°C (59 to 75°F), within typical indoor temperatures. See the grow bag tog guide for recommendations on fabric weight and insulation to match seasonal temperatures. For outdoor setups, a thicker fabric bag provides a small thermal buffer against temperature swings.
Tools and supplies checklist
This is what you actually need on the bench before starting a spawn-bag grow. I've kept it minimal and practical: everything here earns its place.
- Polypropylene spawn bags (appropriate size for your substrate load, with filter patch and injection port)
- Pressure cooker or autoclave: minimum 6-quart for 1 to 2 bags; 23-quart or larger for 4+ bags at a time
- Stainless steel or food-grade mixing bowl and pot for hydrating grains
- Kitchen scale (gram-accurate preferred for tracking substrate ratios and moisture)
- Isopropyl alcohol (70% for surface disinfection) and alcohol lamp or lighter for flame-sterilizing needles
- Liquid culture syringe, spore syringe, or agar wedge (your inoculum source)
- Still-air box (DIY from a clear storage tote) or flow hood for inoculation
- Micropore tape or lab tape to seal the needle hole after injection
- Digital thermometer and hygrometer for monitoring incubation and fruiting environments
- Timer or sticky labels for tracking sterilization time and inoculation dates
- Fabric grow bags (3 to 5 gallon) if you plan to transfer colonized blocks to a fruiting container
- Spray bottle for misting during fruiting
Substrate recipes and moisture targets
Getting substrate moisture right is the single most common place new growers go wrong. Too wet and you create anaerobic pockets that invite contamination; too dry and colonization stalls. The target for most substrates is 'field capacity': when you squeeze a handful firmly, only a few drops of water come out. If water streams out, it is too wet. If no moisture comes out at all, it needs more water.
Grain spawn (rye, wheat, oats, millet)
Simmer or soak whole grains until they are fully hydrated but the outer hull is not split or mushy. A common method: soak rye berries in cold water for 12 to 24 hours, drain, then simmer for 10 to 15 minutes until just tender. Spread on a baking tray to surface-dry for 20 to 30 minutes before bagging. The goal is about 50 to 55% moisture content by weight, which corresponds to field capacity for grain. Load bags to no more than two-thirds full to allow room for shaking. Sterilize at 15 psi (121°C) for 2 to 2.5 hours for a medium or large grain bag. Utah State Extension explicitly recommends 120 minutes at 15 psi for full spawn bags. Allow bags to cool to below 30°C (ideally to room temperature) before inoculating.
Hardwood sawdust and bran (sawdust fruiting blocks)
The most common recipe is a 5:1 ratio by dry weight of hardwood sawdust to wheat bran (or rice bran), hydrated to approximately 60 to 65% moisture content. Measure by squeeze test: a firm squeeze produces 1 to 3 drops. Supplemented sawdust is a high-nutrition substrate that supports contamination aggressively, which is why it requires true sterilization rather than pasteurization. A popular home grower formulation is 'master's mix': 50% hardwood sawdust, 50% soy hulls by dry weight, hydrated to field capacity. Sterilize large bags of supplemented sawdust for 2.5 to 3 hours at 15 psi; dense blocks take longer to reach temperature at the center than grain bags do.
| Substrate recipe | Ratio (dry weight) | Target moisture | Sterilization method | Typical species |
|---|---|---|---|---|
| Whole grain (rye, wheat, oat) | 100% grain | 50–55% (field capacity) | Autoclave 121°C / 15 psi / 2 hrs | Any mushroom species; used as spawn carrier |
| Hardwood sawdust + wheat bran | 5:1 sawdust:bran | 60–65% | Autoclave 121°C / 15 psi / 2.5–3 hrs | Shiitake, lion's mane, reishi, maitake |
| Master's mix (sawdust + soy hulls) | 1:1 sawdust:soy hulls | 60–65% | Autoclave 121°C / 15 psi / 2.5–3 hrs | Lion's mane, oyster, king oyster |
| Coir + vermiculite (CVG) | 2:1:1 coir:verm:water (volume) | ~75–80% (very moist) | Pasteurize 75–82°C / 1–2 hrs or boiling water | Cubensis (Psilocybe), some oyster strains |
| Wheat straw | 100% straw | 65–70% | Pasteurize 75–82°C / 1–2 hrs | Oyster (Pleurotus spp.), wine cap |
Coir and vermiculite mixes
Coir/vermiculite (CVG) is a popular bulk substrate for species that tolerate high moisture. The standard ratio is roughly 2 parts coconut coir to 1 part vermiculite to 1 part water by volume, though you adjust based on the coir block's absorption. CVG does not need sterilization because it is relatively low in nutrients and colonizes so fast that molds cannot compete if the spawn rate is high enough. Simply pour boiling water over the mix in a bucket, let it cool to below 30°C, and use it as a bulk layer mixed with colonized grain spawn at a 1:4 to 1:6 spawn-to-substrate ratio. For fabric bag fruiting, CVG layers work well as a casing on top of a colonized hardwood block.
Supplementation notes
Adding bran, gypsum, or soy hulls to plain sawdust increases nitrogen and nutrition, which boosts yields but also raises contamination risk significantly. Unsupplemented hardwood sawdust can sometimes be pasteurized rather than sterilized for fast-colonizing oyster strains, but any recipe with more than about 10 to 15% bran supplementation should be treated as requiring full sterilization. Gypsum at 1 to 2% of dry substrate weight helps with moisture distribution and prevents clumping without meaningfully increasing contamination risk. Do not add sugars or molasses to spawn bags: the rapid bacterial growth they encourage will outpace your mycelium even in sterilized substrate if any contaminants enter during inoculation.
Preparation and inoculation step by step
- Prepare and hydrate your substrate using the appropriate recipe above. Surface-dry grain if using the simmering method.
- Fill spawn bags to no more than two-thirds of their capacity. Fold the top of the bag over twice and seal it with a bag sealer, impulse sealer, or binder clip rated for autoclave use (confirm the closure method tolerates 121°C).
- Load bags into your pressure cooker or autoclave. Do not stack bags so tightly that steam cannot circulate. For grain, sterilize at 15 psi for 2 to 2.5 hours. For large supplemented sawdust blocks, run 2.5 to 3 hours.
- After sterilization, allow bags to cool fully (below 30°C, ideally 20 to 25°C) before inoculating. This may take 4 to 12 hours depending on bag size. Cooling on a wire rack speeds the process.
- Set up your inoculation area: wipe every surface with 70% isopropyl alcohol. If using a still-air box, let it settle for 10 minutes before opening anything.
- Flame-sterilize the needle tip of your syringe until it glows, let it cool for 5 to 10 seconds, then wipe with alcohol.
- Inject 2 to 4 mL of liquid culture (or the equivalent for a spore syringe) through the self-healing injection port. For larger bags, inject in two to three spots spread across the bag.
- Seal the injection hole with a small piece of micropore tape as a backup measure, though a quality self-healing port does not require it.
- Label the bag with species, inoculation date, and substrate type. Place in your incubation area.
Incubation: conditions and timeline
Incubation is the colonization phase: you are waiting for the mycelium to spread from the inoculation points and claim the entire substrate. For most gourmet species, incubate in the dark at 21 to 26°C (70 to 79°F). Avoid light during colonization as it can trigger premature pinning before the block is ready. Keep bags off cold concrete floors (which can create condensation zones) and away from direct airflow, which can create cold spots on the bag surface.
Shake or break up grain bags when the mycelium has colonized about 30 to 40% of the bag. This distributes the growth points and speeds full colonization significantly, often by 5 to 7 days. For hardwood blocks, do not break them up: they need to colonize as a solid mass. Grain bags typically colonize fully in 10 to 21 days depending on species and inoculation rate. Hardwood blocks may take 3 to 6 weeks. Contamination shows up as green (Trichoderma), black, or pink patches. If you see color other than white mycelium or yellow to amber metabolite secretions (which are normal), isolate the bag in a sealed trash bag and remove it from your grow area immediately.
Fruiting, harvesting, and flush schedules
Initiating fruiting
Once a block or grain bag is fully colonized (solid white with no uncolonized spots), initiate fruiting by introducing a temperature drop of 5 to 10°C, fresh-air exchange, and high humidity. For a spawn bag, this means cutting an X or series of slits in the bag (or removing the top entirely) and moving it to your fruiting chamber. For a fabric-bag fruiting setup, transfer the colonized block from the spawn bag into a clean fabric bag, add an optional casing layer on top, and move it to the fruiting environment.
Environmental targets during fruiting
| Parameter | Target range | Notes |
|---|---|---|
| Temperature | 15–22°C (59–72°F) for most oyster/shiitake | Some species (enoki, snow oyster) prefer 10–15°C; lion's mane 18–24°C |
| Relative humidity | 85–95% | Mist walls of fruiting chamber (not pins directly) 2–3x daily or use ultrasonic humidifier |
| Fresh air exchange (FAE) | 4–8 air changes per hour during fruiting | CO2 above ~1000–2000 ppm causes elongated stems and small caps in Pleurotus |
| Light | Indirect light 6–12 hrs/day | Light provides directional cues for cap development; total darkness reduces cap size |
Harvest mushrooms when the caps are fully formed but before the veil breaks or the edges begin to curl upward and release spores. For oyster mushrooms this means harvesting when the cap edges are still slightly curled under. Twist and pull the entire cluster from the base rather than cutting, to remove the stump and reduce decay. A single colonized bag or block typically delivers 2 to 4 flushes. After the first flush, mist the surface, rest for 5 to 7 days, then resume high-humidity fruiting conditions. Yield per flush usually drops with each cycle as the substrate depletes.
Transferring spawn to fabric grow bags or other substrates
One of the most efficient workflows for home growers is to use a colonized grain spawn bag to inoculate a larger fabric bag of bulk substrate. This is sometimes called a 'grain-to-bulk' transfer. Here is the method in practice:
- Pasteurize your bulk substrate (straw, CVG, or lightly supplemented sawdust) and allow it to cool to below 30°C.
- Wipe down your work area and hands with 70% isopropyl alcohol. This is not a sterile process, but cleanliness matters.
- Open the colonized grain spawn bag and break up the colonized grains into individual kernels.
- In a fabric grow bag (or a clean bucket or bin), layer the bulk substrate and the colonized grain at a spawn rate of about 15 to 25% by weight. Higher spawn rates mean faster colonization and lower contamination risk, at a higher input cost.
- Mix thoroughly so grain is evenly distributed throughout the substrate, then fold or tie the top of the fabric bag closed.
- Incubate the fabric bag at 21 to 24°C for 7 to 14 days until fully colonized, then initiate fruiting using the methods above.
This method takes full advantage of what a fabric grow bag does well: porous walls support gas exchange in the bulk substrate, the bag is reusable, and the setup fits naturally into a grow-bag garden bench or shelf. It also means you only need sterilization equipment for the small grain spawn bag, not for the larger fruiting substrate.
Grow-bed and garden setup options
Beyond indoor fruiting chambers, colonized spawn can be introduced directly into outdoor garden setups. Wine cap mushrooms (Stropharia rugosa-annulata) colonize wood chip mulch and can be established in fabric raised beds or along the edges of existing garden areas by spreading colonized grain spawn through moistened wood chips. King Stropharia particularly suits a mixed vegetable and fabric grow-bag garden because it colonizes the organic mulch between containers rather than needing its own dedicated bag. For outdoor use, spawn bags are still the best way to produce inoculated grain, but the 'bag' that the mushroom actually fruits from may simply be the garden bed itself.
Indoor fruiting chambers for fabric-bag setups range from a simple plastic storage tote with holes drilled in the sides (a shotgun fruiting chamber) to a dedicated Martha-style tent shelf with an ultrasonic humidifier and small clip fan for fresh-air exchange. A 5-gallon fabric grow bag fruiting two colonized hardwood blocks fits comfortably on a 2-foot shelf inside a Martha tent.
Alternatives to spawn bags
If you cannot or don't want to run the sterilized spawn-bag workflow, there are workable alternatives. Pre-sterilized grain bags with injection ports (available from multiple suppliers) remove the sterilization step from your process entirely and are excellent for beginners. Ready-to-fruit mushroom grow kits are the most beginner-friendly option and require nothing but a humidity-friendly spot and a few mists per day. Agar plates and liquid culture syringes let you skip grain spawn entirely for small-scale culture work. For low-tech oyster cultivation, a sealed plastic bag of pasteurized straw with a strip of micropore tape over air holes is a functional (if less elegant) alternative to a purpose-built spawn bag. Any of these can be combined with a fabric grow-bag fruiting setup at the bulk-substrate stage. For another relevant comparison, see grow bag planting guide.
Troubleshooting common problems
Contamination (green, black, or pink patches)
Trichoderma (green mold) is the most common contaminant and almost always enters during inoculation if sterilization is adequate. Causes: insufficient cooling before inoculation, poor technique in the still-air box, damaged filter patch, or a syringe that was not properly sterilized. If you are seeing contamination in sealed bags before inoculation, your sterilization process or bag seal is failing. Check that your pressure cooker is reaching 15 psi and holding it for the full recommended time. A cooking thermometer with a probe placed inside a test bag can confirm that substrate temperature reaches 121°C.
Slow or stalled colonization
The most common causes are substrate too dry (grain not fully hydrated), incubation temperature too low, or inoculum volume too small. Check that your incubation area is consistently above 18°C and that grain was properly hydrated before sterilization. If the filter patch is too small for the bag size, CO2 can accumulate and slow mycelial growth. Shaking grain bags at 30 to 40% colonization helps substantially.
Moisture problems (wet rot, dry cracking)
Substrate that is too wet at the start will develop anaerobic pockets and a sour, bacterial smell during incubation. There is no recovery: bag the block and discard it. For fruiting blocks that dry out between flushes, re-hydrate by submerging the block (still in a partial bag or in a bucket) in cold water for 4 to 8 hours, then drain and resume fruiting conditions.
Abnormal early caps (aborts, AEC, primordia not developing)
Aborts and abnormal early condensation (AEC) on grain bags are often caused by light exposure or temperature fluctuation during colonization triggering premature pinning before the substrate is fully colonized. Keep bags in the dark and at a consistent temperature during incubation. Small pins that appear on a grain bag during colonization are usually a sign to move the bag to fruiting conditions, not a problem in itself if the bag is fully white.
Practical tips for better yields
- Use a higher spawn rate (20 to 25% of substrate weight) when working with pasteurized bulk substrates: faster colonization outcompetes contamination.
- Let grain bags cool on a wire rack after sterilization rather than stacking them; stacked bags retain heat much longer and can cause partial sterilization failures at the center of the pile.
- Do not over-supplement sawdust blocks: recipes above 20% bran by dry weight dramatically increase contamination risk without proportional yield gains.
- Harvest promptly. Mushrooms left past full maturity drop spores that trigger an immune-style response in the remaining mycelium, reducing subsequent flush size.
- Between flushes, scrape off any dead stump tissue from the fruiting surface with a clean knife to prevent bacterial colonization at the harvest site.
- If using fabric grow bags for fruiting outdoors in summer, provide shade during the hottest part of the day. Most gourmet mushrooms struggle above 28°C.
- Track inoculation dates on every bag. A bag that hasn't shown visible colonization within 7 to 10 days may have failed, and catching it early limits contamination spread to other bags in the same incubation space.
Where to go next
If you are setting up your grow space from scratch, the grow bag garden setup topic on this site covers how to organize a fabric-bag growing area that works for both vegetables and mushroom fruiting containers. For species that don't require spawn bags at all, the grow bag planting guide covers direct-substrate methods. If you are weighing whether a spawn-bag workflow is worth the investment compared to kits or other systems, the grow bag alternatives article runs through the honest cost-benefit comparison. And if you are brand new to fabric bag growing in general, the grow bag meaning and grow bag instructions topics lay out the fundamentals that apply whether you are growing tomatoes or oyster mushrooms. See the grow bag meaning topic for the fundamentals that apply whether you are growing tomatoes or oyster mushrooms. See the grow bag instructions for step-by-step guidance on preparing and using fabric grow bags.
FAQ
What primary types of sources are essential to produce an evidence‑based spawn bag grow guide?
Use peer‑reviewed studies and university extension publications for core cultivation principles (sterilization, pasteurization, species responses to CO2/FAE). Supplement with manufacturer technical specs for bag materials, filter patches, and injection ports to ground practical recommendations. Include laboratory SOPs and experienced grower manuals for step‑by‑step methods and troubleshooting, and product/vendor pages for typical sizes, film gauges, and commercially common features.
Which university extension or peer‑reviewed resources should be prioritized and why?
Prioritize extension guides (e.g., Utah State, UF/IFAS) and peer‑reviewed papers on substrate sterilization, colonization, and fruiting because they provide validated procedures and safety parameters (autoclave cycles, incubation temperatures, contamination control). Peer‑reviewed work on species physiology (e.g., CO2 effects on Pleurotus) is needed to justify environmental targets and FAE timing.
What manufacturer and commercial documentation is needed for practical bag recommendations?
Collect technical product pages and spec sheets from established vendors (North Spore, ShroomSupply, Midwest Grow Kits, Unicorn/Field & Forest) that list film type (polypropylene), film thickness (mils/µm), filter‑patch micron ratings (0.2–0.5 µm), injection‑port design, and standard gusseted bag sizes. These inform material selection, breathability expectations, and typical capacities for home setups.
What material science data should I gather to explain bag performance and sterilization compatibility?
Document thermal properties and sterilization compatibility of common materials (polypropylene melting point ~160–170°C and resistance to 121°C autoclave cycles) and breathable sterile‑barrier materials (e.g., Tyvek/HDPE spunbond properties). Use manufacturer technical brochures and polymer material references to support claims about repeated steam sterilization and filter patch function.
What sterilization and pasteurization references are required for safe, evidence‑based protocols?
Cite authoritative sterilization guidance (autoclave cycles at 121°C/15 psi; exposure times scaled to load density) from medical/lab literature and extension SOPs. Also include extension and technical sources that distinguish when true sterilization (for grain and supplemented sawdust) is required versus when pasteurization (for straw and many bulk substrates) is acceptable, and show example time/temperature ranges.
How should I handle gaps in comparative evidence between polypropylene spawn bags and fabric grow bags?
Acknowledge the lack of direct head‑to‑head peer‑reviewed trials comparing outcomes across contamination rate, colonization speed, labor, and yield. Assemble indirect evidence: experimental papers using PP filter‑patch bags, trials using fabric/porous methods under non‑sterile pasteurized workflows, and practitioner reports. Present a decision framework that maps advantages/limitations to grower goals and risk tolerance rather than definitive superiority claims.
Next Articles
Grow Bag Instructions: Step-by-Step Setup and Planting Guide
Step-by-step grow bag instructions: choose size and medium, prep, plant, water, manage drainage, and troubleshoot issues
Grow Bag Meaning: What It Is and How to Use One
Get the grow bag meaning and how fabric air-pruning bags work, plus sizes, buying tips, and fixes for common problems.
Grow Bag ToG Guide: Choose, Plant, and Care Step by Step
Step-by-step grow bag ToG guide: choose the right size and fabric, plant, care routines, troubleshooting, reuse and stor