Yes, you can put a fabric grow bag inside a hard-sided pot, and plenty of growers do it intentionally. The key is making sure the outer pot doesn't trap water underneath the bag or block air from reaching the fabric walls. If you get those two things right, the grow bag keeps doing its job: draining fast, air-pruning roots, and keeping the root zone healthy. Get them wrong and you end up with soggy soil, dead roots, and a setup that's worse than either container on its own.
Can You Put Grow Bags in Pots? Safe Setup Tips

Marcus Holloway
31 May 2026
Why anyone would do this in the first place
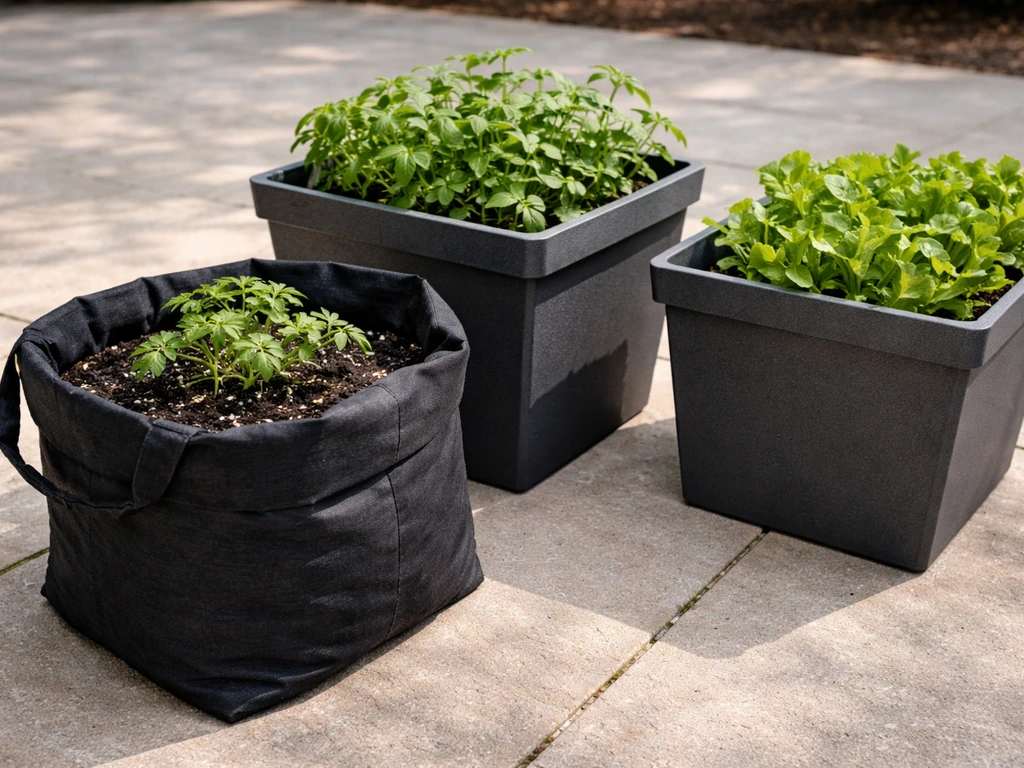
Grow bags are great at what they do, but they're floppy, they can tip over, they look rough on a patio, and they're hard to move without handles. Dropping a grow bag inside a rigid pot solves all of that. The hard pot acts as a structural sleeve: it keeps the bag upright, protects it from UV damage, makes it easy to move, and can look a lot cleaner if you care about aesthetics. RootMaker actually built a whole commercial system around this idea with their RootTrapper Pot-in-Pot Insert, designed specifically to fit inside a socket pot while still trapping roots and building a fibrous root system. So this isn't some workaround hack. It's a legitimate setup when done properly.
The tricky part is that grow bags work because of airflow. Roots grow out toward the fabric wall, hit the air gap on the other side, dry out at the tip, and stop circling. That's air pruning, and it produces a dense, branched root system instead of a coiled mess. The moment you seal the bag inside a pot with no airflow or no drainage, you've blocked that mechanism. So the outer pot has to be chosen and set up carefully.
Setting up the grow bag inside a pot safely
Drainage comes first
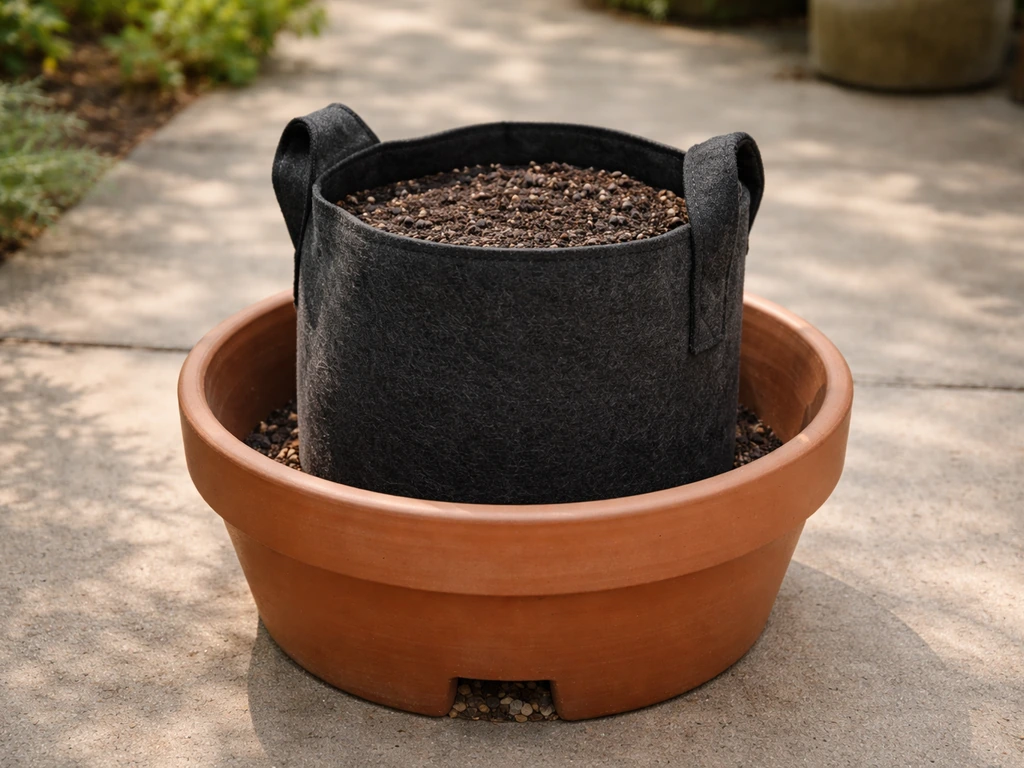
The outer pot must have drainage holes at the bottom. This is non-negotiable. When you water, excess moisture needs somewhere to go immediately. If it pools at the base of the pot, the grow bag sits in standing water, the fabric stays saturated, and roots drown because they can't access oxygen. A grow bag sitting in standing water defeats everything that makes it useful. Choose an outer pot with large, clear drainage holes, and never use a solid-bottomed cachepot as your outer container without a drainage solution built in.
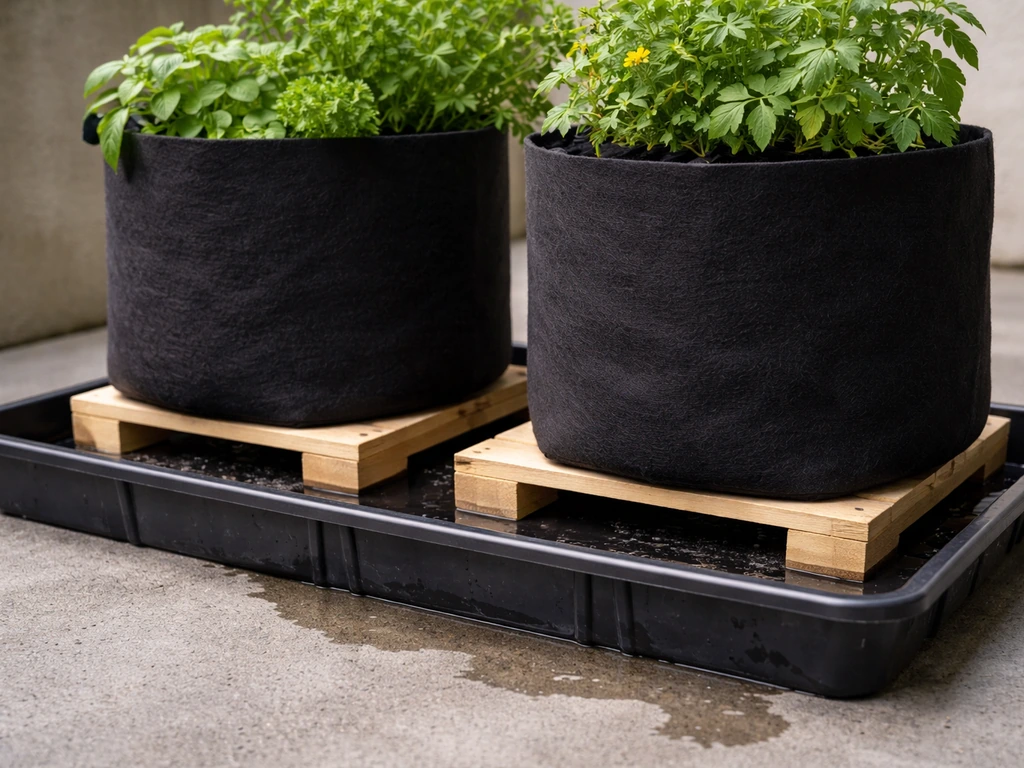
Even with drainage holes, elevate the grow bag slightly off the pot floor. A handful of gravel, a plastic pot riser, or even a few flat stones works. This gap lets water drain through the bag bottom freely and keeps the fabric from sitting flush against the pot base where pooling is most likely. Some fabric bag designs, like RootMaker's RootTrapper inserts, actually leave the bottom two inches of sidewall unlaminated specifically to improve drainage near the base. That kind of design detail matters when the bag is enclosed.
Keeping airflow around the bag walls
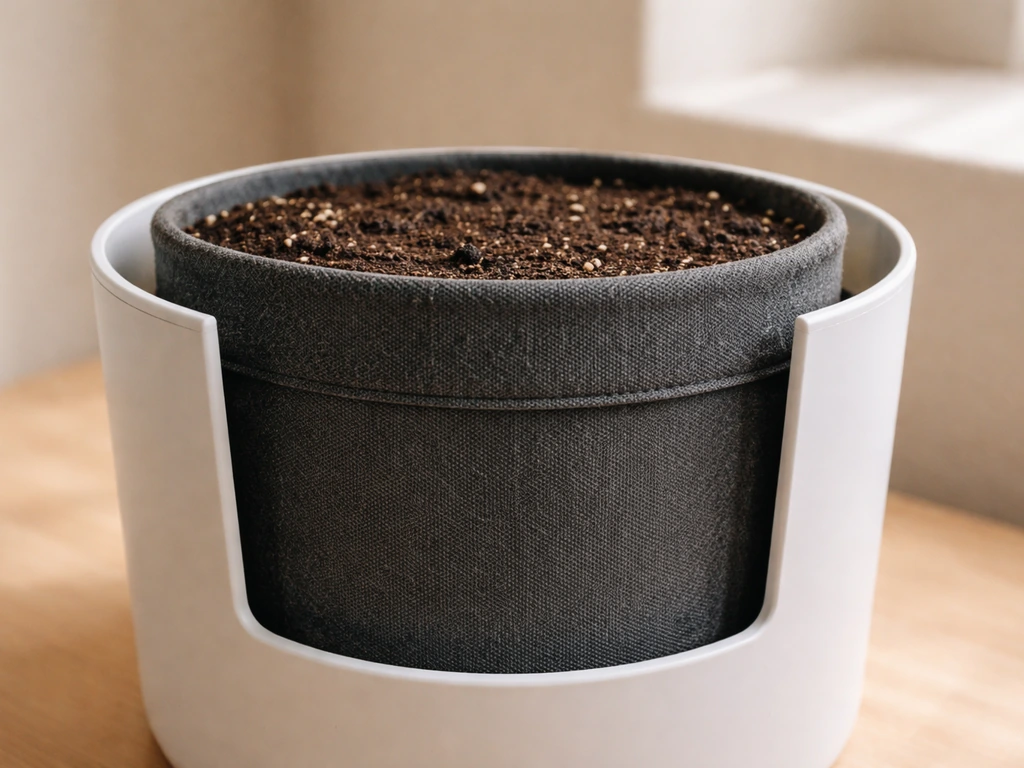
The sides of the grow bag need an air gap between the fabric and the inner wall of the outer pot. If the bag is pressed tightly against a solid plastic or ceramic pot wall with no space, air can't reach the fabric, and air pruning is reduced or stops working altogether.
Gardening Know How notes that air pruning relies on pot/container sides that allow airflow, such as small holes or breathable fabric, and anything that blocks that exposure can interfere with the pruning effect air can't reach the fabric. You want at least a small gap, ideally half an inch to an inch around the sides.
This is easier to achieve if the outer pot is one size up from the grow bag, rather than an exact fit.
Stability and handling
One of the main reasons to pot a grow bag is stability, so choose an outer pot heavy enough to stay upright when the bag is full of moist soil. Terracotta and thick-walled ceramic pots work well because their weight anchors the setup. Lightweight plastic pots can tip just as easily as a bare grow bag if they're not wide enough at the base. Make sure the grow bag handles, if it has them, are accessible above the pot rim so you can still lift the bag out when you need to repot or inspect roots.
Picking the right pot and grow bag combination
| Outer Pot Material | Drainage Behavior | Airflow to Fabric | Weight/Stability | Best For |
|---|---|---|---|---|
| Terracotta | Good (porous base) | Good if slightly oversized | High (stable) | Herbs, flowers, small vegetables |
| Ceramic/glazed | Good with drain holes | Moderate (smooth walls, tight fit possible) | High (stable) | Ornamental setups, patios |
| Plastic (thick-walled) | Good with drain holes | Good if oversized | Low to moderate | Budget setups, balconies |
| Fabric outer pot | Excellent | Excellent | Low (needs support) | Not ideal as sleeve |
| Metal/galvanized | Good with drain holes | Moderate | High (stable) | Raised bed-style look, trees |
For grow bag sizing, use the manufacturer's listed dimensions (length, width, height) to match the bag to the outer pot. As a rule, pick an outer pot with an interior diameter at least one to two inches wider than the grow bag's stated width. This gives you the all-important air gap on the sides and makes it easier to lift the bag out later. A 3-gallon grow bag is typically around 10 inches wide and 8 inches tall, so a 12-inch diameter pot is a good match. A 10-gallon bag will be roughly 16 inches wide and 12 inches tall and needs a pot with at least an 18-inch interior diameter.
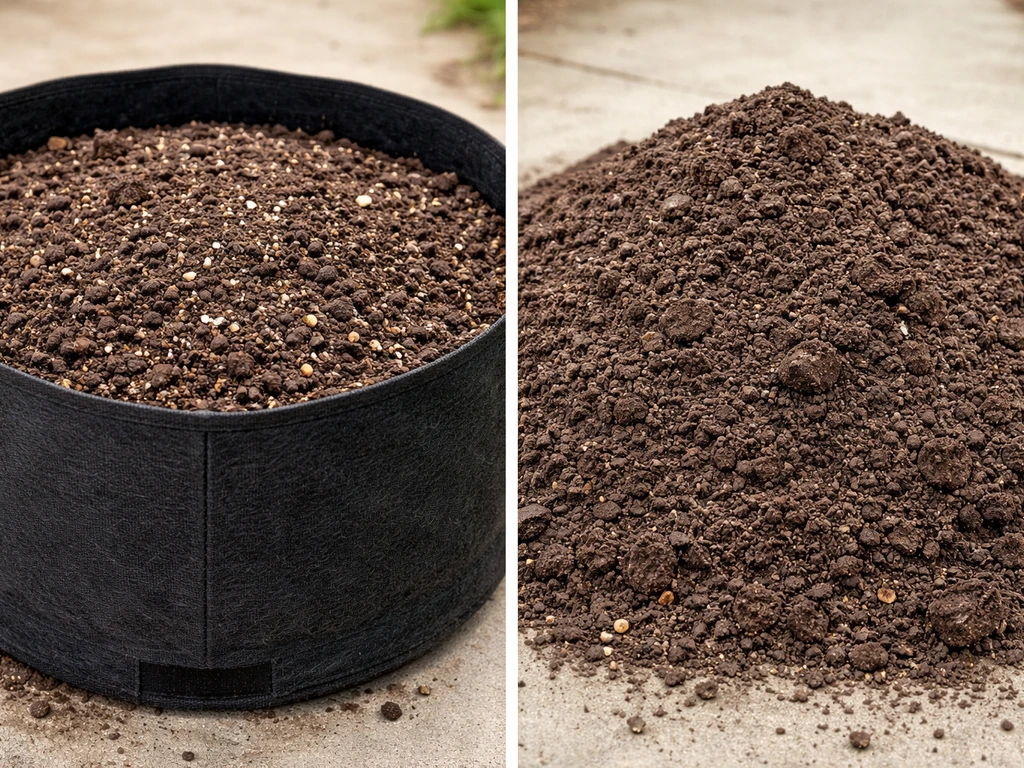
For the grow bag itself, avoid lined or waterproof-bottomed bags for this setup. If you're wondering can i use raised bed soil in grow bags, the main thing is to keep the mix well-draining so water doesn't pool in the fabric. Those designs are meant to hold moisture longer, which is the opposite of what you need inside an enclosed pot. Stick with a standard nonwoven fabric bag in 300 to 400 GSM thickness. Bags without handles can fit into pots more cleanly, but bags with handles are easier to lift out, so think about how often you'll want to remove and inspect. Thicker fabric (400+ GSM) is more durable and holds its shape better inside the pot.
Watering and feeding when a pot is in the picture
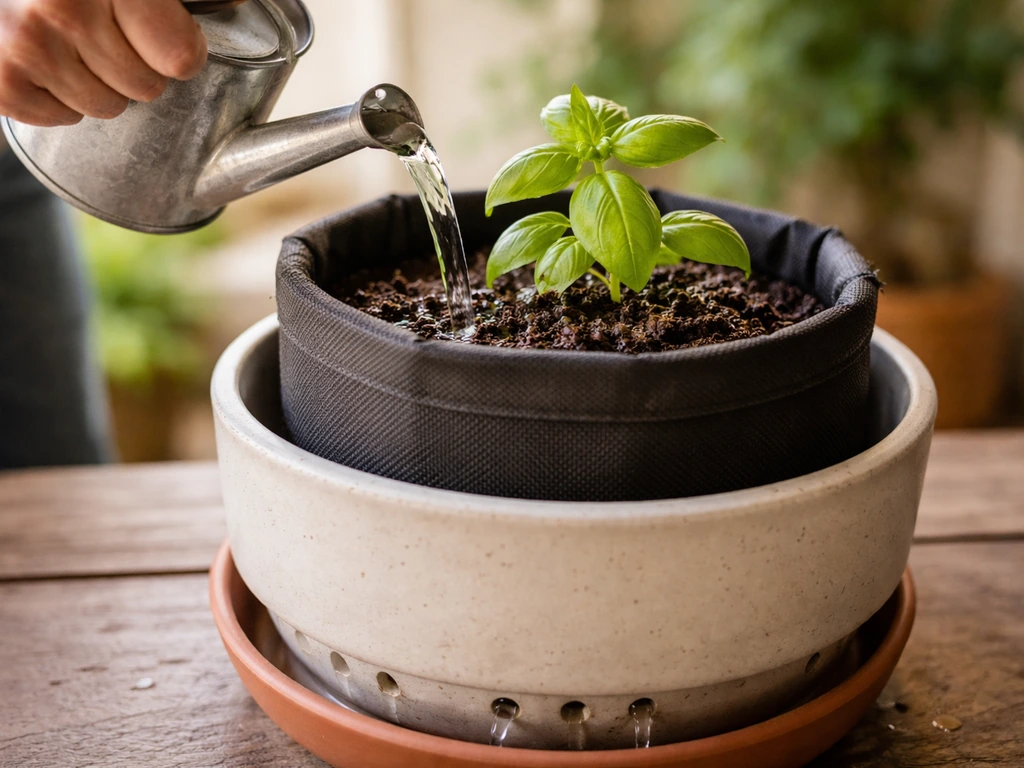
When a grow bag is sitting inside a pot, drying behavior changes and you need to pay attention to it. On one hand, the outer pot walls block some wind and reduce lateral evaporation, which means the mix may stay moist slightly longer than a bare grow bag sitting in the open. On the other hand, rigid plastic pots can reach internal temperatures above 120°F on a hot sunny day, and if the pot is dark-colored and sitting in direct sun, heat can accelerate drying from the top. Check soil moisture by lifting the pot (light means dry) or using your finger two inches deep, and check more often than you think you need to in the first few weeks until you know how your specific setup behaves.
Water until runoff comes out the drainage holes of the outer pot, then stop. Never let the outer pot sit in a saucer of collected water. If you're using a drip tray, empty it within an hour of watering. Because grow bags naturally allow more water to pass through the medium compared to rigid containers, nutrients leach out faster. Bob Vila's grow bag guidance and other sources are consistent on this: supplement with slow-release granular fertilizer worked into the mix at planting, then follow up with liquid feeds every one to two weeks during the growing season. Organic slow-release options like fish meal or pelleted chicken manure work well as a base, with a balanced liquid fertilizer on top.
Which plants work well (and which don't)
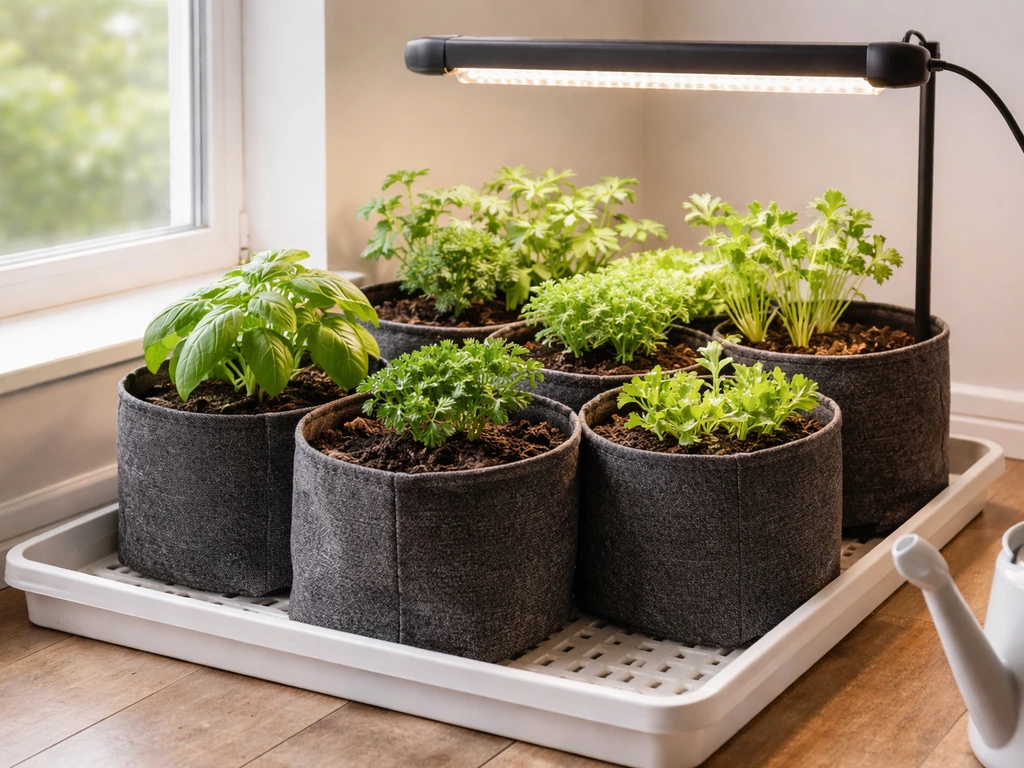
Most common home garden crops do fine in a grow bag-in-pot setup as long as the bag size matches the plant's root space needs. Johnny's Selected Seeds recommends a 10-gallon Smart Pot for broccoli, cabbage, eggplant, and peppers, and those same crops translate well to a 10-gallon bag sitting inside a large outer pot. Tomatoes, cucumbers, and zucchini are good candidates in 10 to 20-gallon bags.
Herbs like basil, parsley, and cilantro work in 3 to 5-gallon bags with a medium outer pot. Flowers like marigolds, petunias, and dahlias also do well. For tree seedlings and shrubs, the pot-in-pot concept is literally what the commercial nursery trade uses, so dwarf fruit trees and ornamental shrubs in 5 to 15-gallon bags are excellent candidates.
Avoid this setup for plants that need very consistent moisture and don't like swings between wet and dry, like moisture-loving bog plants. Also avoid it for very large vining crops like pumpkins or watermelons where the root system will quickly outgrow even a 20-gallon bag and the whole structure becomes unwieldy. Root vegetables like carrots and parsnips can work, but the bag needs to be deep enough (at least 12 inches) and the outer pot has to accommodate that depth without causing the bag to fold or compress.
Common problems and how to fix them
Soggy soil and waterlogging
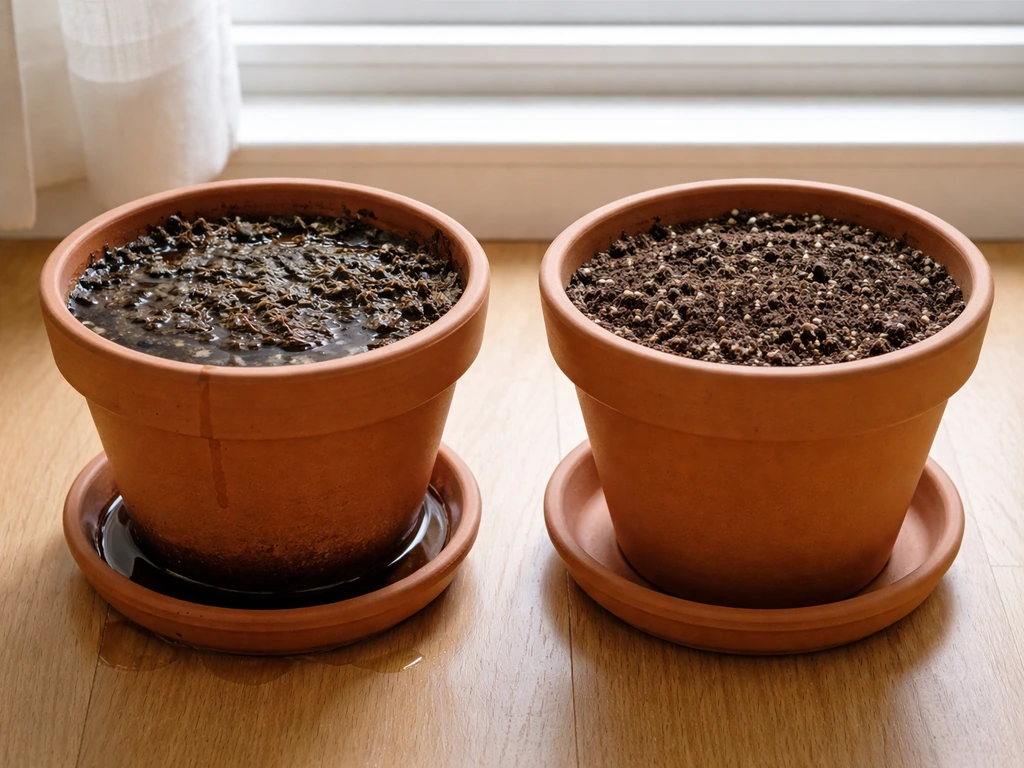
This is the most serious failure mode. If roots are sitting in waterlogged media, they can't get oxygen and they die. The cause is almost always one of three things: the outer pot has no drainage holes, the grow bag is sitting flat on the pot base with no gap for water to escape, or water is collecting in a saucer or tray under the pot. Fix the drainage hole situation immediately and add a riser under the bag. If the mix smells sour or the lower roots look brown and mushy, remove the plant, trim dead roots, and repot with fresh mix in a properly drained setup.
Soil drying out too fast
If the pot is dark-colored and in full sun, it can get very hot and the mix dries from the top faster than expected. Move the outer pot to a spot with afternoon shade, switch to a lighter-colored outer pot, or wrap a reflective material around the pot exterior. Mulching the top of the grow bag with an inch of straw or bark also slows surface drying significantly.
Root circling despite using a fabric bag
If the grow bag is pressed tightly against the inner wall of the outer pot with no air gap, the fabric can't do its job. Roots that reach the fabric hit the solid pot wall behind it instead of open air, and they start circling just like they would in a rigid container. The fix is simple: use a larger outer pot so there's a clear gap between the fabric bag and the pot wall. Even half an inch of space makes a real difference.
Nutrient deficiency mid-season
Yellowing leaves, slow growth, and poor flowering mid-season in an otherwise healthy plant usually point to nutrient depletion. Grow bags leach nutrients faster than sealed containers because more water moves through the medium. Start liquid feeding every 7 to 14 days as soon as plants are established, and don't skip it. A half-strength balanced fertilizer applied consistently does more good than irregular heavy doses.
Mold, fungus gnats, and pests
The enclosed space between the grow bag and the outer pot can trap moisture against the fabric exterior, especially if the gap is small. This creates a microclimate that mold and fungus gnats love. Make sure there's genuine airflow in that gap, not just a theoretical one. Fungus gnats lay eggs in moist topsoil, so let the top inch of the mix dry completely between waterings. Yellow sticky traps catch adults. For mold on the outer fabric surface, improve airflow around the pot and reduce watering frequency slightly.
When it's better to skip the pot entirely
Honestly, putting a grow bag inside a pot adds complexity. If you don't have a good reason for it, a standalone grow bag on a well-drained surface is simpler and performs better because there's nothing restricting airflow. If your main concern is stability, try a wider-based grow bag or position bags against a wall or fence. If you're worried about aesthetics on a patio, grow bags can go directly on concrete as long as they're slightly elevated for drainage.
If you want the plant in the ground, some growers bury grow bags directly in soil as a root management strategy, which is a different approach worth considering. If your goal is to plant in the ground, you can also grow successfully with grow bags buried in soil, but you still need good drainage and airflow.
The pot-in-pot method makes the most sense when you genuinely need the structural support of a hard container, you want to move plants around regularly, you're growing trees or shrubs that benefit from the commercial pot-in-pot nursery technique, or you want the aesthetic of a proper planter without giving up the root health benefits of fabric. For straightforward vegetable growing on a deck or balcony, a quality grow bag on its own, properly watered and fed, will almost always outperform the more complicated layered setup.
If you're already thinking about where grow bags can go, the same principles around drainage and airflow apply whether you're putting a grow bag on concrete, using one indoors, or even burying one in the ground. If you’re growing indoors, you can still use the same drainage and airflow rules to keep the roots healthy using one indoors. The surface underneath and the airflow around the bag always matter, regardless of the specific setup.
FAQ
Can you put a grow bag inside a pot when the outer pot sits on concrete or a patio slab?
Yes, but only if the pot has true drainage outlets and you avoid letting the grow bag base sit on wet concrete. Use pot feet or a riser so runoff cannot pool, water to full runoff through the holes, then empty any capture tray quickly. Also expect slightly slower drying than an open grow bag because the hard pot moderates wind.
Can I place a grow bag inside a decorative cachepot that has no drainage holes?
Avoid it. A solid-bottom decorative cachepot traps water around the grow bag, which can turn a healthy mix into waterlogged fabric and cause root dieback. If you must use a non-draining outer container, treat it like a sleeve only if the grow bag drains freely through its own bottom and you can guarantee no standing water can collect under the bag.
How much space should there be between the grow bag and the inside wall of the outer pot?
Aim for at least a small continuous side air gap, roughly half an inch minimum if possible, and leave the bottom able to drain by keeping a riser under the bag. A tight fit can reduce air-pruning and lead to slower growth and more circling roots, especially as roots reach the fabric wall.
What should I do if the outer pot is dark and my grow bag dries out too quickly?
Switch to lighter-colored or reflective outer pots in hot sun, and check moisture more frequently after watering because the top can dry faster than you expect while the bottom stays cooler. If leaves wilt midday but recover later, increase monitoring and consider mulching the grow bag surface to slow evaporation.
How often should I check soil moisture in a grow bag-in-pot setup?
For most setups, start checking 2 to 3 times per week until you understand your conditions, then adjust. Use the finger test about 2 inches down, or lift the pot and compare weight. Do not rely only on the top inch, since heat and wind can make the surface look dry while deeper layers stay wet.
My plant has yellow leaves and slow growth, could it be the grow bag-in-pot method?
It usually means either leaching is happening faster than your feeding schedule, the mix started low on nutrients, or the plant is root-constrained. Start consistent feeding (for example, liquid fertilizer every 7 to 14 days after establishment) and confirm the outer pot drains freely so roots can access oxygen.
What are the signs of root problems in this setup, and what should I fix first?
If you see a sour odor, brown mushy lower roots, or the plant suddenly collapses, treat it as a drainage failure first. Remove the plant, trim any dead roots, refresh the medium, ensure the outer pot has large bottom holes, add a riser, and never leave the pot in standing water or an undrained tray.
Can I use drip irrigation with a grow bag inside a pot?
Yes, but plan for faster nutrient and water changes. Drip emitters can work well if the system waters enough to produce drainage runoff, and if the tray is emptied promptly. Avoid constantly dripping without letting excess escape, since continuous wetting removes the natural drying cycle that helps prevent fungus gnats.
Does putting the grow bag inside a pot make it hotter or drier in summer?
Consider adding a reflective mulch or straw on the bag surface, and place the outer pot where it gets afternoon shade. If you use a tall outer pot, wind protection can increase heat too, so monitor top-down drying and do not assume the enclosure prevents heat stress.
Can I use a waterproof-bottom grow bag or a raised-bed mix designed for longer moisture retention?
Avoid bags that are lined or described as waterproof-bottom or raised-bed-style moisture-retention bags for this exact pot-in-pot method. Those designs are made to hold water longer, which conflicts with the goal of quick drainage and air at the fabric surface when enclosed by a rigid pot.
How do I remove the grow bag to inspect roots without damaging it?
In most cases, remove the bag from the outer pot to inspect roots, especially mid-season and at repot time. The wider the outer pot relative to the bag, the easier it is to lift without damaging fabric. Handles can help, but still plan for inspection so you can catch circling roots early.
Can I use this setup for bog or moisture-loving plants?
It can, but it is not ideal for plants that require consistently wet conditions. If you try it, you must manage drainage carefully and accept that you will not get the same constant saturation you would in a bog garden or hydroponic setup. For moisture-loving plants, consider a different container method designed for steady moisture instead.
What happens if my outer pot is only slightly bigger than the grow bag?
Most people choose a larger outer pot to guarantee a side air gap. If the outer pot is the same size or smaller, the bag can bow into the wall and the air gap disappears as the medium settles. A one-to-two-inch larger interior diameter than the grow bag width is a good starting target.
Next Articles
Can You Put Grow Bags on Concrete? Safe Setup Guide
Learn if you can put grow bags on concrete and how to set up trays, risers, barriers for safe drainage and healthy roots
Can You Use Grow Bags Indoors? Setup Guide and Tips
Yes. Learn how to use fabric grow bags indoors with placement, drainage, light, watering, nutrients, and fixes for mold
Can I Use Raised Bed Soil in Grow Bags? How-To Guide
Yes, with changes: how to mix raised bed or garden soil for grow bags, improve drainage, and manage faster drying.