You can use raised bed soil in a grow bag, but only if you modify it first. Straight garden soil or raised bed mix used as-is will compact, drain poorly, and often crust over in the confined space of a fabric bag, killing roots and stalling growth. The fix is straightforward: cut it with perlite, coir, and compost so the structure stays loose and airy. If your raised bed soil is already a quality blend (not heavy clay or native topsoil), you're closer to ready than you might think.
Can I Use Raised Bed Soil in Grow Bags? How-To Guide

Marcus Holloway
7 May 2026
Why garden soil struggles in grow bags
The core problem is confinement. In the ground or even a raised bed, roots can push through dense spots, seek out moisture, and "mine" the surrounding soil for nutrients. In a grow bag, they can't do any of that. If you were wondering whether you can plant grow bags in the ground, the key point is that grow bags are meant to be used as containers, so you should focus on making the mix work well for a raised setup instead In a grow bag. Whatever you fill the bag with is all they get. That makes soil structure and composition far more critical than it is in open ground.
Garden soil and most raised bed mixes tend to compact under the weight of repeated watering. Once compacted, air pockets disappear, water pools rather than drains, and oxygen gets crowded out of the root zone. University of Maine Extension specifically warns that garden soil in containers compacts, dries out, and crusts over quickly, exactly the conditions that cause root stress and stunted growth. Add in the fabric bag's excellent drainage (which dries the mix out faster than a plastic pot), and heavy soil becomes an even bigger liability.
Topsoil, raised bed mix, compost, and potting mix: what's the difference?
Not all "garden soil" is the same, so it's worth being specific about what you're actually working with before deciding how much to amend it.
| Soil Type | What It Is | Works in Grow Bags? | What It Needs |
|---|---|---|---|
| Straight garden/native soil | Your yard's ground soil, often clay or silt-heavy | No — too dense and risky | Full replacement or very heavy amendment |
| Topsoil (bagged) | Mineral soil, sometimes blended with sand or compost | Not alone — compacts easily | Add perlite and coir, still risky for pathogens |
| Raised bed mix (quality blend) | Often a topsoil/compost/bark blend; lighter than topsoil | With amendments, yes | Add perlite and extra compost to lighten |
| Bagged compost | Decomposed organic matter, rich but water-retentive | Not alone — too dense when wet | Blend with perlite and peat or coir |
| Potting mix / container mix | Specifically designed for containers: coir, perlite, bark, etc. | Yes — best starting point | May need slow-release fertilizer added |
A quality raised bed mix sits somewhere between topsoil and potting mix on that spectrum. If yours is fluffy and well-blended (not heavy or clay-like), it's a reasonable base to work with. If it's dense, sticky when wet, or has a lot of native soil in it, treat it more like topsoil and amend aggressively, or skip it entirely in favor of a proper container mix.
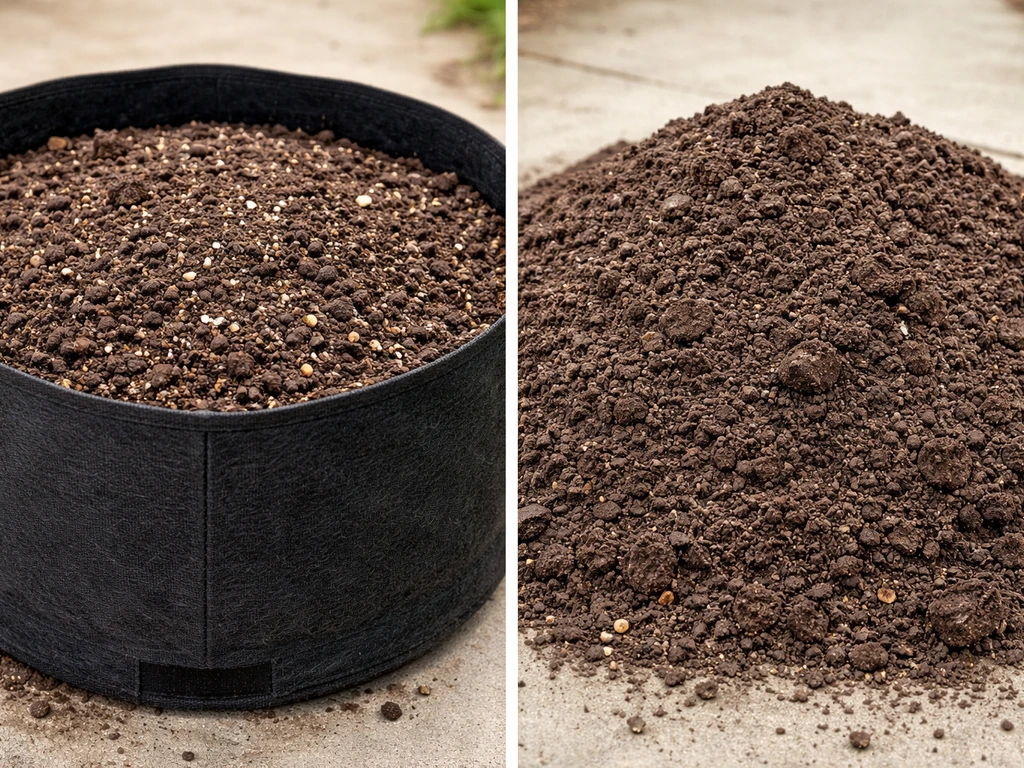
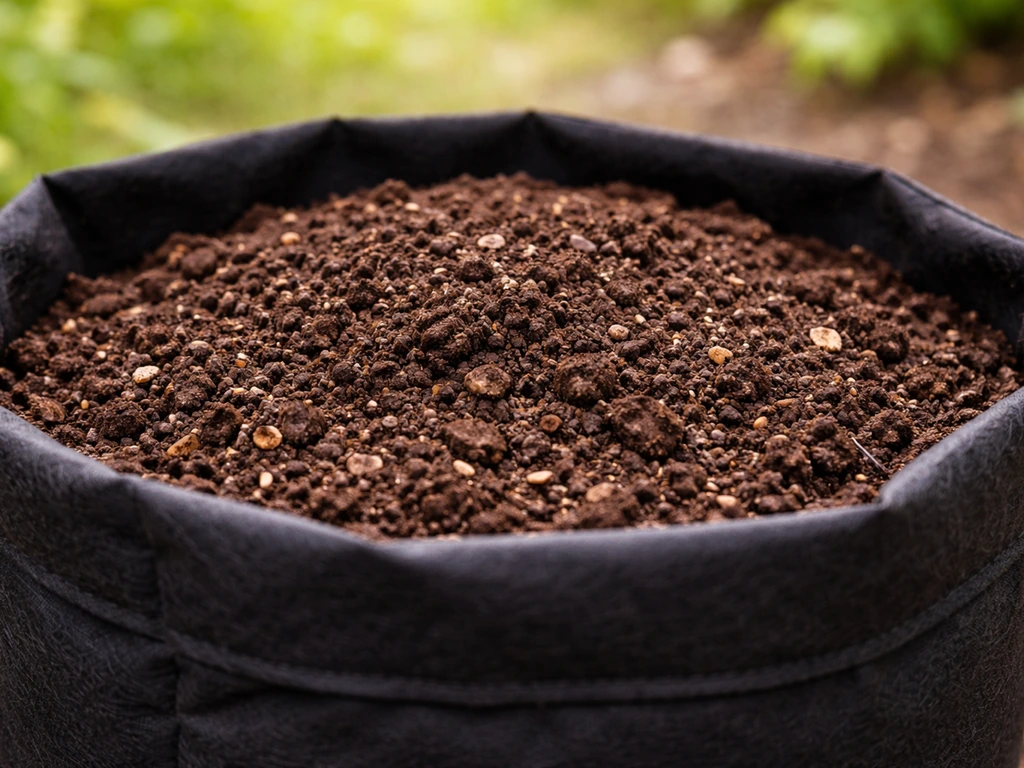
The best soil mix for grow bags: ratios and what to add
The goal is a mix that holds enough moisture to sustain plants between waterings, drains excess water quickly so roots aren't waterlogged, stays loose enough for root growth throughout the season, and carries enough nutrients to support steady growth. University of Vermont Extension also emphasizes that for organic growers, potting mixes should have proper pH, enough available nutrients, and good aeration and drainage. Potting mix already does this, which is why it's the go-to recommendation. But you can build a reliable mix from scratch or stretch what you have.
Option 1: Pure potting mix (easiest)
Buy a quality potting or container mix and fill your bags. University of Maryland Extension notes these mixes typically have a pH around 6.2 and are made from ingredients like sphagnum peat moss, perlite, vermiculite, composted bark, compost, and coir, everything roots need without the compaction risk. Add a slow-release granular fertilizer at the label rate when filling, and you're set for the season's first few months.
Option 2: DIY mix from scratch
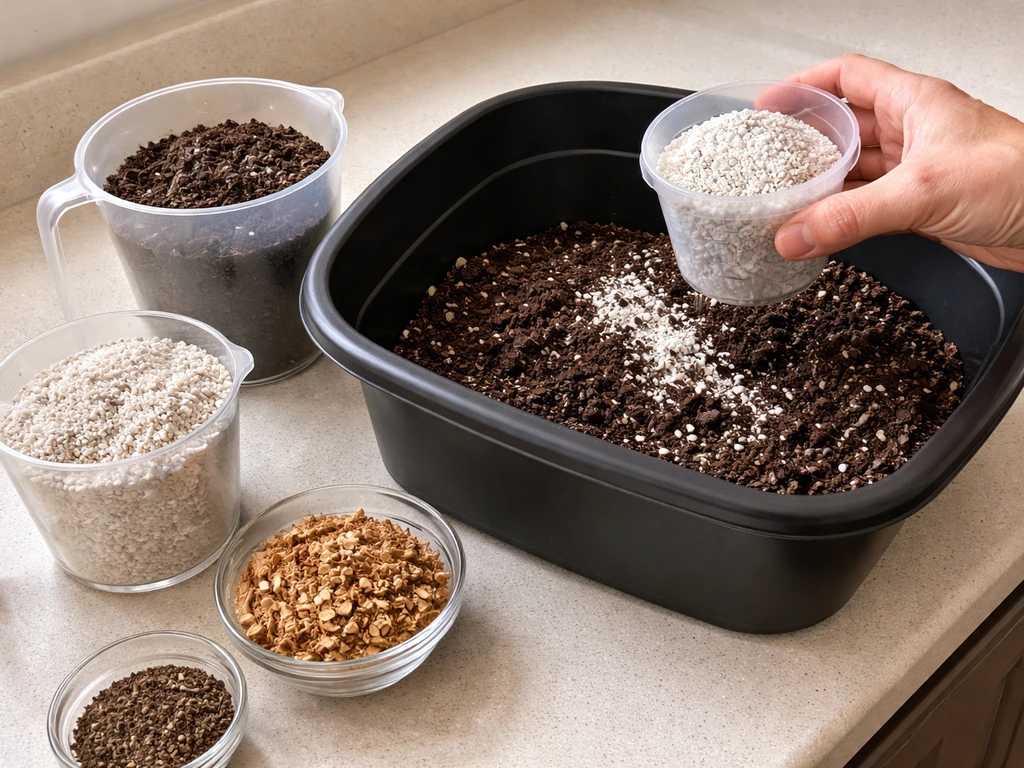
University of Maine Extension suggests equal volumes of peat moss, coarse vermiculite, and compost as a reliable container mix. Penn State Extension recommends a similar structure: peat moss blended with perlite or vermiculite, plus compost or organic fertilizer for both aeration and nutrients. Here's a practical ratio that works well in fabric grow bags:
- 1 part peat moss or coconut coir (moisture retention and structure)
- 1 part perlite or coarse vermiculite (drainage and air porosity)
- 1 part quality compost (nutrition and microbial activity)
- Optional: slow-release granular fertilizer mixed in at planting time
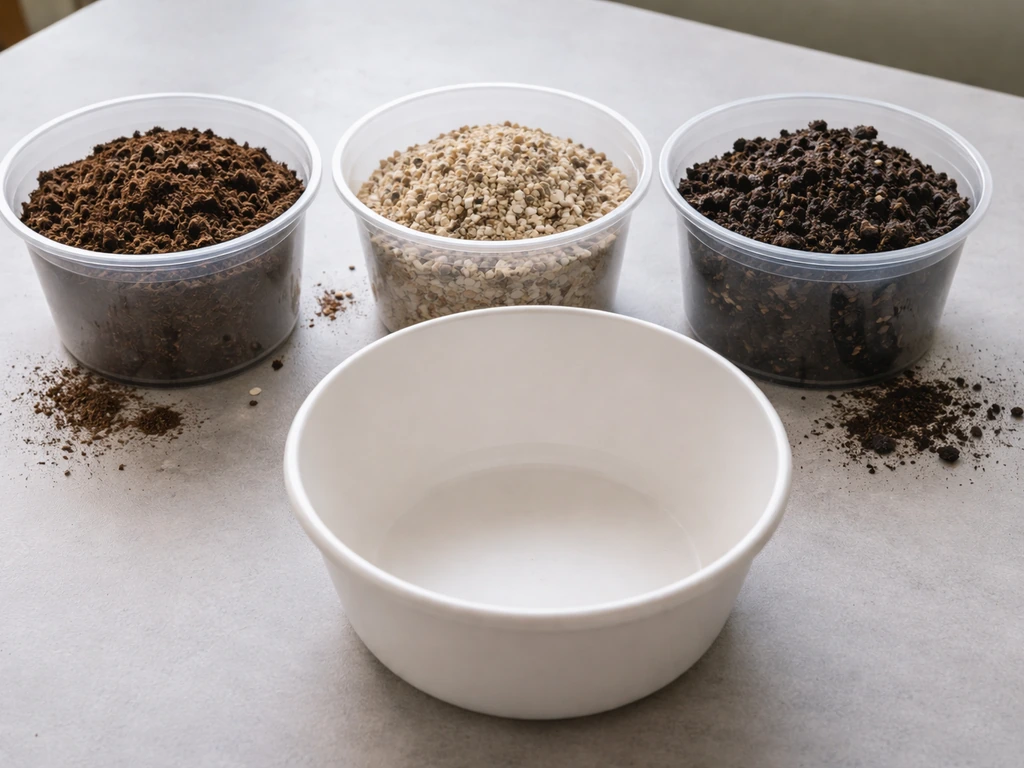
Option 3: Stretching your raised bed mix
If your raised bed mix is reasonably light and you want to use it rather than buy new material, blend it with amendments to hit a similar structure. A mix of roughly 50% raised bed soil, 25% perlite, and 25% coir or compost gives you something workable. Never use raised bed mix as more than 50 to 60 percent of the total volume, beyond that, you're relying on the soil's structure too heavily and compaction becomes likely.
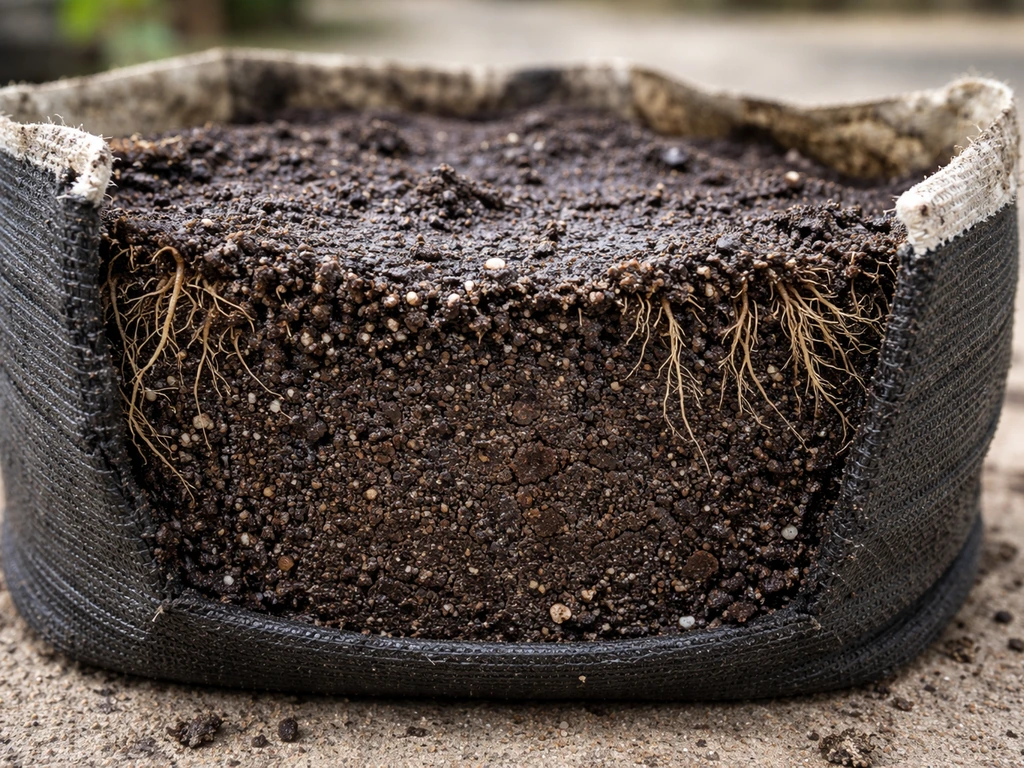
Drainage, compaction, and watering in fabric bags
Fabric grow bags drain faster and dry out more quickly than plastic pots or raised beds. You can put grow bags on concrete as long as you manage drainage so excess water can escape and air can reach the roots. That's actually one of their biggest advantages: air-pruning roots and preventing waterlogging. But it also means your watering schedule needs to adjust. Bob Vila notes that grow bag gardening requires more frequent watering than in-ground or raised bed growing because the soil dries out quickly. In hot weather, that can mean daily watering for larger bags and even twice daily for small ones.
The practical fix is straightforward. Check moisture by pushing your finger 2 inches into the mix, if it's dry at that depth, water thoroughly until you see runoff from the bottom of the bag. Don't water on a rigid schedule; water based on what the soil is actually telling you. If you are trying to put grow bags in pots, make sure your pot has good drainage and use a proper container mix so the roots do not sit in wet, compacted soil. A mix with coir or vermiculite will hold moisture longer than one heavy in perlite, so dial in your amendment ratio based on your climate and how often you can check on the bags.
Compaction is a slower threat. Over a growing season, organic matter breaks down and the mix settles. You'll notice the soil level dropping and sometimes a hard crust forming on top if you're using any soil at all in the blend. Breaking up the surface lightly before watering helps, and topping up the bag (more on that in the maintenance section) keeps root space optimized.
When to skip garden soil entirely
Some situations call for leaving garden or raised bed soil out of the equation altogether, regardless of how well you amend it.
- If your garden has had recent disease problems (fungal blight, root rot, wilts), the pathogens can survive in the soil and infect whatever you plant in the bag.
- If your soil has a weed problem, especially perennial weeds like bindweed or nutsedge, seeds and root fragments will come along for the ride.
- If you're starting seeds or transplanting seedlings, any risk of damping-off disease from contaminated soil can wipe out young plants fast.
- If you're growing in bags indoors or on a surface where you can't afford pests or weed germination — read more about indoor grow bag use and growing on concrete surfaces, both of which raise the stakes for soil cleanliness.
- If you don't know what's been treated, sprayed, or applied to the soil source — unknown herbicide residue in particular can persist and damage roots.
Colorado State University Extension is direct about this: potting soil should be free of disease organisms, insects, and weed seeds. That standard rules out most garden soil without intervention. If you're set on using garden or raised bed soil, solarization is one way to reduce pathogen and weed seed load before using it. Spread the soil in a thin layer under clear plastic sheeting in direct sun for 4 to 6 weeks during the hottest part of summer. Research cited by ISHS shows solarization can eliminate many pests when the growing medium reaches around 60 to 70°C (140 to 158°F) for 30 to 60 minutes. That said, Oklahoma State Extension notes it won't reliably control perennial weeds, so it's not a cure-all.
How to fill and prep your grow bag: step by step
- Choose your mix. Use a ready-made potting or container mix, or blend your own using the ratios above. If using raised bed soil, cap it at 50% of the total volume and amend with perlite and coir.
- Check for obvious problems. If the soil source has had disease or heavy weed pressure, either solarize it first or swap in clean potting mix instead.
- Add slow-release fertilizer. Mix a granular slow-release fertilizer (balanced NPK, like 10-10-10 or similar) into the dry mix before filling. Follow the label rate — more is not better here since roots can't escape excess salt buildup in a bag.
- Fill the bag loosely. Don't pack or compress the mix. Fill to about 2 to 3 inches below the bag's rim to leave room for watering and topping up later.
- Water before planting. Wet the mix thoroughly before putting plants in. Dry potting mix can be hydrophobic, meaning water beads off rather than soaking in. Pre-wetting solves this.
- Plant at the right depth. Place transplants or seeds at the same depth they would go in a raised bed. With tomatoes, you can bury the stem deeper to encourage additional root growth.
- Water in well after planting. Give the bag a thorough first watering to settle the mix around roots and eliminate large air pockets. Don't press the soil down manually — let water do the work.
Keeping your bags healthy through the season
Fertilizing
Frequent watering, which is unavoidable with fabric bags, flushes nutrients out of the mix faster than in a raised bed. Even with a slow-release fertilizer added at planting, most crops will need supplemental feeding by midsummer. UNH Extension recommends that slow-release fertilizer incorporated at the start may only need one application, but water-soluble liquid fertilizer applied every week or two is a reliable backup to keep plants fed through the season. Watch for yellowing leaves (nitrogen deficiency), purple-tinged leaves (phosphorus deficiency), or brown leaf edges (potassium or salt stress) as signals that nutrition is off.
Topping up settled soil
The mix will settle and compact somewhat over the growing season, especially if it contains any soil or heavy compost. When the level drops significantly, top up with fresh potting mix or coir-perlite blend to restore the root zone volume. Don't use more garden soil to top up, you want the surface layer to stay light and drain freely.
Drainage problems
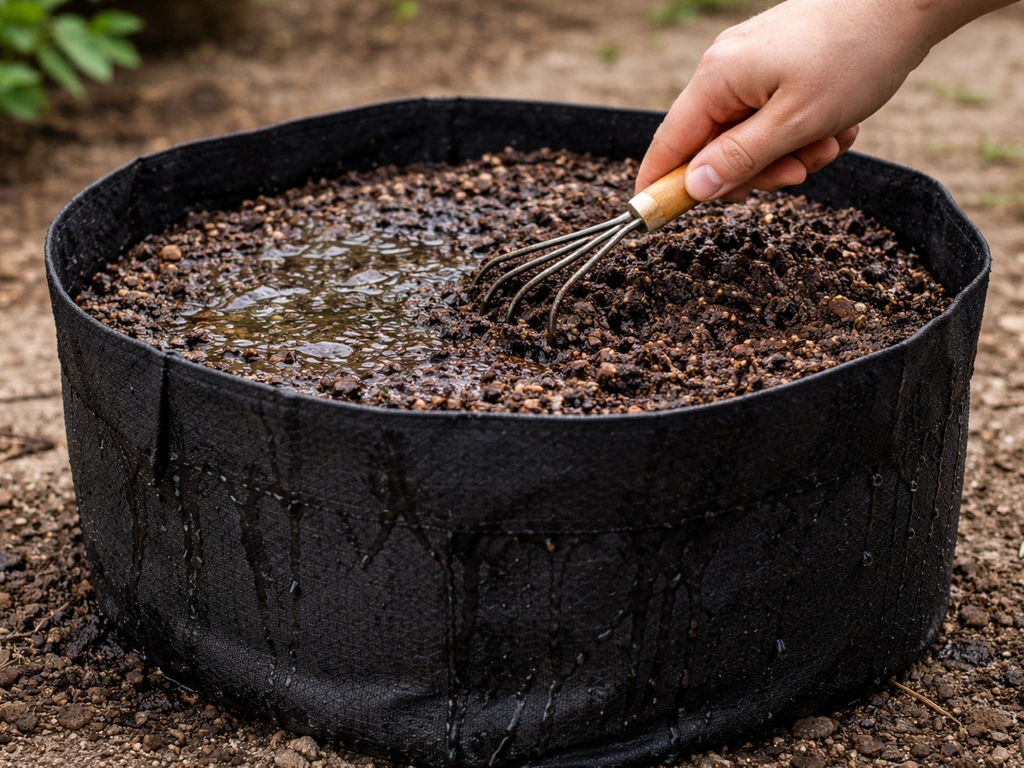
If water is pooling on top of the mix rather than draining through, you likely have compaction or a soil ratio that's too heavy. Gently break up the surface with a fork or chopstick to restore porosity. If it's a recurring problem, you may need to remove the plant, empty the bag, re-amend the mix with more perlite, and replant.
Reusing mix between seasons
Colorado State University Extension advises never reusing the same potting soil from the previous growing season because it may contain disease organisms. Oklahoma State takes a slightly more pragmatic view: if your plants grew well and showed no signs of disease, the risk is lower. In practice, the safest approach is to refresh the bag with at least 30 to 50% new potting mix each season, add fresh compost, and incorporate new slow-release fertilizer. Fully replace the mix if you had any disease issues during the prior season.
Maintaining soil life
Grow bags with a reasonable compost component will support a healthy microbial community that helps break down organic matter and makes nutrients available to roots. Avoid over-applying synthetic fertilizers, which can build up salts and disrupt soil life. If you're using mostly soilless media (pure perlite and coir), consider adding a small amount of worm castings or quality compost each season to introduce and sustain microbial activity.
FAQ
How can I tell if my raised bed soil is too heavy to use in a grow bag?
Wet a handful and squeeze it. If it forms a sticky clump that stays together when you poke it, or if water appears to sit on the surface instead of soaking in quickly, it is likely too dense. In that case, treat it like topsoil and amend more perlite and coir, or switch to a true container mix.
What’s the best way to amend raised bed soil so it stays loose in a fabric grow bag?
Aim for a “fluffy” container structure, then adjust by observation. Start near a 50% raised bed soil, 25% perlite, and 25% coir or compost blend, mix thoroughly, and then check drainage after the first watering. If it takes more than about 10 to 15 minutes to drain after runoff begins, increase perlite next time or top up with a lighter mix.
Can I use raised bed soil for seedlings in grow bags?
It’s possible only if it’s lightened a lot and kept consistently moist, but germination and early roots are more sensitive to density and pathogens. For best results, use a dedicated seed-starting or all-purpose container mix for the first few weeks, then transplant into amended grow-bag mix.
Should I add fertilizer when using raised bed soil in grow bags?
Yes, but match the fertilizer type to the mix. If you’re building a blend similar to potting mix, you can add slow-release granular fertilizer at label rate when filling. If your raised bed soil already contains manure or compost, reduce or skip additional nitrogen-based products to avoid excessive growth with fewer flowers or fruit.
Will my grow bag mix go “stale,” and how do I refresh it mid-season or next year?
During the season, the main issue is usually nutrient depletion and mix settling. Mid-season, use a liquid feed every week or two if leaves start yellowing or growth slows. For next year, don’t assume the same mix is safe. Replace most of it (at least 30 to 50%), and fully replace if you had any disease problems.
How often should I water when using raised bed soil in grow bags?
More often than in-ground planting, because fabric bags dry quickly. Use a depth check instead of a schedule: push your finger about 2 inches in, and water thoroughly only when that depth feels dry. In hot weather, this can mean daily watering for larger bags, and sometimes more for small bags.
Can I mix raised bed soil with compost and still avoid compaction?
Small amounts are fine, but too much compost or native soil can increase settling and crusting. If your compost is rich and fine, increase perlite and consider limiting raised bed soil to the 50 to 60% range. If crust forms at the top, lightly break the surface and add a thin top-up with lighter container mix only when levels drop.
Is solarization enough to make raised bed soil safe for use in grow bags?
It can reduce weed seeds and many pathogens if done properly, but results vary with soil type, thickness of the soil layer, and achieving sustained high temperatures. If you can’t confidently solarize, the safer approach is to use store-bought container mix or restrict your amended use to low-risk crops in a rotation.
What should I do if water pools on top after I amend with raised bed soil?
First, gently break up the top layer to restore airflow. If pooling happens repeatedly, your blend is too heavy or the perlite amount is too low. The practical fix is to remove the plant, empty and re-amend the bag with more perlite (or switch to a higher proportion of container mix), then replant to avoid root suffocation.
Can I use raised bed soil in grow bags placed inside a pot or on a patio?
You can, but you must manage drainage and runoff. If you nest a grow bag in a decorative pot, ensure the outer pot has drainage and that water cannot collect at the bottom. If you place bags on hard surfaces, keep a small gap for airflow and empty any saucer or catch tray so the mix doesn’t stay waterlogged.
Next Articles
Can You Plant Grow Bags in the Ground? Best Setup Tips
Learn if fabric grow bags can touch soil, how to prevent waterlogging, weeds, pests, and fabric damage.
Best Soil for Grow Bags: Mix Recipes and How Much to Add
Best soil for grow bags: mix recipes, how much to add by bag size, and vegetable tweaks for strong drainage and yield.
Pros and Cons of Grow Bags for Vegetables and Flowers
Grow bag pros and cons for veg, flowers, trees, and mushrooms: aeration, mobility, and watering plus fixes for common is