
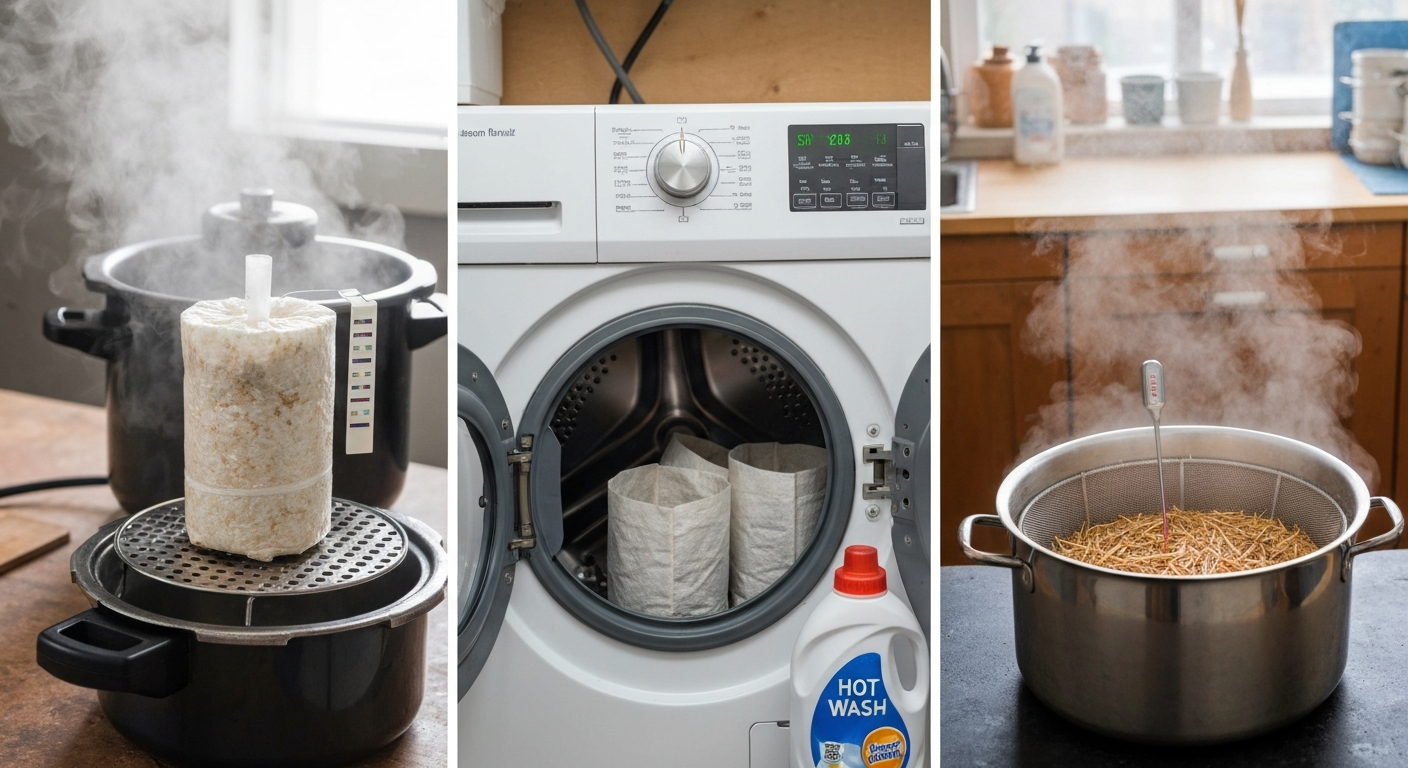
For vegetable and ornamental grow bags, sterilization usually means a hot machine wash with detergent at 60°C (140°F) or higher, followed by a thorough dry. For mushroom grow bags, especially grain spawn or supplemented sawdust bags, you need real sterilization: a pressure cooker or autoclave running at 121°C (250°F) and 15 psi for 90 to 120 minutes. Pasteurization at 60–80°C for 1–2 hours covers straw and coir substrates used for oyster mushrooms and similar species. Which method you need depends almost entirely on what you're growing, what's in the bag, and what material the bag is made from.
How to Sterilize Grow Bags: Safe Methods for Home Growers
Marcus Holloway
5 Aug 2026
Why sterilize grow bags, and who this guide is for
Reusing grow bags without cleaning them properly is one of the most reliable ways to carry disease, pest eggs, and fungal spores from one season or crop to the next. For vegetable growers, that might mean a build-up of Fusarium or root rot pathogens that hit your next tomato crop before it even gets started. For mushroom cultivators, contamination in an unsterilized grain bag can wipe out an entire batch of spawn within days. This guide covers both worlds: home gardeners using fabric pots for vegetables, herbs, flowers, and trees, and hobby mushroom cultivators working with polypropylene spawn and fruiting bags. Whether you're cleaning a well-used fabric pot or prepping a filter-patch bag for grain spawn, you'll find the exact method, temperature targets, and material cautions you need here.
Sterilize vs. pasteurize: what each term actually means
These two terms get used interchangeably, but they describe completely different levels of treatment and are not interchangeable in practice.
Sterilization means the complete elimination of all viable microorganisms, including the heat-resistant bacterial spores that survive boiling. It requires saturated steam under pressure, typically 121°C (250°F) at 15 psi, held long enough for heat to penetrate to the center of the load. This is the standard used in laboratories, healthcare settings, and mushroom cultivation when working with dense, nutrient-rich substrates like grain or supplemented sawdust. There is no effective low-temperature sterilization method for home growers.
Pasteurization is a lower-temperature heat treatment designed to knock back competing bacteria, molds, and pathogens without eliminating heat-resistant spores. For bulk mushroom substrates like straw or coir, targeting 60–80°C (140–176°F) for 1–2 hours is a practical and widely used pasteurization protocol. For fabric vegetable grow bags, a 60°C+ machine wash with detergent achieves a similar result. Pasteurized materials are not sterile, beneficial microbes and heat-tolerant organisms survive, but the microbial load is reduced enough to give your spawn or seedlings a meaningful competitive advantage.
| Sterilization | Pasteurization | |
|---|---|---|
| Goal | Eliminate ALL microorganisms including spores | Reduce competing organisms; spores may survive |
| Temperature | 121°C (250°F) under 15 psi steam pressure | 60–80°C (140–176°F) at atmospheric pressure |
| Typical duration | 90–120 min for dense loads | 1–2 hours depending on substrate and method |
| Equipment | Pressure cooker, pressure canner, autoclave | Stockpot, steam injector, machine washer |
| Used for | Grain spawn, supplemented sawdust, dense nutrient substrates | Straw, coir, cardboard, fabric vegetable grow bags |
| Overkill for? | Low-nutrient bulk substrates, fabric garden pots | Grain spawn, agar plates, supplemented blocks |
Do you actually need sterilization? A decision guide
Not every grow bag needs pressure-cooker treatment, and subjecting a fabric pot to autoclave conditions would destroy it. Here's how to match the treatment level to the actual risk and bag type.
Vegetable and herb grow bags
Standard fabric grow bags used for tomatoes, potatoes, peppers, herbs, and flowers do not require true sterilization between seasons. Hot machine washing at 60°C (140°F) or higher with detergent, plus a thorough dry, achieves the sanitization level these crops need. If you've had a confirmed disease outbreak (Fusarium wilt, late blight, club root), step up to the hottest wash the fabric tolerates plus a laundry bleach additive or EPA-registered laundry sanitizer. For tips on installing and using suspended fabric pots, see how to use hanging grow bags. The physical action of a washing machine, combined with heat and detergent, is genuinely effective here, chemical disinfectants sprayed onto porous fabric simply don't penetrate deeply enough to do the job.
Ornamental grow bags
Ornamentals carry their own set of pathogens, Pythium, Botrytis, powdery mildew spores, but the infection pressure is lower than with dense mushroom substrates. A hot wash and dry is sufficient for reusing fabric pots between ornamental plantings. For nursery growers cycling grow bags through multiple species quickly, the same 60°C wash principle applies.
Mushroom grow bags
This is where the sterilize-vs-pasteurize decision really matters. The substrate you're working with is the deciding factor, not the bag itself.
- Grain spawn bags (rye, wheat, popcorn, oats): these are rich in nutrients and bacteria thrive in them. Full sterilization at 121°C/15 psi for 90–120 minutes is non-negotiable. Pasteurization will not cut it.
- Supplemented sawdust blocks: same requirement as grain — sterilization at 121°C/15 psi. Supplementation increases contamination risk, which is why bran or rye additions always push you into sterilization territory.
- Straight hardwood sawdust (un-supplemented): many experienced growers pasteurize this, but sterilization improves reliability, especially in home environments where air quality is hard to control.
- Straw (oyster mushrooms, king straw): pasteurization at 60–80°C for 1–2 hours is the standard and works well. Sterilization adds complexity and cost without proportionate benefit for most straw species.
- Coir and cardboard-based substrates: pasteurization in the same 60–80°C range for 1–2 hours. Some coir formulations are low-nutrient enough to use with minimal treatment.
Material compatibility: what your grow bag is made of matters
Applying the wrong treatment to the wrong material can melt, shrink, or degrade a bag beyond use. Here's what to know before you start.
Polypropylene (PP) mushroom grow bags
Commercial filter-patch mushroom grow bags and standard spawn bags are made from polypropylene laminates. Polypropylene has a crystalline melting point around 160–170°C, but its practical heat tolerance in thin-film form is much lower. The key point: autoclavable-grade PP bags, when manufactured specifically for sterilization, tolerate repeated 121°C cycles. Standard polypropylene storage bags or repurposed household plastics do not. Always use bags that are explicitly labelled as autoclavable by the manufacturer. Never place the bag directly on the bare metal base of the pressure cooker, use a rack, trivet, or folded towel in the bottom to prevent direct contact with the heating surface and avoid melt-through.
Fabric grow bags (non-woven polypropylene, felt, woven geotextile)
Most fabric grow bags sold for gardening are made from non-woven polypropylene, felt-like geotextile, or occasionally canvas. These are not autoclavable. The fibers themselves may survive the temperature, but seams, handles, and dye finishes often don't. Machine washing in hot water (up to whatever the manufacturer's care label recommends, ideally 60°C or higher) is the appropriate treatment. If no care label is present, start at 40°C and check for shrinkage before moving to higher temperatures. Air dry or tumble dry on a medium setting, high heat in a dryer can mat and degrade non-woven PP over time. If you prefer a DIY option, see a step-by-step guide on how to make a grow bag out of landscape fabric for a durable, reusable alternative.
Filter patches and injection ports
Filter patches on mushroom grow bags are made from microporous polypropylene or polyethylene membrane material bonded to the bag. They allow gas exchange while blocking contamination. These patches are heat-sensitive compared to the bag body, extended or repeated autoclave cycles can degrade the bond between patch and bag, compromising the filter. Avoid direct steam blast onto the patch during sterilization. Injection port membranes (self-healing silicone ports) tolerate autoclave temperatures but can be damaged by physical pressure or direct heat element contact. Inspect both components after each cycle. If the patch peels, discolors, or the port loses its self-sealing ability, retire that bag.
Choosing the right method: a quick overview
| Method | Best for | Temperature | Duration | Works on fabric pots? |
|---|---|---|---|---|
| Pressure cooker / autoclave | Grain spawn bags, supplemented sawdust, dense nutrient substrates | 121°C / 250°F at 15 psi | 90–120 min for 1–2 L loads | No — will destroy fabric bags |
| Steam pasteurization | Straw bags, coir substrates, bulk fruiting substrates | 60–80°C / 140–176°F | 1–2 hours | No — not practical for fabric pots |
| Hot-water soak | Straw, coir, low-nutrient bulk substrates | 60–80°C / 140–176°F | 1–2 hours | No |
| Machine washing | Fabric vegetable / ornamental grow bags | 60°C / 140°F minimum | One full wash cycle | Yes — designed for this |
| Chemical disinfection | Hard surfaces, exterior of bags, injection ports, work surfaces | Ambient | Per label (typically 5–10 min wet contact) | Limited — poor penetration of porous fabric |
Pressure cooker and autoclave method (step by step)
This is the method mushroom cultivators use for grain spawn and supplemented fruiting blocks. A standard home pressure canner or pressure cooker rated to 15 psi is sufficient, you don't need a laboratory autoclave. That said, you need to run it correctly and confirm your cooker actually reaches the required temperature and pressure.
Equipment and setup
- Pressure cooker or canner rated to 15 psi — check your manual to confirm maximum pressure rating
- Rack or trivet to keep bags off the metal base
- Autoclavable polypropylene grow bags (explicitly labelled as such by manufacturer)
- Pressure gauge or weight indicator (confirm it reads accurately — old gaskets lose accuracy)
- Chemical indicator strips (autoclave tape or indicator strips that change colour at sterilizing temperature) for verification
- Heat-resistant gloves and eye protection for handling hot equipment
- Timer
Step-by-step procedure
- Fill the pressure cooker with water to the level specified in your manual — typically 3–5 cm (1–2 inches) deep. Never run it without enough water; running dry will damage the equipment and your bags.
- Place the rack or trivet on the bottom. Load bags onto the rack without tightly compressing them. Leave space between bags for steam to circulate freely — overpacking is the most common reason sterilization fails at home.
- Attach chemical indicator strips to bags in the interior of the load, not just the outer edges. If the strip doesn't change, steam didn't penetrate.
- Seal the cooker. Heat on high until steam vents steadily from the vent pipe, then allow steam to vent continuously for 10 minutes. This purges trapped air, which is critical — trapped air prevents the cooker from reaching sterilizing temperature even at the rated pressure.
- Close the vent (or add the weight) and allow pressure to build to 15 psi.
- Once 15 psi is reached, start your timer. For 1–2 L grain loads in a home pressure cooker, maintain 15 psi for 90–120 minutes. Larger or denser loads need more time. Reduce heat to the minimum needed to hold pressure steady without dropping below 15 psi.
- After the timed cycle, turn off the heat. Allow the cooker to cool and depressurize completely on its own — do not force-cool by running water over it or releasing the vent manually. This prevents sudden pressure changes from damaging bag seals.
- Once pressure has fully dropped, open carefully and allow bags to cool at room temperature to below 30°C (86°F) before inoculating. Hot substrate kills spawn.
- Check chemical indicator strips. If they haven't changed colour to the target indicator, do not consider the load sterilized — reassess your load density, water level, and cycle time.
Time and temperature reference
| Load type | Minimum cycle at 121°C / 15 psi | Notes |
|---|---|---|
| Grain spawn (rye, wheat, oats) — 1–2 L per bag | 90–120 minutes | Use the longer end for denser loads or larger cookers |
| Supplemented sawdust block — 1–2 kg | 90–120 minutes | Denser than grain; lean toward 120 min |
| Un-supplemented hardwood sawdust — 1–2 kg | 60–90 minutes | Lower nutrient load; some practitioners pasteurize instead |
| Large loads (multiple bags, 3+ L each) | 120 min+ | Validate with biological indicators if running large or unusual loads |
Key cautions
- Never autoclave fabric vegetable grow bags — the heat will damage or destroy them
- Do not place bags directly on bare metal cooker base — use a rack to prevent scorching or melting
- Do not rush depressurization — forced cooling can warp lids, damage seals, and cause liquid to be sucked back through filter patches
- Old or worn pressure-cooker gaskets may prevent the cooker from holding 15 psi reliably — inspect and replace annually if you sterilize regularly
- Chemical indicator tape confirms temperature was reached but does not confirm sterility for a specific load; biological indicator spore strips (Geobacillus stearothermophilus) are the gold standard for validation
Steam pasteurization and hot-water soak
These methods are the workhorses for straw, coir, and other low-nutrient bulk substrates used in oyster mushroom and similar cultivation. They don't require any specialist equipment beyond a large stockpot or a food-safe container and a thermometer.
Hot-water soak (field pasteurization)
- Heat water to 74–80°C (165–176°F) in a large stockpot. A kitchen or brewing thermometer is important here — guessing by sight is unreliable.
- Submerge the straw or coir substrate in the hot water. Use a weight (a plate, a heavy pot lid) to keep it fully submerged.
- Hold the substrate at 74–80°C for 1–2 hours. You'll need to manage the heat source to maintain temperature — this is the step most people underdo. Check with a thermometer every 15–20 minutes.
- Drain the substrate and allow it to cool to room temperature (below 30°C / 86°F) before adding spawn. Excess moisture can be worked out by hand or by spreading the substrate on a clean surface.
- Inoculate as quickly as practical to minimize re-contamination from the environment.
Steam pasteurization
Steam pasteurization involves placing the substrate in a sealed or covered container and injecting or trapping steam to bring internal temperature to 60–80°C for 1–2 hours. A simple setup: a large pot with a tight-fitting lid, substrate in a colander or mesh basket above boiling water, wrapped in foil or a sealed bag to trap steam. Target internal substrate temperature of 65–70°C (149–158°F) for 1–2 hours, lower than the hot-water soak method but effective for low-nutrient materials. Use a probe thermometer inserted into the center of the substrate mass to verify temperature penetration.
A note on straw for fabric bag users: if you're building a mushroom fruiting setup inside a fabric grow bag (some growers do use large fabric pots for bulk fruiting columns), pasteurize the straw substrate first, then pack it into the clean bag. Do not attempt to pasteurize substrate while it's inside a fabric bag, the porous fabric lets heat escape too quickly and you'll get uneven treatment.
Chemical disinfection: what works, what doesn't, and what's safe
Chemical disinfection has a real but limited role in grow-bag work. It's effective on hard, non-porous surfaces, work benches, tool handles, the exterior of glass jars, injection port areas on mushroom bags, but penetrates porous materials like fabric or bulk substrate poorly or not at all. Use chemicals for surface prep and contamination control around your workspace, not as a substitute for heat treatment.
Sodium hypochlorite (household bleach)
Diluted to approximately 0.1% (roughly 1,000 ppm, or about 2.5 ml of 5% bleach per litre of water), sodium hypochlorite is effective for routine surface disinfection of non-porous hard surfaces. For heavier contamination or known pathogen spills, 0.5% (5,000 ppm) is the standard. Always pre-clean surfaces of organic debris before applying bleach, organic matter neutralizes chlorine rapidly and drastically reduces efficacy. Apply, leave wet for the full contact time specified on the product label (typically 5–10 minutes), then rinse off surfaces that will contact food or plant material. Do not use bleach directly on filter patches or injection ports, chlorine degrades polypropylene and silicone over time. Bleach is corrosive to metal parts; rinse any tools that contact bleach solutions promptly.
Hydrogen peroxide (H2O2)
Hydrogen peroxide at 0.5–3% is a useful non-chlorine alternative for surface disinfection. It breaks down into water and oxygen, leaving no toxic residue, which makes it popular for use around mushroom cultivation setups. At 3% (standard drugstore concentration), it's effective on hard surfaces with appropriate contact time, typically 1–5 minutes depending on formulation and registered claims. It is less damaging to polypropylene and silicone than bleach, making it a better choice for wiping down the exterior of mushroom grow bags and around injection ports. Check EPA List N or the product label for specific contact times, as formulations vary. Avoid getting H2O2 on filter patches directly, as concentrated solutions can oxidize and degrade the membrane over time.
Isopropyl alcohol (70%)
70% isopropyl alcohol (IPA) is the standard for quick wipe-downs: gloved hands, scalpel handles, the outside of injection ports, inoculation loop handles, and work surfaces immediately before inoculation. It works on contact but evaporates quickly, so contact time is limited. It's not suitable for porous fabric or as a substrate treatment. Do not use IPA as your only disinfection step for work surfaces in a high-contamination environment, combine with a longer-contact-time agent like diluted bleach or H2O2 for a more robust protocol.
Peracetic acid
Peracetic acid (PAA) formulations appear on EPA disinfectant lists and are used in commercial mushroom production for equipment and surface sanitation. They offer broad-spectrum activity including against bacterial spores at higher concentrations. For home growers, PAA products are harder to source and require careful handling (they're corrosive at working concentrations). They're worth knowing about if you scale up or if bleach isn't suitable for your equipment, but most hobby growers won't need to go this route.
| Agent | Use case | Working concentration | Contact time | Avoid on |
|---|---|---|---|---|
| Sodium hypochlorite (bleach) | Hard work surfaces, tool exteriors | 0.1% (1,000 ppm) routine; 0.5% heavy contamination | 5–10 min wet contact | Filter patches, silicone ports, metal tools (rinse after), porous fabric |
| Hydrogen peroxide | Work surfaces, exterior of PP bags, ports | 0.5–3% | 1–5 min per label | Filter patch membranes (concentrated), eyes/skin without PPE |
| Isopropyl alcohol (70%) | Quick wipes, gloved hands, ports, tools | 70% IPA | Contact — allow to air-dry | Porous fabric, substrates, large surface areas |
| Peracetic acid | Equipment, large surfaces, commercial setups | Per product label | Per product label | Skin/eyes without PPE; carbon steel tools; use per label |
Machine washing fabric grow bags
For the fabric grow bags most vegetable and ornamental growers are working with, a washing machine is genuinely the best tool for the job. Porous non-woven fabric is difficult to disinfect with sprays or soaks because the material's structure traps debris and chemical solutions don't reach evenly. Mechanical washing action, heat, and detergent working together achieve something no surface spray can.
- Shake out all loose soil and root debris over your compost bin before washing. Large debris clogs filters and reduces washing effectiveness.
- Brush off any caked-on soil with a stiff garden brush — particularly around seams and handles where soil collects.
- Turn bags inside out if possible to expose the interior surface to the most mechanical washing action.
- Machine wash at the hottest temperature the fabric tolerates — ideally 60°C (140°F) or above. Most non-woven PP fabric grow bags handle 40–60°C; canvas handles higher. If no care label is present, test one bag at 60°C first and check for shrinkage or damage to seams.
- Add a standard laundry detergent. For extra sanitization (especially after disease outbreaks), add a laundry bleach or an EPA-registered laundry sanitizer at the dose on the product label.
- Run a full wash cycle — not a quick wash. Full cycles provide more mechanical action and longer hot-water contact.
- Tumble dry on medium heat or air dry completely in the sun. High UV exposure during outdoor air drying adds a small additional disinfection effect. Do not store damp bags — mold will grow inside folded fabric quickly.
Research on laundry hygiene consistently shows that 60°C+ washes with detergent achieve significant reductions in bacteria and fungi. A review (blank" rel="noopener noreferrer">Laundry Hygiene and Odor Control: State of the Science) summarizes evidence that household laundry cycles at 60°C or higher achieve robust reductions in bacteria and fungi, and that lower-temperature cycles can be made effective with appropriate disinfectant laundry additives and thorough drying. A QMRA review found that ≥60°C washes with detergent or sanitizer additives produce significant pathogen reductions (Quantifying pathogen infection risks from household laundry practices (QMRA) | PMC/NCBI) blank" rel="noopener noreferrer">A QMRA review found that ≥60°C washes with detergent or sanitizer additives produce significant pathogen reductions (Quantifying pathogen infection risks from household laundry practices (QMRA) | PMC/NCBI).. If your machine doesn't reach 60°C (many domestic machines run cooler than their dial suggests), compensating with a laundry sanitizer additive and thorough drying covers the gap.
Safety and PPE: don't skip this part
Pressure cookers at 15 psi contain water at 121°C, that's superheated steam under pressure. A failure or accidental premature opening is genuinely dangerous. Chemical disinfectants at working concentrations can cause skin burns, eye injury, and respiratory irritation. Basic precautions are non-negotiable.
- Pressure cooker work: read and follow your equipment manual completely before first use. Wear heat-resistant gloves when moving a hot cooker. Never force-open or force-cool. Inspect gaskets and pressure release valve before each use. Keep children and pets clear of the area during pressurized operation.
- Chemical disinfectants: wear nitrile gloves (minimum) when handling bleach, H2O2, or PAA solutions. Safety glasses are strongly recommended — splashes happen. Work in a ventilated area, especially with bleach (chlorine fumes accumulate in enclosed spaces). Never mix bleach with ammonia, acids, or other cleaners.
- Hot-water pasteurization: use insulated gloves and long sleeves when submerging and removing substrate from hot water. Keep a clear path from pot to drainage area — carrying a pot of 80°C water is a burn risk.
- Drying: fully dry all cleaned grow bags before storage. Folded damp fabric is a mold incubator and undoes all your cleaning work.
Troubleshooting contamination after sterilization
Seeing green, black, or orange mold in a bag you thought was sterilized is frustrating, but it's diagnostic information. Here are the most common reasons contamination appears post-sterilization and what to do about each.
| Problem | Likely cause | Fix |
|---|---|---|
| Green mold (Trichoderma) in grain bags | Insufficient exposure time or temperature; air trapped in cooker during sterilization | Extend cycle to 120 min; vent cooker for 10 full minutes before pressurizing; use chemical indicators to verify heat penetration |
| Contamination concentrated in center of large loads | Poor steam penetration — bags packed too tightly | Space bags on rack; reduce load size per cycle; validate with indicators placed in load center |
| Contamination appearing only after inoculation | Post-sterilization contamination during inoculation; unsterilized inoculation tools or surfaces | Improve inoculation environment (still-air box or flow hood); wipe tools with 70% IPA; disinfect work surfaces before each session |
| Repeated failures despite extended cycles | Heat-resistant spore contamination in source substrate; cooker not reaching true 15 psi/121°C | Test cooker with biological indicator strips; consider different substrate source; replace worn gasket |
| Filter patch bags failing post-autoclave | Bag placed directly on cooker base; too many repeated sterilization cycles | Use rack; inspect patch bonding after each cycle; retire bags with compromised patches |
| Mold in clean fabric vegetable bags after reuse | Bags not fully dry before storage; insufficient wash temperature | Increase wash temp; add laundry sanitizer; ensure complete drying in sun or dryer before folding |
Reuse or discard? Making the call
Fabric vegetable grow bags are built for multiple seasons, and proper washing extends their life significantly. Most quality non-woven PP bags handle 3–5 seasons of washing without meaningful degradation. Check handles and seams after each wash, these fail before the fabric body does. If handles are fraying or seams are pulling, retire the bag. Discard bags that held plants with confirmed soil-borne disease (Fusarium wilt, club root, verticillium wilt) even after washing, unless you're confident the wash reached 60°C+ with a sanitizer additive and the bags will be used for a completely unrelated crop family.
Polypropylene mushroom grow bags are typically single-use from a sterilization standpoint, especially filter-patch bags. The patch membrane degrades with repeated autoclaving and the seal integrity becomes unreliable. Most cultivators retire mushroom grow bags after one or two sterilization cycles. If you're reusing bags without filter patches (simple PP tubes), inspect visually for pinholes, weak welds, and clarity of the plastic (cloudiness can indicate stress or degradation) before re-sterilizing. For ideas on what to do with bags that are no longer suitable for sterilization, there are good options beyond simply throwing them out, whether for fabric garden bags or mushroom cultivation bags. See our guide on what to do with old grow bags for recycling, repurposing, and safe disposal options. For practical reuse and camouflage ideas, see how to disguise grow bags.
Quick-reference checklists
Fabric vegetable / ornamental grow bag cleaning checklist
- Shake out and brush off all soil and root debris
- Turn bag inside out
- Machine wash at 60°C (140°F) minimum with detergent
- Add laundry sanitizer if disease outbreak occurred
- Tumble dry on medium or air-dry fully in direct sun
- Inspect handles and seams before storing
- Store only when completely dry
Grain spawn sterilization checklist (pressure cooker)
- Use autoclavable-grade PP bags — confirm manufacturer labelling
- Check cooker gasket and pressure release valve
- Add correct water level per your equipment manual
- Place rack — do not put bags on bare metal base
- Load bags with space between them; attach chemical indicator strips
- Vent steam for 10 full minutes before sealing
- Build to 15 psi; start timer — run 90–120 minutes for 1–2 L grain loads
- Allow to cool and depressurize fully on its own
- Check indicator strips before counting the load as sterile
- Cool below 30°C before inoculating
Straw / coir pasteurization checklist (hot-water soak)
- Heat water to 74–80°C (165–176°F) and confirm with thermometer
- Submerge substrate fully and weight it down
- Maintain temperature for 1–2 hours — check every 15–20 min
- Drain and spread to cool to below 30°C
- Inoculate as quickly as practical in a clean environment
FAQ
What is the difference between sterilize, sanitize, and pasteurize?
Sterilize: complete elimination of all viable microorganisms including spores. Achieved by validated saturated‑steam autoclaving cycles (commonly 121°C/250°F at 15 psi for laboratory loads; denser loads require longer exposure). Pasteurize: selective reduction of competing organisms, not a full kill of spores; commonly used for bulk mushroom substrates (typical targets ~60°C/140°F held for hours). Sanitize (or disinfect): reduction of microbial load on surfaces to safe levels (laundering, chemical wipes, or heat at lower temperatures). Use the appropriate term and method for your substrate and risk tolerance.
Do I always need to sterilize grow bags?
No. Decision depends on substrate type and target organism: - Dense, nutrient‑rich materials (grain spawn, supplemented sawdust) require true sterilization to prevent fast‑growing contaminants. - Low‑nutrient bulk substrates (straw, coir, many pasteurized composts) typically use pasteurization or hot‑water/steam treatments. - Fabric plant/garden grow bags (porous cloth for vegetables/ornamentals) generally require cleaning and laundering (hot wash and drying) rather than autoclaving. Match method to substrate: sterilize for spawn and sterile plugs; pasteurize for bulk substrate; sanitize/wash for fabric bags.
What household equipment can I use to sterilize grow bags safely?
Common home options: - Pressure cooker/pressure canner rated to 15 psi (can reach 121°C) — widely used by hobbyists for grain spawn and autoclavable bags. - Small consumer autoclaves (if available) — follow manufacturer instructions. Important safety notes: only use equipment rated to 15 psi for true sterilization at 121°C; follow the pressure cooker manual for water level, venting and loading; do not overpack the vessel (allow steam penetration); validate cycles where possible (chemical autoclave tape or biological indicators).
Step-by-step: sterilizing grain or dense substrate bags in a pressure cooker
1) Use autoclavable filter‑patch bags or jars designed for sterilization. 2) Fill containers leaving headspace; loosely close lids/cloth or use recommended bag closures. 3) Arrange bags/jars on a rack to avoid direct contact with cooker bottom and allow steam flow; do not overpack. 4) Add recommended water per pressure cooker manual. 5) Vent steam for a few minutes (follow manual) then bring to 15 psi (approx. 121°C). 6) Hold at 15 psi for the validated time (common hobby ranges: 60–120 minutes for 1–2 L grain loads; increase for larger or denser loads). 7) Turn off heat and allow pressure to return to zero and items to cool fully before opening (cooling avoids boiling-over and protects filters/ports). 8) Let bags reach room temperature before inoculation. Tip: use chemical autoclave tape to confirm exposure; if contamination recurs increase time or reduce load density.
What time and temperature ranges should I use for sterilization and pasteurization?
General guidance: - Sterilization (saturated steam): 121°C (250°F) at 15 psi. Typical lab cycles start at 15–30 minutes for small loads; hobby mycology commonly uses 60–120+ minutes for dense grain or large bags — longer for larger volumes/dense loads. - Pasteurization (steam/hot‑water for bulk substrates): common targets ~60°C (140°F) held for 1–2+ hours for finished composts; some protocols use 60–65°C for 1–2 hours or 74–80°C (165–176°F) for ~1 hour depending on substrate. - Laundering fabric bags for sanitation: use the hottest safe water for the fabric (≥60°C/140°F preferred) with detergent and thorough drying. Always adjust time upward for denser or insulated loads and follow equipment manuals.
How do I pasteurize straw, coir, or other bulk mushroom substrates at home?
Hot‑water batch pasteurization (common home method): 1) Chop or prepare substrate as recommended. 2) Heat water in a kettle/large pot to boiling, then reduce to maintain target temperature. 3) Submerge substrate in water kept at ~60–80°C (140–176°F). Typical approaches: 60–65°C for 1–2 hours (gentle pasteurization) or 74–80°C for ~1 hour (shorter, hotter). 4) Drain thoroughly and cool to inoculation temperature before use. Steam pasteurization is similar but use a steamer/tray system to expose substrate to steam at the target temperature. Monitor with a thermometer; avoid prolonged full boiling which can leach nutrients or degrade structure.
Next Articles
How to Disguise Grow Bags: Covers, DIY Ideas & Care Tips Now
How to disguise grow bags: DIY covers, painting, baskets, hanging solutions and hygiene tips for healthy plants.
What to Do With Old Grow Bags: Clean, Reuse, or Retire
Triage old fabric grow bags and used compost. Learn when to reuse, how to clean, and when to retire.
Best Flowers for Grow Bags: Top Picks, Soil & Care Guide DIY
Best flowers for grow bags: top annuals, perennials, bulbs & trailers; soil, fertilizer, planting and care checklists.