
You can disguise fabric grow bags without harming your plants by using removable slip-on covers, decorative outer containers, light-reflective wraps, or carefully applied acrylic paint. The key rule that runs through every method: never block the bag's drainage or breathability. Fabric bags earn their keep through air pruning, evaporative cooling, and free-draining roots. Any disguise that wraps them in an impermeable layer cancels those advantages. Keep that rule in mind and the options are genuinely wide.
How to Disguise Grow Bags: Covers, DIY Ideas & Care Tips Now
Marcus Holloway
29 Jul 2026
Why bother disguising grow bags at all
Fabric grow bags are excellent growing containers, but they're not beautiful. A row of black or brown fabric sacks on a patio looks more like a rooftop nursery than a considered garden. That matters if grow bags are in a visible spot, sharing space with decorative planting, or part of a front-of-house design. Beyond aesthetics, disguising a bag can provide real functional benefits: light-colored or reflective outer layers lower root-zone temperatures on hot days, insulating covers protect roots during cold snaps, and shading wraps reduce how often you need to water in a heatwave.
Fabric bags already outperform rigid plastic containers on root health and temperature management. Comparative nursery trials with shrub roses showed larger above-ground growth, dramatically reduced root circling, and lower substrate temperatures at the pot wall when fabric containers were used instead of smooth black plastic pots. Those advantages come from the fabric itself: evaporative cooling through the porous wall and air pruning at the root tips. Any disguise method needs to preserve that fabric function, not fight against it. That's the main consideration before you choose your approach.
Quick cosmetic covers: baskets, wraps, and liners
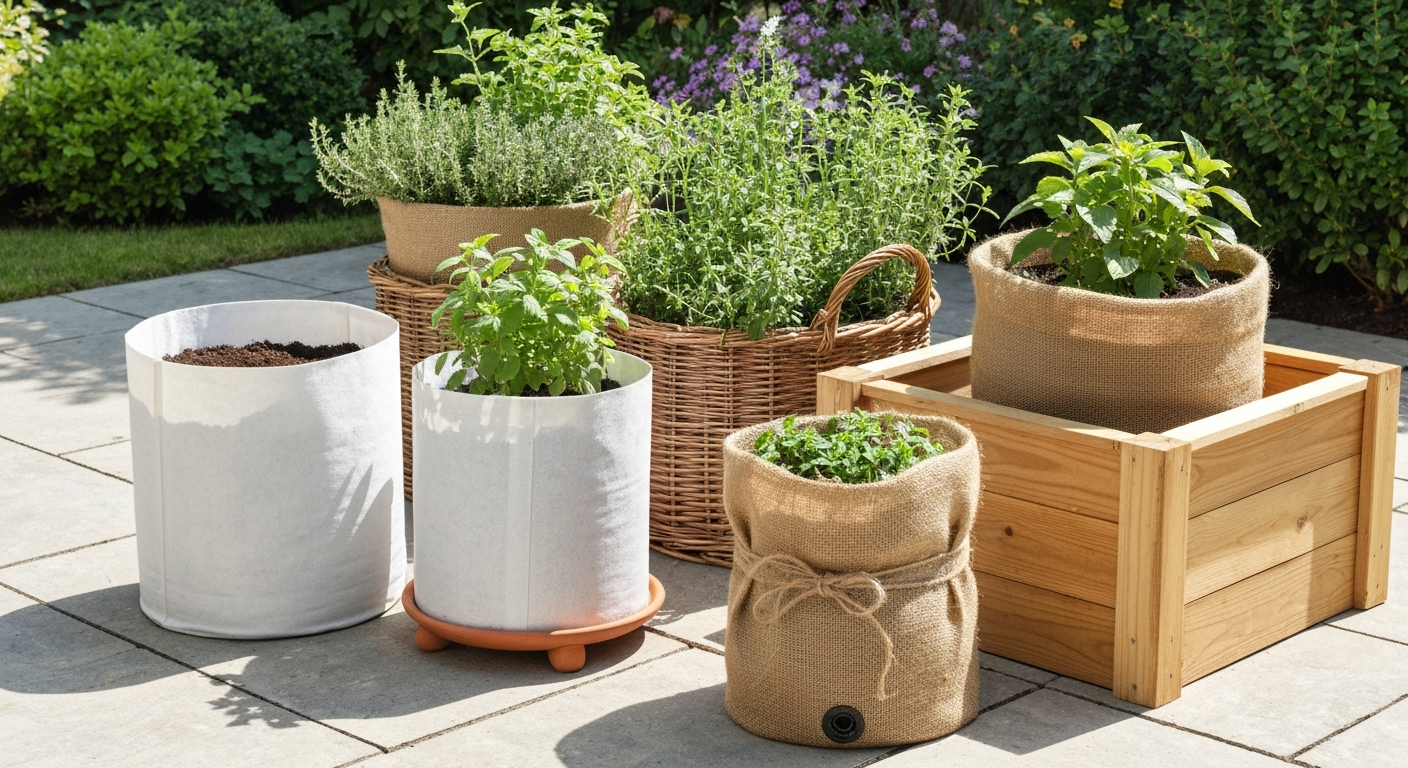
The fastest route to a better-looking grow bag is a removable outer cover. These take minutes to fit, cost very little, and can be swapped out or removed entirely without touching the bag itself. Options fall into three main categories: rigid decorative baskets or pot sleeves, fabric wraps, and liner combinations.
Rigid decorative baskets and pot sleeves
A wicker, rattan, seagrass, or woven wire basket sized to loosely fit around the grow bag is probably the most popular quick disguise. The grow bag sits inside the basket, which holds its shape independently, so the basket can be lifted off at any time for inspection, watering, or bag replacement. The critical detail is clearance: leave at least 1–2 cm between the bag wall and the basket wall so air continues to circulate. Sitting the bag on a small trivet or two stacked terracotta feet inside the basket also keeps the base clear for drainage. Baskets degrade outdoors over a season or two, but they're cheap, widely available, and genuinely attractive.
Fabric wraps
Hessian (burlap), canvas, or open-weave fabric can be wrapped around a bag and tied or pinned in place. These are breathable by nature, so they don't block airflow. A simple square of hessian tied with jute twine takes about two minutes and looks intentional rather than improvised. Avoid waterproof or waxed wrapping fabrics, which trap moisture against the bag wall and can promote root rot or mildew on the fabric itself.
Inner liners
Some gardeners reach for a plastic liner thinking it will reduce water loss from the bag. That's a trade-off worth being honest about: a solid plastic liner placed inside a fabric bag before filling does reduce the air-pruning effect and cuts evaporative cooling, which are among the main reasons to use a fabric bag in the first place. If you want a liner for an outer decorative pot to catch excess water, use a saucer or tray under the bag rather than an internal liner. That way drainage is not blocked but drips onto your patio are controlled.
| Cover Type | Cost (approx.) | Breathability Impact | Durability | Best For |
|---|---|---|---|---|
| Wicker/rattan basket | $8–$25 | None (air gap maintained) | 1–3 seasons outdoors | Patios, visible spots, decorative gardens |
| Hessian/burlap wrap | $2–$6 | None (breathable fabric) | 1 season | Rustic look, allotments, quick fixes |
| Canvas or duck-cloth wrap | $5–$12 | Minimal if loosely tied | 2–3 seasons | Sturdy appearance, DIY projects |
| Seagrass/woven sleeve | $10–$20 | None (open weave) | 1–2 seasons outdoors | Indoor/covered porch growing |
| Plastic inner liner | $0–$5 | High (blocks air pruning) | Indefinite | Not recommended inside fabric bags |
DIY sewn covers and slip-on fabric wraps
If you want a tailored look, a sewn fabric cover beats anything you'll find off the shelf. The project is genuinely simple: most grow bags are cylinders with flat bases, which makes them straightforward to measure and pattern. A basic slip-on cover with a reinforced top hem and open base takes about 30–60 minutes for a beginner and costs under $10 in materials. If you want handles or a drawstring top, add another 20–30 minutes. For larger bags (25 gallon and up), materials cost can edge toward $20–$25 depending on fabric.
Materials and what to avoid
Cotton canvas, duck cloth, and outdoor upholstery fabric all work well. Aim for a weight between 8 oz and 12 oz per yard for small to medium bags, heavier for large ones. For a water-resistant exterior without blocking airflow, you can spray the outside of the finished cover with a breathable DWR (durable water repellent) treatment rather than using a coated or laminated fabric. Full waterproof coatings trap humidity against the bag and are best avoided.
Step-by-step: basic slip-on cover
- Measure the grow bag's circumference at its widest point and its height from base to rim. Add 4 cm to the circumference for seam allowance and 6 cm to the height for a top hem fold.
- Cut a rectangle of fabric to those dimensions. For a neat base, also cut a circle matching the bag's base diameter plus 2 cm seam allowance all round.
- Fold the top edge down by 3 cm and press, then fold again by 3 cm and stitch close to the inner fold to create a clean hem. This hem sits above the bag rim and forms the visible top edge.
- With right sides together, sew the rectangle into a tube along the short edge using a 1 cm seam. Press the seam open.
- Pin the circular base piece to the bottom of the tube (right sides together), clip the seam allowance around the curve at 1–2 cm intervals so the fabric lies flat, then stitch.
- Turn right-side out, press lightly, and slide over the grow bag. The base circle sits on the ground or on a saucer.
- For outdoor use, spray the outside lightly with DWR treatment and allow to dry fully (typically 24 hours) before placing in the garden.
Patterns for round pot covers are widely available as free downloads or low-cost PDFs on craft marketplaces. Many can be scaled by adjusting the rectangle dimensions and circle diameter to fit any grow bag size. If you want to make the bag itself from scratch rather than just cover it, a separate approach using landscape fabric is covered in the section below.
Painting and finishing fabric grow bags safely
Yes, you can paint a fabric grow bag. The results look much better than most people expect, and painting in a lighter color is one of the most practical things you can do for root health in a hot climate: light-colored bags and reflective outer surfaces genuinely reduce root-zone temperatures compared with dark bags. The research is consistent on this point, and fabric bag manufacturers like Root Pouch explicitly highlight thermal moderation as a product benefit.
Which products are safe
Use water-based acrylic (latex) fabric paint or exterior latex paint. These bond to fabric without fully sealing the pores when applied in a thin coat, unlike oil-based paints or rubberized sealants. Check the SDS (Safety Data Sheet) before you buy: look for low-VOC formulations and confirm the product lists a full cure time. Most acrylic latex products are touch-dry within a few hours but reach full cure in 48–72 hours depending on temperature and humidity. Do not plant into or use a painted bag until the full cure time has passed, particularly for edible crops. Keep painted bags away from food preparation surfaces during the curing period.
Surface prep and application
- Start with a clean, dry bag. If the bag has been used before, wash it thoroughly and allow it to dry completely. Scrub off any caked soil with a stiff brush and check for mold or mildew (treat with a dilute bleach solution if needed, then rinse and dry).
- Work in a well-ventilated area. Lay the bag flat on a protected surface. Stuff it loosely with newspaper or plastic bags to hold its shape while you paint.
- Apply thin coats using a wide foam roller or a brush with synthetic bristles. One thin coat is better than one heavy coat: heavy coats clog pores and reduce breathability.
- Allow each coat to dry to the touch (typically 1–3 hours for latex acrylic) before adding the next. Two coats is usually enough for good coverage on dark fabric.
- Leave the painted bag in a warm, ventilated spot for the full cure period stated on the product data sheet (48–72 hours is typical). Do not plant into it until curing is complete.
One practical note: painting the bag white or a light cream color, rather than decorative patterns, gives the most meaningful functional benefit by reflecting solar radiation. If you want decorative motifs, stencil them over a light base coat. Avoid painting the base of the bag where drainage water exits, or at minimum keep that area to one thin coat.
Building rigid shells and decorative outer containers
A rigid outer shell gives the most polished result of any disguise method and adds genuine structural benefits: it protects the bag from physical damage, can be insulated for temperature protection, and provides a stable planting unit that doesn't tip in wind. The three most practical options are timber planter boxes, wicker or willow sleeves, and simple welded or bolted metal frames.
Timber planter boxes
A simple open-bottomed timber box built to fit around the grow bag is the most customizable option and suits most garden styles. Untreated cedar or redwood are naturally rot-resistant and the first choice for food-crop growing areas. If you use pressure-treated timber, check that it carries a current food-safe certification (modern ACQ or CA treatments are generally considered acceptable, but older CCA-treated wood is not recommended near edibles). Build the box 2–4 cm larger in each internal dimension than the grow bag so air circulates between the bag and the wood. Leave the base completely open or use widely spaced timber slats so drainage is unrestricted. Treat the timber exterior with an exterior wood oil or paint to slow weathering.
Wicker and willow sleeves
Pre-formed wicker or willow planters are available in standard sizes (30 cm, 40 cm, 50 cm diameter) and work very well as grow-bag surrounds because they're naturally open-weave, lightweight, and look good in almost any garden setting. The weave maintains airflow without any modification. Line the inside with hessian only if you're using them as a standalone pot and not as a grow-bag surround; as a surround, leave them unlined. Elevate on feet or a saucer to prevent the base from sitting in standing water, which rots the willow quickly.
Metal frames
Powder-coated steel or corten steel frames give a contemporary look. These are typically welded into a simple cylinder or square with open bases and no solid walls, so airflow is unimpeded. You can source custom frames from metalworking fabricators at reasonable cost for a one-off project, or buy flat-pack powder-coated planter surrounds online. For mounting several bags in a line on a deck or balcony, a simple bolted timber-and-metal frame can hold multiple bags side by side and looks intentional rather than improvised.
Whichever rigid shell you choose, the same principle applies: maintain that air gap between the bag wall and the outer structure. Don't pack insulating material (straw, foam, fibre) into that gap unless you're deliberately targeting cold-weather root insulation. In that case, use the insulation only during cold periods and remove it once temperatures rise above freezing consistently.
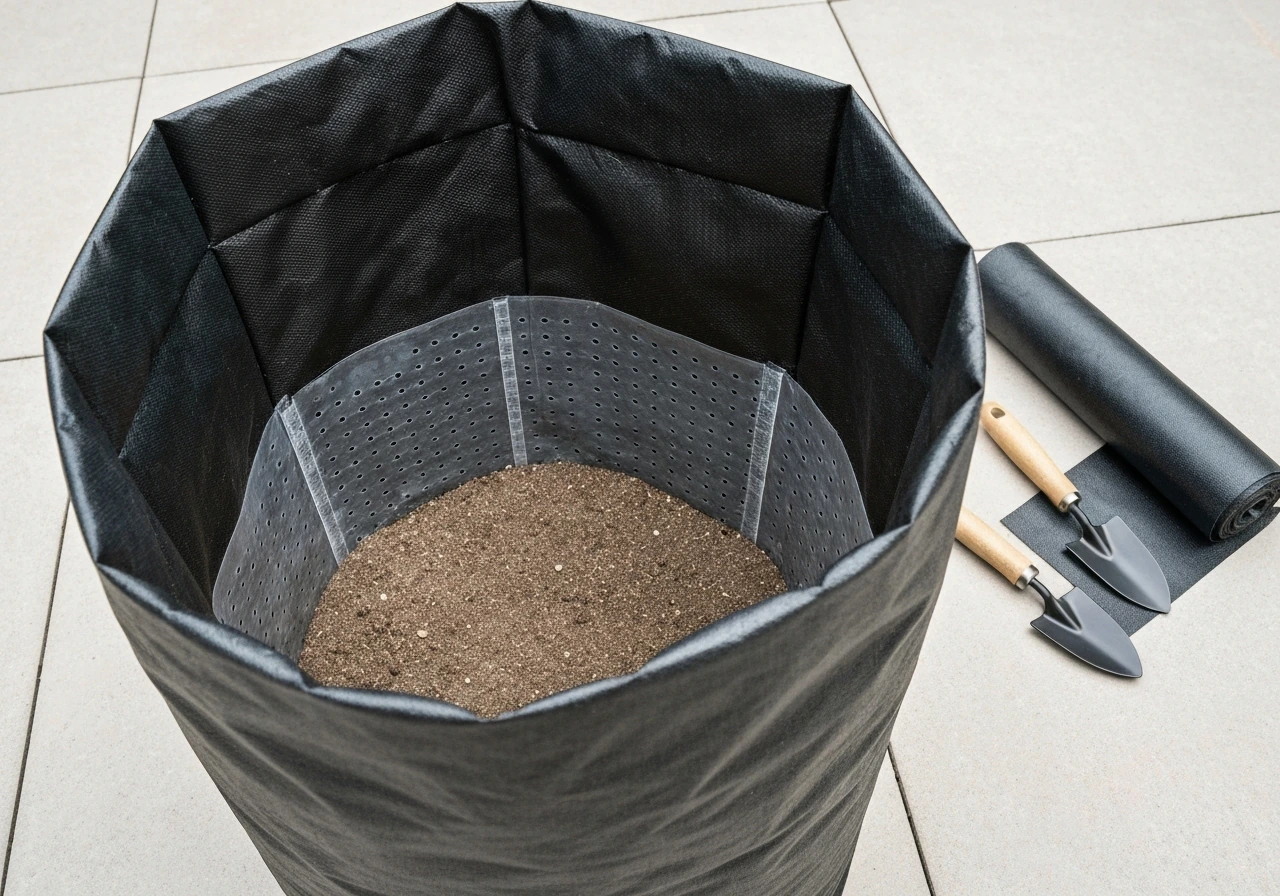
Making your own grow bag from landscape fabric
If you want full control over the look of your grow bag from the start, making your own from landscape fabric is a practical option. A DIY landscape-fabric bag costs a fraction of a commercial grow bag, can be made in any size you need, and can be constructed in colors or patterns that suit your garden. The trade-off is durability: landscape fabric bags typically last 1–3 seasons depending on the fabric weight and UV exposure, while commercial bags like Root Pouch (made from recycled PET fiber in 90–260 g/m² weights) are engineered for multiple seasons of outdoor use.
Materials
- Non-woven landscape fabric, minimum 3–4 oz/sq yd (roughly 100–135 g/m²) for a single-season bag, 5–6 oz for a multi-season bag
- Heavy-duty thread (polyester or UV-resistant nylon, not cotton which degrades quickly in wet/UV conditions)
- Sharp fabric scissors or a rotary cutter and cutting mat
- A sewing machine capable of handling two to three layers of landscape fabric (a standard home machine can manage lighter weights with a heavy-duty needle, size 16 or 18)
Cutting and sewing
- Decide the target volume of the bag. For a 10-gallon equivalent, a cylinder roughly 30 cm in diameter and 40 cm tall works well. Calculate the rectangle dimensions: circumference (diameter × 3.14) plus 3 cm seam allowance for width, height plus 3 cm seam allowance for length.
- Cut the rectangle and a matching circular base piece (diameter plus 2 cm seam allowance all round).
- Sew the rectangle into a tube with a flat-felled seam (fold seam twice and stitch through all layers) for strength. This seam type also keeps frayed edges inside the seam.
- Attach the circular base using two rows of stitching 5 mm apart. Clip the seam allowance around the circle every 2 cm. This double-stitched base is the point most likely to fail under the weight of moist soil, so take the time to do it well.
- Turn right-side out and fold the top edge down twice by 1.5 cm each, then topstitch to create a clean, reinforced rim.
- Optionally, punch or cut 4–6 small drainage holes (roughly 5–6 mm) near the base if the landscape fabric you've used is relatively tight in weave. Most non-woven landscape fabric drains adequately without additional holes, but very dense woven varieties may need them.
When to choose this approach: DIY landscape-fabric bags make sense when you need an unusual size not available commercially, want to test grow-bag growing before investing in manufactured bags, or are growing crops for just one or two seasons. For long-term perennial growing or tree containers, a purpose-built commercial bag with proven UV and tensile ratings is a better investment.
Hanging grow bags: disguise, suspension, and protection
Hanging grow bags are among the hardest to disguise well, but the problem is mostly solved by the plant itself: a well-planted hanging bag full of trailing herbs, strawberries, or flowering annuals becomes the decoration. The fabric recedes behind the plants. That said, there are still practical disguise options, and suspension safety deserves more attention than most guides give it.
Disguise options for hanging bags
A simple hessian or canvas sleeve that wraps the top half of the bag (leaving the planting pockets on the lower half exposed) disguises the most visible part without restricting the plants. Macramé plant hangers work beautifully here: the rope or cotton cord cradles the bag from below and wraps around the sides without any contact with the planting pockets, so drainage and access remain unrestricted. Alternatively, a hanging wicker basket (the kind sold for traditional hanging baskets) can contain the grow bag directly, with the bag sitting inside the basket frame.
Secure suspension and load ratings
This is where people get into trouble. A 10-gallon grow bag filled with moist potting mix weighs roughly 15–20 kg. Add in the pot, bracket, and hanger and the load on a single anchor point can exceed 25 kg before accounting for wind loading and dynamic forces (swinging in gusts). Use hardware with a clearly rated Working Load Limit (WLL), not decorative hooks whose strength is unknown. Rated carabiners, for example, list WLL and tensile strength explicitly (a typical aluminum carabiner might list tensile strength around 25 kN with a WLL around 250 kg), which is far stronger than needed for a grow bag but illustrates the principle: use hardware rated for the job, not hardware that looks about right. For wall anchors and brackets, check the anchor's load rating for both the direct load and the cantilever moment if the bag hangs away from the wall.
Drainage and wind protection
Hanging fabric bags drain freely from all sides and base, which is excellent for roots but can drip onto surfaces below. A small drip tray clipped or tied just under the base catches the worst of the runoff without blocking drainage. For wind protection, a simple windbreak of shade cloth behind or beside the bag reduces both desiccation and the swinging stress that loosens anchor points over time. Check all suspension hardware after any significant windstorm.
Disguise approaches by crop type
The best disguise for a grow bag isn't the same for every crop. Plant size and growth habit determine how much of the bag is visible, and different crops have different temperature, moisture, and access requirements that affect which disguise materials work. Here's how I think about it across the main crop categories.
Vegetables
Tomatoes, peppers, and courgettes in large bags (20-gallon and up, reflecting the roughly 20-inch minimum diameter recommended for tomatoes by university extension guidance) quickly fill out and hide most of the bag with foliage. Small-space containers big with new gardeners (University of Illinois Extension) recommends a minimum pot top diameter of about 20 inches for tomatoes. For these, a simple painted bag or a light-colored fabric sleeve does the job, with the main functional goal being reflective color to reduce root heat stress in summer. Potatoes and leafy greens in smaller bags (5–10 gallon) are more exposed and benefit from a timber box or wicker sleeve if they're in a visible spot. With all vegetables, prioritize unimpeded drainage: fabric bags already dry faster than plastic pots (some production data reports they can require over three times more irrigation than plastic equivalents in hot conditions), so any disguise that further restricts airflow compounds that drying rate.
Flowers
Annual flowers (petunias, calibrachoa, marigolds) in small to medium bags are typically the easiest to disguise because the plants themselves overflow the container within a few weeks. A hessian wrap or a wicker sleeve is plenty for the early weeks; once plants fill out, the cover is barely visible anyway. For perennial flowers or ornamental grasses in permanent spots, a timber box or a painted finish makes more sense since you're looking at the same container for multiple seasons.
Mushrooms
Mushroom grow bags are a special case. These are typically polypropylene autoclave bags filled with sterilized substrate, not the breathable fabric bags used for plants. They're usually kept indoors or in a fruiting chamber where aesthetics aren't the primary concern, and they shouldn't be covered or wrapped in ways that restrict gas exchange (CO2 buildup is a significant issue for mushroom cultivation). If mushroom bags are in a visible space, a simple timber shelf or crate that holds them upright is more useful than any wrap or sleeve. When a mushroom bag has finished fruiting, refer to guidance on sterilizing and reusing or disposing of old grow bags rather than attempting to reuse the same bag without treatment, since spent substrate is a significant vector for contamination. See a step‑by‑step guide on how to sterilize grow bags for cleaning, pasteurizing, and safely reusing or disposing of spent substrate.
Small trees and shrubs
This is where fabric bags genuinely shine: the root-health research on fabric containers is most compelling for woody plants, where circling roots in conventional containers cause long-term structural problems. A dwarf apple, fig, or olive in a large (25–45 gallon) fabric bag benefits most from disguise methods that also provide thermal insulation in winter. A timber box with an air gap around the bag, with a layer of straw or bubble wrap inserted into the gap during hard frosts, protects roots that would otherwise freeze in a container exposed on all sides. In summer, remove the insulation and allow the fabric to breathe freely. Because large tree bags are heavy and largely immovable when planted, install the rigid outer shell before filling the bag, not after.
| Crop Type | Recommended Bag Size | Best Disguise Method | Key Functional Priority |
|---|---|---|---|
| Tomatoes / peppers | 20-gallon+ | Light-colored paint or reflective sleeve | Reduce root-zone heat; maintain drainage |
| Leafy greens / herbs | 5–10 gallon | Wicker sleeve or hessian wrap | Quick access for harvest; air gap maintained |
| Annual flowers | 3–10 gallon | Hessian wrap or decorative basket | Aesthetics; minimal functional constraints |
| Perennial flowers / grasses | 10–20 gallon | Timber box or painted finish | Multi-season durability; stable structure |
| Mushrooms (poly bags) | Standard autoclave bags | Timber shelf or crate (no wrapping) | Gas exchange; humidity control |
| Dwarf fruit trees / shrubs | 25–45 gallon | Timber box with removable insulation | Winter root protection; summer airflow |
Hygiene and prep before you disguise a reused bag
If you're disguising a bag that's been used before, clean it thoroughly before you paint, cover, or build around it. Spent soil harbors pathogens including Phytophthora and Pythium that can carry over to the next crop. Oregon State University Extension (EM-9330) recommends removing all organic matter first (soil, roots, debris), because organic material inactivates chemical disinfectants and reduces heat penetration. After mechanical cleaning, a 1:10 dilution of household bleach (roughly one part bleach to nine parts water) applied as a soak or wash, followed by a thorough rinse and complete drying, is effective against most common soilborne pathogens. For heavily contaminated bags, steam treatment at 140°F (60°C) held for the appropriate contact time achieves pasteurization. See Preventing Phytophthora infestations in restoration nurseries (Oregon State Univ. Extension, EM‑9330) for steam/pasteurization guidance recommending reaching and holding ~140°F (60°C) to pasteurize heavily contaminated containers and potting mixes. Allow the bag to dry completely before painting or enclosing it in a cover, as a damp bag inside an outer sleeve stays damp and encourages mold growth.
Drainage and breathability: the rules that apply to every method
Whatever disguise approach you choose, these principles are non-negotiable. First, free drainage: fabric bags must be able to shed excess water. A bag sitting flat on an impermeable surface with a tight-fitting base cover around it will pool water at the base and waterlog roots. Always raise bags on feet, slats, or a trivet, and check that water exits freely after watering. Second, airflow: avoid any continuous, impermeable coating applied to the exterior of the bag (rubberized paint, wax, heavy silicone sealants). Thin acrylic paint in one to two light coats does not fully seal the fabric. A rubberized dip or spray applied to achieve a waterproof finish will. Third, cure before planting: any product applied to the bag (paint, DWR spray, sealant) must reach its full cure before you add soil and begin growing edibles. The SDS or product data sheet will give you specific times. As a general rule, 72 hours at room temperature in good ventilation is a reasonable minimum for water-based acrylics.
What to do when the bag has run its course
Even the best disguise doesn't extend a grow bag's life forever. Fabric bags eventually degrade at the seams, develop tears from UV exposure, or become too contaminated for safe reuse after repeated cycles. At that point the choices are: repair (patch small tears with adhesive repair tape designed for fabric or stitch tears closed with UV-resistant thread), repurpose (old bags make excellent weed-suppressing liners for raised beds, or can be cut into strips for plant ties), or dispose. For detailed guidance on recycling, repurposing, and safe disposal options, see what to do with old grow bags. Commercial fabric grow bags made from recycled PET fiber like Root Pouch are technically recyclable as textile waste, though local recycling infrastructure varies. Check with your council or local textile recycler. Landscape-fabric bags that have reached end of life should go into general waste unless your local authority accepts synthetic textiles. Thinking about repurposing options before a bag is fully worn out extends its usefulness and avoids an abrupt disposal decision.
FAQ
What are safe quick cosmetic options to disguise fabric grow bags without reducing breathability or drainage?
Use removable covers or outer pots: slip-on fabric sleeves (canvas, burlap, duck cloth), wicker or decorative baskets with the bag sitting inside, or a lightweight plastic/ceramic outer pot with open bottom for drainage. Ensure any cover is loose or perforated and does not seal the bag’s sides or block the bottom—this preserves air pruning, evaporative cooling and free drainage.
Can I line or coat a fabric grow bag to make it look nicer or last longer?
Avoid impermeable continuous linings or coatings. Adding a non-breathable liner defeats the fabric’s purpose (air pruning, aeration, evaporative cooling) and can trap moisture, harming roots. If you must line for cleanliness, use a highly perforated liner or keep a removable liner inside the decorative outer pot rather than applying sealants to the fabric itself.
Is it safe to paint grow bags to change their color or match garden design?
You can paint fabric bags using low-VOC, water-based acrylic (latex) paints, but follow product SDS/TDS: paint in a well-ventilated area, allow full cure per manufacturer (often days), and keep painted bags empty until fully cured. Avoid solvent-based paints that off-gas longer. Do not seal the fabric to the point it becomes non-breathable—use thin coats or paint only exterior surfaces sparingly.
What DIY permanent disguises preserve function while improving appearance?
Build or buy rigid shells (slatted wood boxes, twine‑wrapped frames, open-bottom wicker baskets) sized to hold the bag; sew custom slip-on covers from breathable fabric (duck cloth, canvas); or make pot-in-pot setups where the fabric bag sits inside a decorative pot elevated for drainage. All permanent solutions should allow air exchange and have an open bottom or ventilation holes.
How do I disguise hanging grow bags safely?
Use breathable slip-on covers or macramé/shelf-style holders that support the bag below the rim, not compressing the sides. Choose hardware rated for the expected weight (wet soil + plant) and a safety factor—use hardware with an explicit Working Load Limit (WLL) comfortably above the load. Avoid trapping water—ensure the bottom remains open for drainage and that the hanger doesn’t block aeration.
Any special considerations for vegetables, fruiting plants and tomatoes?
Vegetables and fruiting crops often need larger volumes and consistent moisture. Preserve the bag’s breathability and drainage to avoid root stress; choose bag sizes matched to crop (consult Grow Bags Guide sizing links). Use removable covers or open-bottom outer pots rather than linings that hold extra water. If painting, wait for full cure before planting edible crops and rinse plant-contact surfaces if uncertain.
Next Articles
What to Do With Old Grow Bags: Clean, Reuse, or Retire
Triage old fabric grow bags and used compost. Learn when to reuse, how to clean, and when to retire.
Best Flowers for Grow Bags: Top Picks, Soil & Care Guide DIY
Best flowers for grow bags: top annuals, perennials, bulbs & trailers; soil, fertilizer, planting and care checklists.
Best Landscape Fabric for Grow Bags: Buy and Install Guide
Choose the best landscape fabric for grow bags with weed-blocking, drainage and aeration tips plus DIY install steps.